From script to server - Deploying solutions with PrimalScript
- Details
- Written by Alexander Riedel
- Last Updated: 14 November 2017
- Created: 25 March 2014
- Hits: 15313
Take a look at PrimalScript's ribbon interface and you will discover a tab called “Deploy”.

This tab combines three major stepping stones for deploying your scripting solutions:
- The Script Packager that you all know from previous versions of PrimalScript. Of course this wouldn’t be much of a new version if there weren’t any upgrades.
- The new MSI builder, which allows you to take your scripts, packages, modules and all the supplemental files you may need and wrap them into a professional grade installer package.
- Last but not least PrimalScript’s deployment functionality lets you copy your completed package with whatever add-ons you may have to any desired location. You can also execute any number of additional commands to accommodate the deployment mechanism you have in your network environment.
Deployment Tab: Script Packager
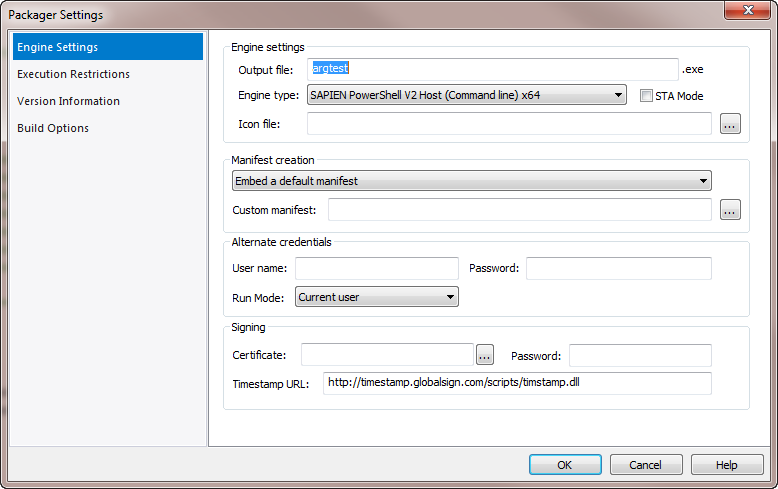
Some of the settings for the packager will look familiar to you. The usual suspects are all here, Engine selection, STA mode for PowerShell, credentials, signing and so forth. Where it gets interesting is the Engine type selection:

Most notably are the “Any platform” engines for PowerShell. If you don’t have any specific platform dependencies in your script, you can package it now so that the same executable will run on 32 bit Windows versions as well as 64 bit Windows versions. Of course it will always run in mode native to the machine.
If you are wondering why there are no specific PowerShell V4 engines, don’t worry. The hosts labeled as V3 work perfectly fine on computers with PowerShell V4 installed. The engine really isn’t any different as far as our hosts are concerned.
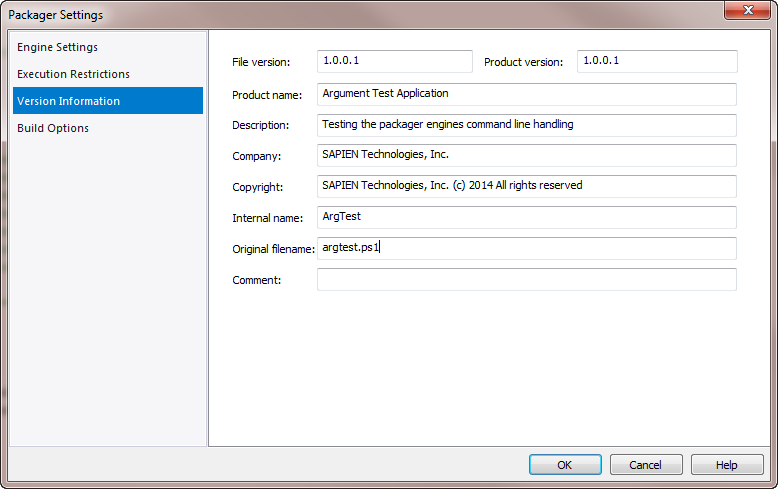
The version page also will not hold much of a surprise if you are already familiar with the PrimalScript packager. So we will skip right to the interesting part:
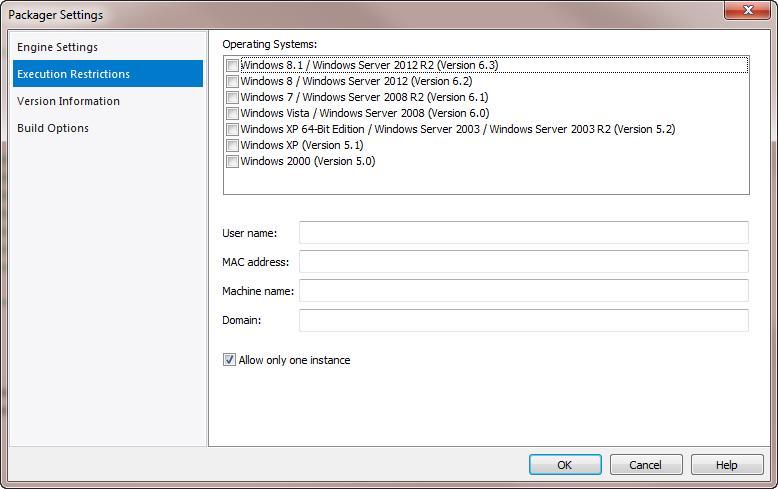
So this is all new. You can restrict the packaged executable to only run under certain conditions. If your solution is only meant for Windows 8 and higher and their server equivalents, check the two top boxes in the list. Running the package on any other platform will just result in a message that this package was not meant for that particular platform.
User name, MAC address, Machine Name and Domain all accept semicolon separated lists that allow you to restrict execution of this package to the conditions you specify. So for example JOE;Calvin;Hobbs in the user field will require to have the logged on user to have one of those three specific usernames. The same applies correspondingly to the other fields.
Allowing only one instance will make any secondary launch of your executable exit right away. Because of the mechanism used to detect previous instances this only applies to the same user. Different users logged on to the same server can execute their own instance independently.
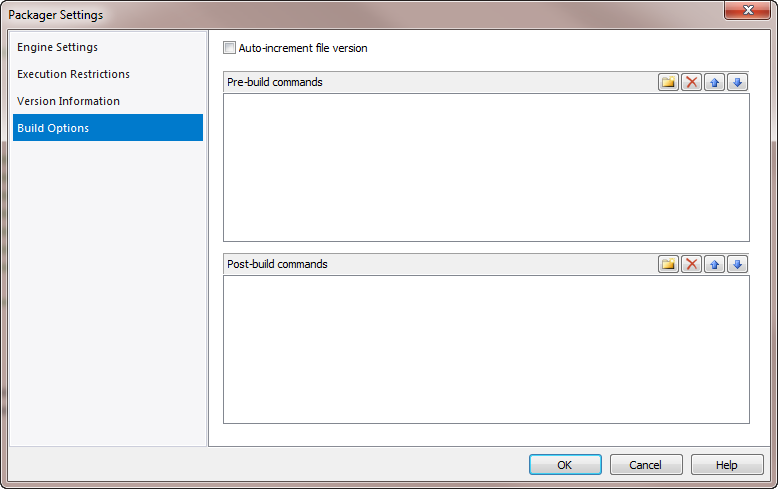
Last but not least, some additional options to run command pre- or post-packaging
If you need some kind of pre-processor for your script or you want to do something to the final executable, add your commands here. They will be executed in the sequence defined and one after another rather than in parallel.
The auto-increment file version option will save you the trouble of having to remember to increment the version number each time a package is created.
Now that you have set up all the parameters for your package, what do you do next?

You have three additional functions in the Packager group: ‘Build’, ‘Build & Run’, and ‘Run’.
‘Build’ applies all your settings and creates the actual executable file. ‘Run’ executes that file. If you picked a command line engine then the package is executed in a shell window. Depending on the file packaged, this is either a PowerShell console or a regular cmd window. If you picked a form or Windows engine, the file is executed directly.
‘Build & Run’? Well, I think you can figure that one out…
Deploy Tab: Installer Group
If you look at the deploy tab again, you'll see an installer group:

This new feature allows you to wrap your scripts, packaged executables, associated scripts, modules, configuration and binary files in a proper Microsoft Windows Installer database for easier deployment. If you have participated in our MSIWizard community preview you may already be familiar with a lot of this. Let’s examine the options we have.
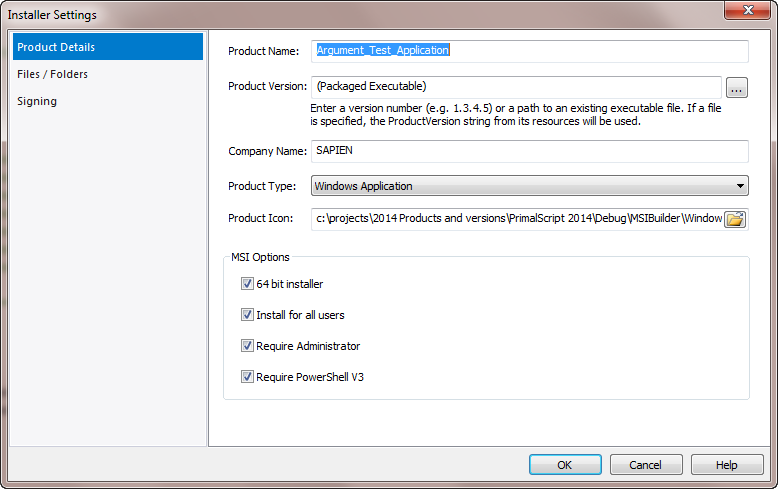
Most of the settings on this dialog are pretty straightforward, but lets go through them anyway:
Product Name: That is what will show up in the control panel “Programs and Features” list. So it’s important that you pick a name your users will recognize.
Product Version: Each installer needs to have a version number. That allows the update feature to work properly. It prevents older copies from installing over a new version, it prevents re-installing an already installed version and it will trigger an uninstall/install if a previous version is installed. To make keeping track of this number easier we added a feature where the version number for the installer gets extracted from an executable file. Most commonly that will be the file you created with the packager, but it can be any executable file with a version resource. But of course you can still enter your version numbers manually if you like.
Company Name: That name is visible in the “Programs and Features” applet as well. It also determine the folder name if you application gets installed under the Program Files folder.
Product Type: Your selection here, together with the “64 Bit installer” and “Install for all users” options determines where your files are installed.
The following table shows the locations for a 64 bit OS with “Install for all users” selected
|
Product Type |
32 bit |
64 bit |
| Windows Application | C:\Program Files (x86)\Product Name | C:\Program Files\Product Name |
| Script Application | C:\Program Files (x86)\Product Name | C:\Program Files\Product Name |
| PowerShell Module | %Windir%\SysWOW64\WindowsPowerShell\v1.0\Modules\Product Name | %Windir%\System32\WindowsPowerShell\v1.0\Modules\Product Name |
This table shows the locations for a 64 bit OS with a current user only install selected
|
Product Type |
32 bit |
64 bit |
| Windows Application | C:\Program Files (x86)\Product Name | C:\Program Files\Product Name |
| Script Application | %HomePath%\Script Applications\Product Name | %HomePath%\Script Applications\Product Name |
| PowerShell Module | %HomePath%\WindowsPowerShell\Modules\Product Name | %HomePath%\WindowsPowerShell\Modules\Product Name |
The folders for a 32 bit OS are the same to those shown here, except that “Program Files (x86)” is always “Program Files” and “SysWOW64” is always “System32”.
Product Icon: This icon file will be embedded in the MSI file and shown in “Programs and Features” with your product.
64-Bit installer: Checking this option prevents installation on 32 bit OS. It also registers COM components as 64 bit components and changes some folder names as indicated earlier.
Install for all users: This will install the application and its shortcuts for all users on a system. In most cases this option will require administrative privileges. It also affects the install folder location for some product types.
Require Administrator: Checking this option will cause Windows Installer to prompt for elevation on Windows Vista or higher. The type of prompt depends on your local UAC (User Access Control) settings and the currently logged on user.
Require PowerShell V3: With this option checked, the installer checks if PowerShell V3 is installed. If it is not, a prompt to install WinRM 3.0 is displayed and the installation is aborted.
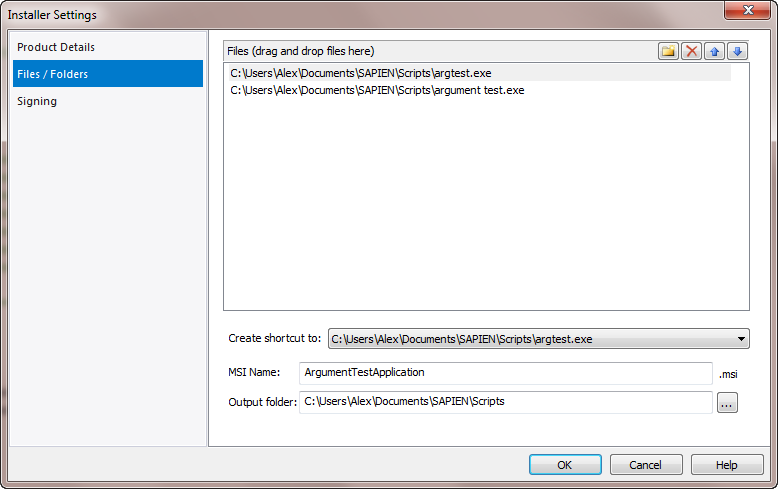
This page of the MSI settings allows you specify which files go into your installer. To make this easier, you can just drag and drop them from Windows Explorer onto this list. The little blue arrows allow you to arrange the files in any order you like, but note that this has no actual impact on the installation.
Create Shortcut to: Select the file you want to create a shortcut to in the Windows Start menu. At this time you can only select one file. Typically this is your main executable or script file. For PowerShell modules you can link to the help file for example.
MSI Name: The filename for your MSI. This only affects the actual MSI file and not any of the internal names.
Output Folder: This specifies the location where you want the MSI file to be created. It can be any existing folder. If you choose a network location, please make sure this location is available when building your installer.
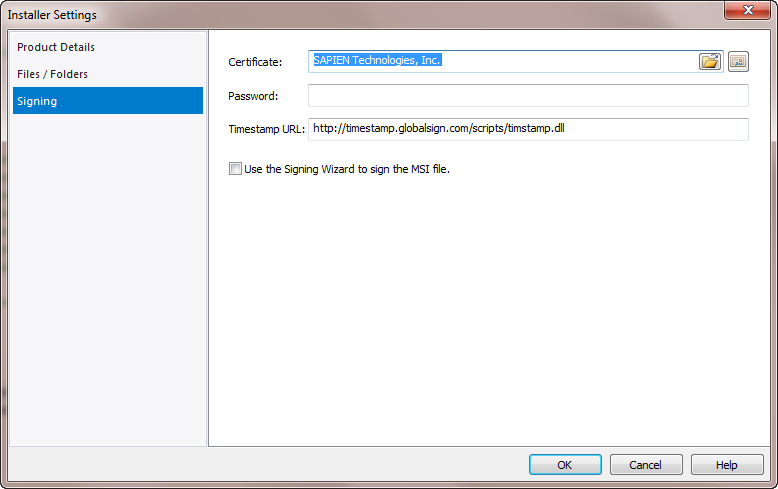
Last but not least, you have the option to apply a digital signature to your installer.
Certificate: A certificate is either a code signing certificate installed in your local store or a PFX file you specify in this field. You can browse for a PFX file using the file browse button(![]() ) or a certificate using the certificate button (
) or a certificate using the certificate button (![]() )
)
Password: If you specified a PFX file for code signing it may require the use of a password. If so, please enter it here.
Timestamp URL: This URL is used to create a time stamp for the signature used to sign the file. Logging the time of signing allows your MSI file’s signature to remain valid even after the certificate expired.
Use the Signing Wizard to sign the MSI file: If your certificate does not fit the above criteria or if you need to sign with a different signature each time you are building a MSI you can use the Microsoft Signing Wizard. Any settings entered above will be ignored and the wizard will guide you through the signing process.

The buttons here let you easily build and test your installer. Build, install and uninstall from here until you have it all ready to go. Next time we will look at the Deployment options which will help you distribute your solution to others.
Deploy Tab: Deployment Group
If you look at the deploy tab again, you will see a “Deployment” group. These functions will help you distribute your solutions to your target audience.

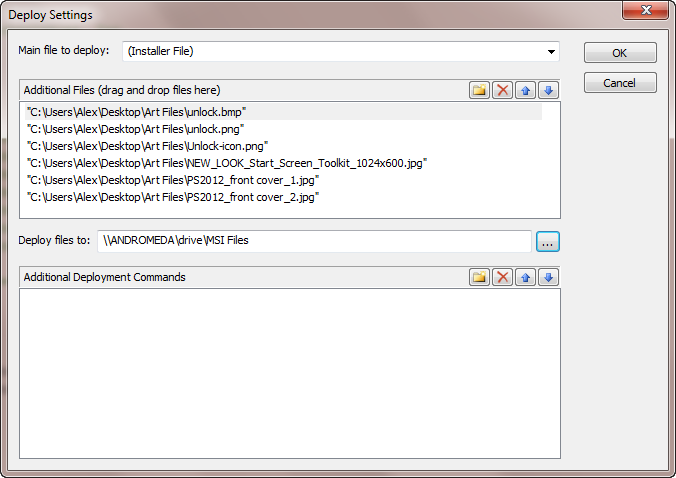
First lets look at the settings. There are two items that are mandatory.
You need to have at least one file that gets deployed. If you look at the combobox, there are three items in it:

Depending on what else you have defined for your solution, the initial file to deploy can either be the associated script file, the packaged executable you created or the installer containing these items. The first time you bring this dialog up PrimalScript will select what seems most appropriate automatically based on your other settings.
Adding additional files is just as easy as it is for the installer part, simply drag and drop the file here from Windows Explorer. Make sure they will be accessible when you choose to deploy.
The destination of course is a required field. Without it PrimalScript won’t know where to copy things. Pick a folder. Any folder.
For the additional deployment commands you can add any command line tools you like or need. If, for example you need to also ftp your MSI file somewhere, this would be the place to specify that command. These commands are executed in sequence, one at a time, so make sure you have no blocking tools in there which will potentially sit all night with a dialog up, waiting for your response.
Putting it all together

Setup
Head over to the Deploy tab and apply all the settings you need. These settings will be stored per script in a .psbuild file.
 Don’t delete these files or your settings will be lost. Normally you don’t need to worry about these files, but we will revisit them for an automated build and deploy scenario.
Package, build installers and deploy
While you are editing your scripts you don’t want to deviate too often from the “Home” tab. Maybe you have the ribbon hidden most of the time anyway. That is why we added some of the “Deploy” tab functionality to the “Home” tab.

You can package, build installers and deploy with your current settings right here. Additional commands are available in the dropdown menus for these buttons.

Hotkeys:
Ctrl+F7: Create executable
Shift + F7: Create installer
Ctrl+Shift + F7: Deploy
F7: Build all
”Build all” will execute every single step in sequence. It will create an executable, pack it with your other files into a Windows Installer database (MSI) and copy it to your target destination. Along that process it will also execute any other pre- and post-package commands you have defined and it will also execute any deployment commands.
So if you have a change to your most important script solutions, make the change to your script, hit F7 and watch PrimalScript do all the work for you.
With one keystroke your updated script was packaged, wrapped into an installer and deployed to your network.
The automated build tool
Sometimes you don’t want to roll out things one thing at a time. Most likely you have some kind of process to roll out your business processes. Quite frequently you will do that based on a scheduled task, because it is not always only about copying a few files here or there. Our PSBuild tools allow you to incorporate our packaging, installer and deployment steps into your process.

This is where the aforementioned .psbuild files come back into play.Run ‘PSBuild /BUILD myscript.ps1.psbuild’ to do all the things you just pushed the “Build all” for, just from the command line and integrated into your process. You can use the other options (/PACKAGE, /MSI, /DEPLOY) to perform the individual steps if you need to.
Questions? Comments? Suggestions? Head on over to our support forum and and let’s hear it.
For licensed customers, use the forum associated with your product in our Product Support Forums for Registered Customers.
For users of trial versions, please post in our Former and Future Customers - Questions forum.


