Hidden Charms of PowerShell Studio - #2
- Details
- Written by June Blender
- Last Updated: 03 October 2016
- Created: 02 October 2016
- Hits: 20508
On October 1, 2016, I celebrated my second anniversary at SAPIEN Technologies, Inc. It's been quite a wild ride. I've morphed from a writer sitting alone behind a desk to a technical evangelist and Microsoft MVP who is active on social media, speaks in public regularly, records videos, and even presents at conferences, large and small.
I've also become keenly aware of what it's like behind the scenes in an outstanding small software development shop. To keep our scripting tools cutting-edge, we add features every day, driven by blitz-speed technology changes (open-source, cross-platform PowerShell!), a creative and experienced staff, and customer requests. In fact, this article (not a blog) is hosted in our new indexed, searchable content library, SAPIEN Information Center.
So, as I celebrate my 2nd year and SAPIEN celebrates its 30th, it's time to update my Hidden Charms of PowerShell Studio fan-girl article, where I detail all of my can't-live-without features of PowerShell Studio, apart from its already famous GUI designer features. This list supplements the features I listed last year, including Restart Shell, Format Script, and Filegroups. Some of them are old, but I just discovered them. Some of them are new, but instant favorites. If I forgot yours, just add them in the comments.
And to everyone at SAPIEN Technologies, Inc., thank you for a great year!
10. Layouts
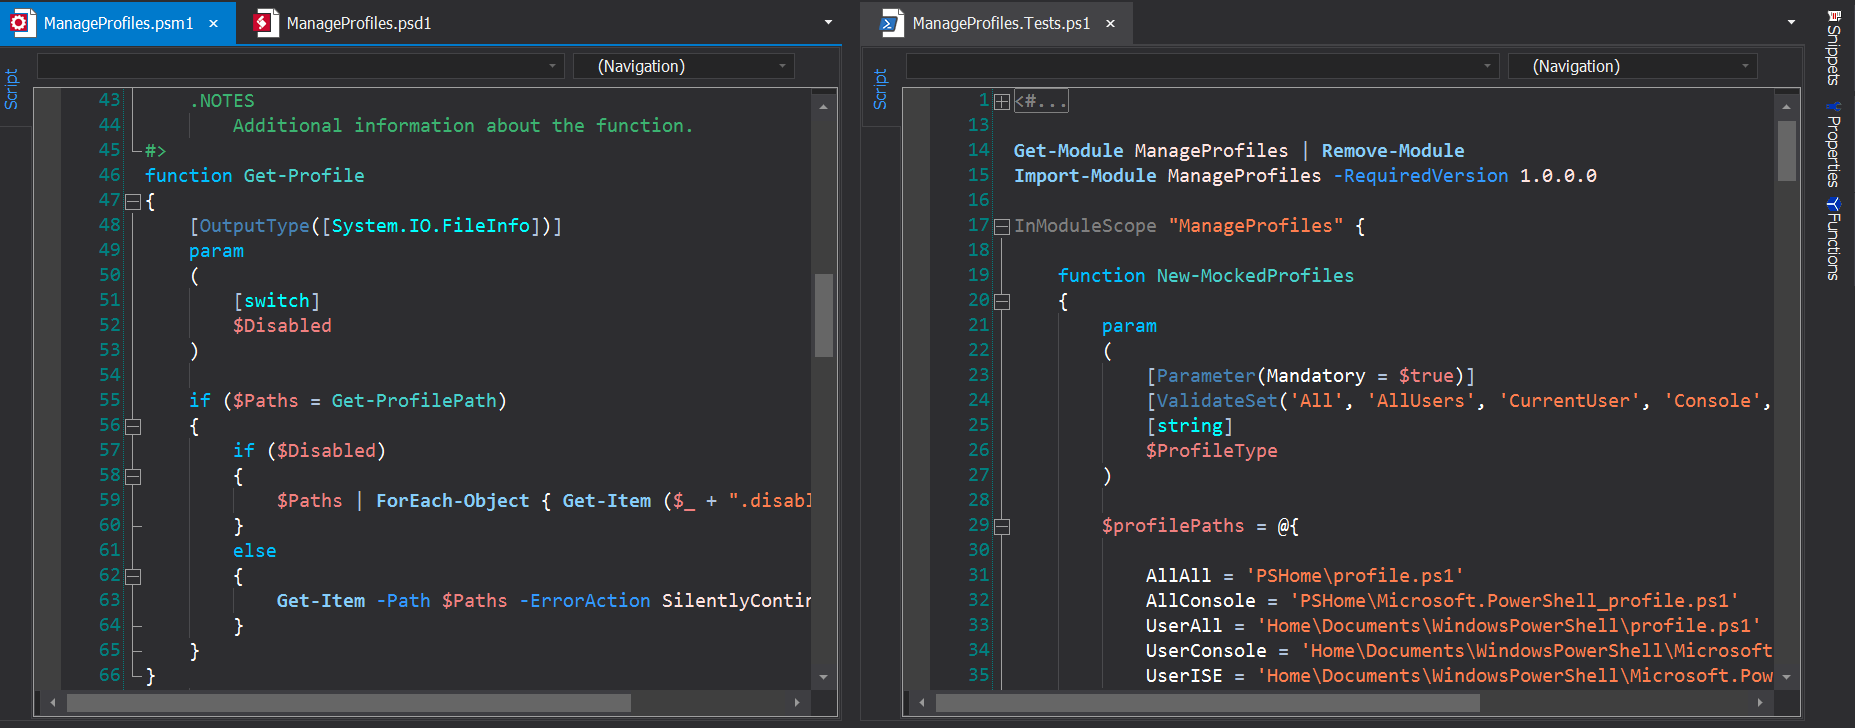
You can completely customize PowerShell Studio to your working style. You can close the panes you don't need. Open panes you need. Move the panes to different positions. Even convert a pane to a tab and create horizontal and vertical tab groups. To reposition tabs, drag and drop. To reposition panes, pin, drag and drop. (See it in action in the video: Use Layouts to Customize PowerShell Studio.)
My favorite thing is dragging a tab into a side-by-side position, like when I'm writing Pester tests for a script.
When you have the tabs and panes in your favorite spots, you can save the arrangement as a layout, so you can use it on demand. To save a layout, in the bottom left corner of the screen, click Layouts, then Save Layout. To switch layouts at any time, use the Layouts menu.
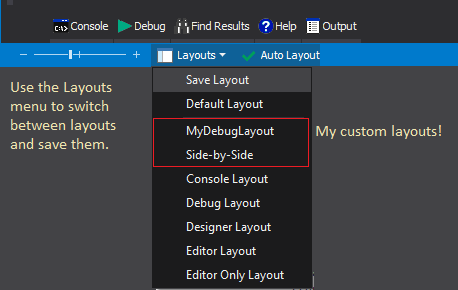
You can even make your custom layout the default layout for editing, debugging, or design, so PowerShell Studio loads it automatically. To change a default layout, click Home, Options, Panels, and in the Auto-Layout group, select an alternate layout.
9. Auto-Run Script Analyzer
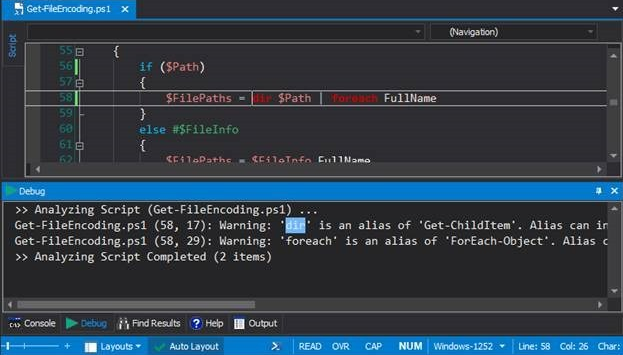
PowerShell Studio automatically runs Script Analyzer (Invoke-ScriptAnalyzer in the PSScriptAnalyzer module) whenever you run or debug a script. This feature helps you to comply with important PowerShell best practices. You can also run Script Analyzer on demand on any script: on the ribbon, click Tools and, in the Analysis group, click Analyze Script.
PowerShell Studio displays the Script Analyzer results in the Debug pane. And, if Script Analzyer finds a rule violation, in the Debug pane, click the violation message and PowerShell Studio brings you to the line in the script that violated the rule. Sweet.
8. Create custom tools
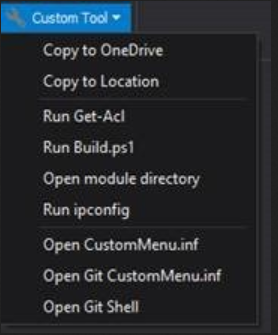
PowerShell Studio has lots of amazing tools. But, if it's missing a tool you need, you can make your own and add it to the Custom Tools menu. On the ribbon, click Tools and, in the File group, click Custom Tools.
In Custom Tools, you can run almost any command, including cmd.exe commands, Windows PowerShell commands and scripts, and commands to executable files, like robocopy.exe, netstat.exe, and git.exe. I have custom tools that copy my current script to OneDrive and to my GitHub repo, open my $home\Documents\WindowsPowerShell\Modules directory, and even open my Custom Tools source file, CustomMenu.inf.
For detailed instructions, see Add Custom Tools to the Menu.
7. Amazing context menus
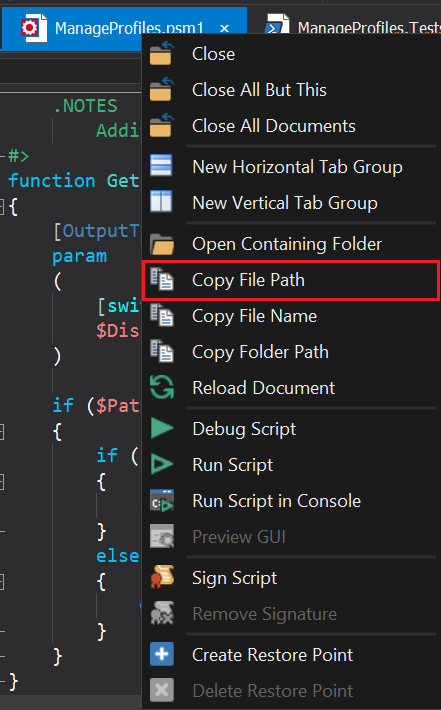
When you right-click a script tab in the PowerShell Studio editor, the context menu offers a huge variety of time-saving features, like Copy File Path, Open Containing Folder, Close All But This, and Reload Document. I use these all the time. For example, I copy a file path (fully-qualified name), then paste it in my PowerShell 6.0 console to run it or dot-source it.
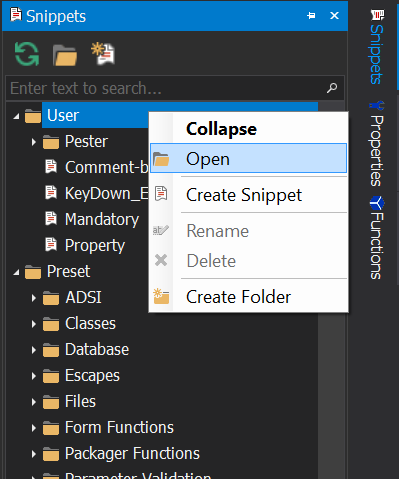
Almost all of the folders in PowerShell Studio have really helpful context menus. For example, to open the source folders for User Snippets or Preset Snippets, don't memorize arcane paths. Instead, right-click the folder and click Open.
Make it a habit to right-click elements in PowerShell Studio and search the treasures inside. They'll save you lots of time.
6. Show whitespace characters
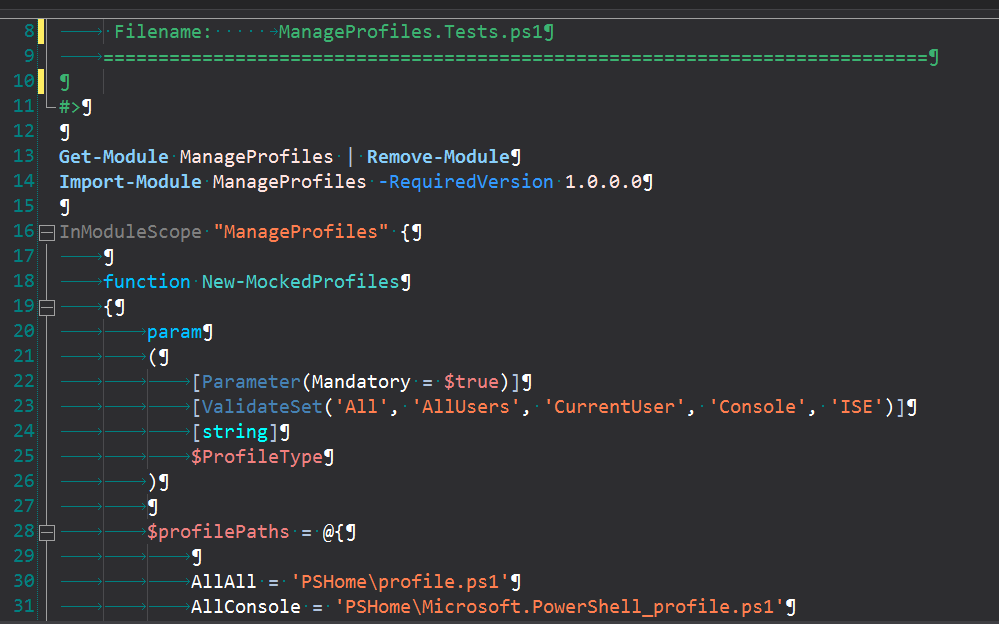
One of the little-known features that I really love is the Show White Spaces option. I don't have it on all the time, but I turn it on when I'm debugging, when I'm reviewing code for friends with different coding styles, and especially when I'm helping people to find knotty problems.
It's great for revealing extra and missing spaces, like spaces after backtick continuation characters and spaces between # and Requires, along with tabs and unicode characters that were typed by mistake. It even works on comments and comment-based help.
To enable and disable it, click Home, Options, Editor and, in the Editor Settings group, click Show White Spaces.
5. Expand/collapse
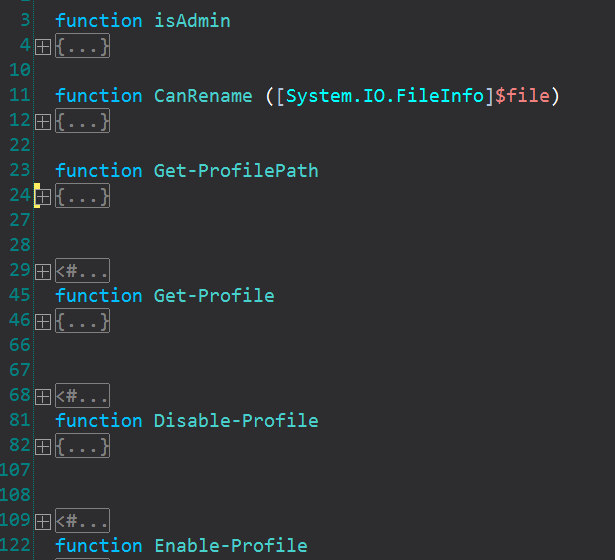
When I open a script, it usually starts with several paragraphs of comment-based help. Nice. But I want to see the function headers and other code. So, instead of clicking the little boxes to collaps the elements I don't want to see, I just type Ctrl+Minus_key.
That's better! To expand particular collapsed sections, click the plus sign beside a collapsed section. To expand all collapsed sections, type Ctrl+Plus_key.
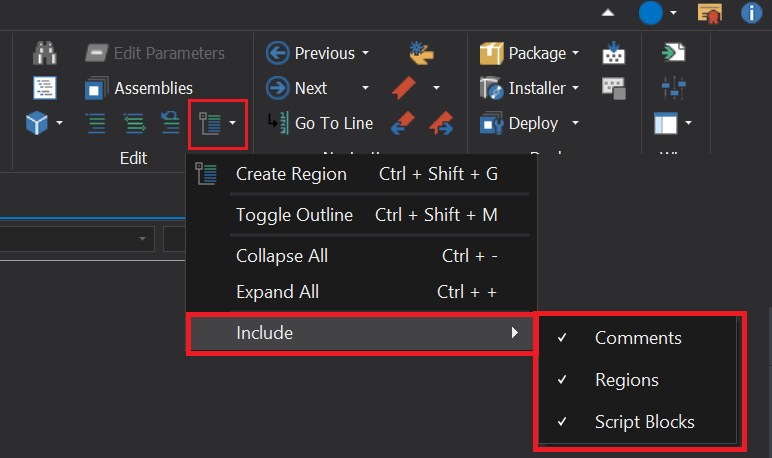
You can also configure the collapse feature to determine what collapses. To configure collapse, click Home and in the Edit group, click Regions, then point to Include and select from among the elements. I collapse everything, but if you prefer, you can collapse regions or comments without collapsing script blocks.
4. Rename
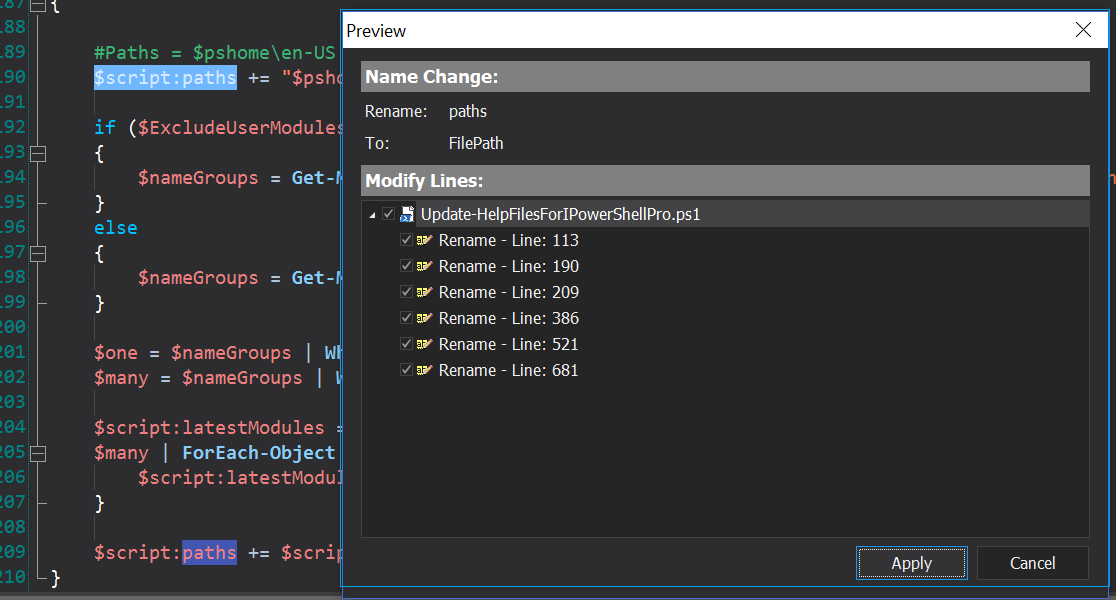
PowerShell Studio has a fantastic rename feature that intelligently identifies the items with the specified name, lets you edit the list, and then renames them. To use the rename feature, right-click the item and then click Rename.
In a script, the Rename feature finds all instance of the named item. But it understands scope, so when you rename a variable in a function scope, it doesn't rename variables with the same name in other functions. In a project, it renames all instances of the named item in all files in the project. You can even use it to rename open project files (in the Project pane, right-click the file name and then click Rename). In a GUI script, it finds all instances of a variable, plus related items, like event handlers.
I think of Rename as Find/Replace, but without the errors.
3. Rewind & Restore
How many times have you opened a script that works just fine, fiddled with it, and then realized that the original was better? But, you've already saved your changes and maybe even closed the script file. (Watch the video: Rewind in PowerShell Studio)
No problem! PowerShell Studio automatically saves a temporary copy of every script on first edit. It doesn't delete that original version even if you save or close the script. It's available until you close that session of PowerShell Studio. To revert to the version of the script when you first opened it in PowerShell Studio, on the ribbon, click Source Control and, in the Restore Points group, click Rewind.
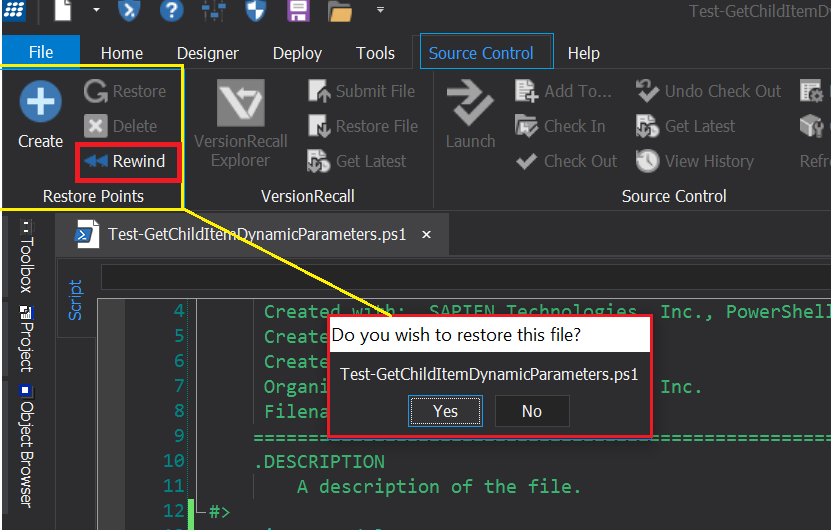
You can also create a Restore Point that saves a current version of the script in a permanent file on disk. This is terrific for refactoring without risk or demonstrating a different way to code something when you know you'll revert.
To create a restore point, on the ribbon, click Source Control and, in the Restore Points group, click Create. To go back to the Restore Point version at any time in any session of PowerShell Studio, click Source Control and, in the Restore Points group, click Restore.
2. New module from functions
One of easiest ways to create a new module or organize an unwieldy directory of scripts is to create a module from functions in scripts and even other modules. It's so easy that you've lost your excuse for having a disorganized script directory.
Watch the video: Create a PowerShell Module from Functions
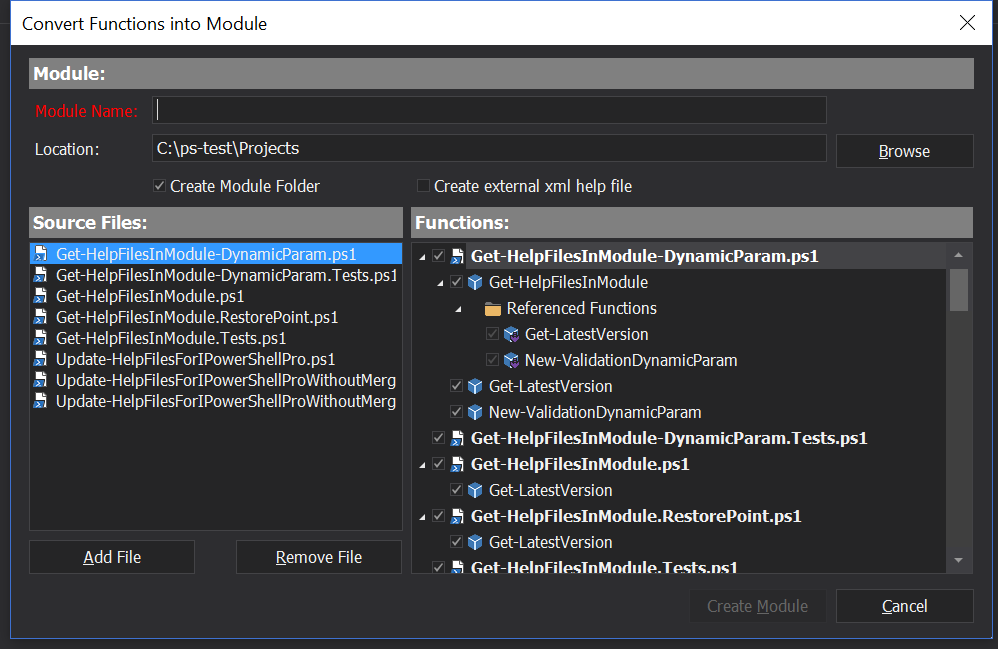
To create a new module, click File, New, New Module from Functions, browse to your script directory, and select the scripts and module files (.psm1) that have the functions you need. PowerShell Studio displays the functions in your scripts. Select the ones you want and click Create Module.
PowerShell Studio creates a module project for you. It copies the functions into a .psm1 file and adds an Export-ModuleMember command for each function. It generates a matching .psd1 file. It even creates a starter test file. Wow!
1. Conditional breakpoints
There are times when a PowerShell Studio feature makes my typical work style easier, like auto-completing parentheses and curly braces. And then there are features that revolutionize the way I work -- cutting minutes or hours out of a process. Conditional breakpoints, and the addition of variable and function (and command) breakpoints, is one of these. It earns my "new favorite feature" award for 2016.
Now, instead of just breaking on a line that I think might be a problem, I can break when a function or cmdlet is called, or when a variable is used, or when its value changes, or both. And, best of all, I can break when a variable has a particular value.
See the video! Add Line, Function, Variable, and Conditional Breakpoints
For example, if I have a list of servers (foreach ($server in $servers)) and one of them is erroring out or generates the wrong output (or no output -- grrrr...), instead of stepping into, over, out and around until I get to the problem server, I can set a breakpoint that stops on that server (when the value of $server is 'srv-007'). This is invaluable when the error is caused by something in the sequence of servers, so running the script on only that server doesn't cause it.
To create a conditional breakpoint, enter a scriptblock in the Action property of a function or variable breakpoint. When the code hits the breakpoint, instead of breaking into the debugger, which is the default action, it runs your scriptblock. If you want to break into the debugger, be sure to add the Break keyword.
Technically, the action scriptblock should be enclosed in curly braces, but PowerShell Studio knows you meant to do that, so if you forget, it adds it for you at debug time. (Thanks, David!)
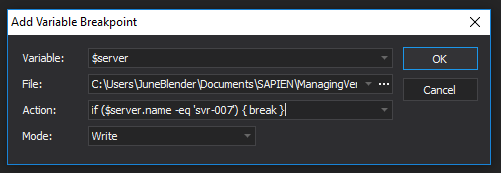
You can manage all of the breakpoints and tracepoints that you've set on your script or project (yes, multi-file debugging!) in the Edit Breakpoints dialog. Edit Breakpoints is a one-stop debug shop. You can add, delete, search, enable, disable, and configure all breakpoints right here. I'd add it as a favorite feature, but I've already listed 10, so I'll just sneak in a picture. You can see it in the video.

There are so many things I didn't mention, like the pretty new dark theme that saves my eyesight and keeps my hip reputation and auto-completing enclosures. But, these are my current hidden charms. I hope they help you, too.
See last year's article: Hidden Charms of PowerShell Studio
June Blender is a technology evangelist at SAPIEN Technologies, Inc. and a Microsoft Cloud & DataCenter MVP. You can reach her at This email address is being protected from spambots. You need JavaScript enabled to view it. and follow her on Twitter at @juneb_get_help.
For licensed customers, use the forum associated with your product in our Product Support Forums for Registered Customers.
For users of trial versions, please post in our Former and Future Customers - Questions forum.


