PowerShell Studio: Function Builder
- Details
- Written by David Corrales
- Last Updated: 22 April 2016
- Created: 24 April 2014
- Hits: 15368
PowerShell Studio helps you create complex functions quickly and easily using the Function Builder:
Let’s cover each field of the Function Builder and how to create a function.
Cmdlet Name
The function builder provides you with a verb and noun field. The verb field contains a combo box with a list of approved verbs, but you have the option to enter your own unapproved verb if necessary.
Synopsis & Description
You have the option to enter a quick synopsis and a longer description using these fields. The information provided here will be used to generate the function’s comment-based help.
Cmdlet Binding
Check the “Enable Cmdlet Binding” option if you want your function to behave like a cmdlet and take advantage of PowerShell’s built-in parameters such as Debug and Verbose and/or process input from the pipeline.
This option will add the [CmdlingBinding] attribute to your function:
function Get-Noun {
    [CmdletBinding(SupportsShouldProcess = $true)]
    param ()
    if ($pscmdlet.ShouldProcess("Target", "Operation")) {

    }
}
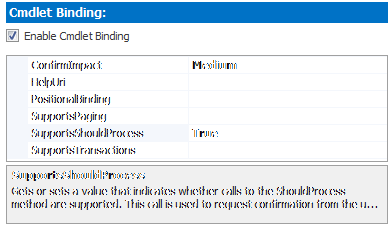
You can set the cmdlet binding attributes by using the properties grid:
 The property grid provides a help description of each attribute.
Parameter Sets
The function builder allows you to specify multiple parameter sets, including a default.
Once you define a parameter set, you can assign it to each individual parameter.
Output Type
You can specify the output type of the function and the appropriate attribute will be added:
function Get-Noun {
    [CmdletBinding()]
    [OutputType([string])]
    param ()

}
The output type field also allows you to select from existing types:
The output type field also provides code completion for namespaces and types.
Parameters
The function builder makes adding a parameter as simple as typing in a name:
The grid of parameters, allows you to mark the parameter as mandatory, provide a name, parameter type and assign a property set. If needed, you can press the Details button or press (Ctrl + E) to open the parameter editor for more advanced settings.
Parameter Editor
Pressing the New Parameter button or the Details button will bring up the parameter editor:
Use the parameter editor dialog to edit the details of a specific parameter such as adding validation and aliases.
Parameter Name:
Use this field to change the name of the parameter.
Description:
The description of the parameter that will appear in the help comment.
Alias:
(Optional) Provides an alternative name for the parameter.
Type:
Specify the object type of the parameter. Checking the “Switch Parameter” will make the parameter a switch parameter. This is the same as typing “switch” in the type field.
Settings:
In the settings you set the parameter’s attributes, such as marking the parameter as mandatory.
A helpful description is displayed in when editing a parameter attribute.
Validation:
The parameter editor also allows you to apply validation attributes to the parameter. Using the Add button you can select and add a validation type and in turn it will be added to the validation list:
Once added, you can modify the validation attribute using the property grid:
Parameter Set:
You can also set the parameter’s parameter set assignment with in the parameter editor:
Once you have added all the parameters and entered the information required, press the OK button in the Function Builder dialog. Now you have an advanced function ready to go:
The function builder is a time saver and a learning tool for those who may not be familiar with the intricacies of creating an advanced function.
For licensed customers, use the forum associated with your product in our Product Support Forums for Registered Customers.
For users of trial versions, please post in our Former and Future Customers - Questions forum.


