WMI Explorer Windows 8 Remote Connection Issues
- Details
- Written by Devin Leaman
- Last Updated: 09 October 2019
- Created: 07 October 2015
- Hits: 13863
Connecting WMI Explorer to a remote Windows 8 computer is not an easy task. Due to the various firewall and permission settings that Windows 8 has, there are a few things that need to be modified in order to connect properly. Please note that this article only addresses Windows 8 and 8.1 but not Windows 10. We will examine the necessary modifications for Windows 10 at a later time.
The first step is to enable Remote Admin on the computer you’re connecting to. You can do this two different ways, through the command line interface (CLI) or the Windows Firewall GUI. I find the easiest way is to simply type the following in a command console with administrator rights:
netsh firewall set service RemoteAdmin enable

When you press enter, you should get something like the above image where PowerShell lets you know this is deprecated and you should use the more up to date method with netsh advfirewall firewall. The only downside to the newer netsh advfirewall firewall method is it turns into a much longer command that is tougher to remember: netsh advfirewall firewall set rule group=“remote desktop” new enable=Yes
After enabling RemoteAdmin, it’s on to the DCOM permissions. To change these you need to open dcomcnfg by typing dcomcnfg into a command console or from the run dialog (Win + R). When it opens, you should see a window that looks like this:

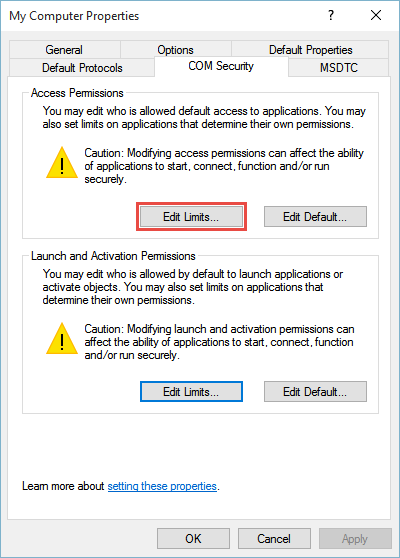
Open the Computers folder, right click on My Computer, and then select properties. A dialog should appear with a few tabs at the top and you’re looking for the COM Security tab.

In this tab there are two sections, the Access Permissions, and the Launch and Activation Permissions. Both of them need to be modified, but we’ll start with Access Permissions by clicking Edit Limits…

Verify that Everyone has the Remote Access permission enabled and then press OK.
(Please note that we used Everyone for simplicity but for security purposes, you may want to limit this to specific users or groups.)

After pressing OK, move on to the second section and select Edit Limits… in the Launch and Activation Permissions area.

Verify that Everyone has Remote Launch and Remote Activation permissions, and then press OK.

By this point there’s only one final step until we should be able to connect and that’s the WMI Namespace permissions. To get there you can type wmimgmt.msc into either a command console or the run box (Win + R). When that opens, right click on WMI Control (Local) and select properties. The following dialog should appear, and we want to navigate to the Security tab.

Select Security and then click Advanced in the bottom right. When the window opens, select Authenticated Users and then Edit.

The only permission required is Remote Enable so verify that it is enabled and then press OK and Apply until you close all open windows.

After enabling the final permission, you should be able to connect without any issues. If for some reason you cannot connect after following these steps, try looking at the following links from Microsoft as they go into other possible solutions.
- https://msdn.microsoft.com/en-us/library/aa389286(v=vs.85).aspx
- https://msdn.microsoft.com/en-us/library/aa393266(v=vs.85).aspx
- https://msdn.microsoft.com/en-us/library/aa822854(v=vs.85).aspx
- https://msdn.microsoft.com/en-us/library/aa393613(v=vs.85).aspx
For licensed customers, use the forum associated with your product in our Product Support Forums for Registered Customers.
For users of trial versions, please post in our Former and Future Customers - Questions forum.

