Creating Responsive Loops
- Details
- Written by David Corrales
- Last Updated: 14 April 2016
- Created: 15 July 2011
- Hits: 34276
In the Preventing Multiple Button Clicks article, we introduced the [System.Windows.Forms.Application]::DoEvents method, which allows the application to process form events. This method also becomes very useful when you have a script that runs through a long loop.
Here is a sample loop with a progress bar you may encounter in your script:
$buttonProcessLoop_Click={
    #Reset the Progress Bar
    $progressbar1.Value = 0

    for($i = 0; $i -lt $progressbar1.Maximum; $i++)
    {
        #Simulate work
        sleep -Milliseconds 200

        #Step the progress bar
        $progressbar1.PerformStep()
    }
}

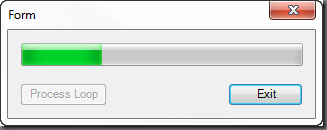
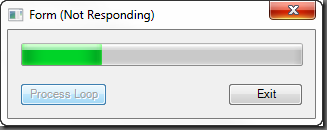
When we click the button, the script will go through a loop a number of times and step the progress bar to show to current position. Now if you run the form and press the button, you will notice that the form freezes while the loop is processing.

As mentioned in the Preventing Multiple Buttons Clicks, this happens because the form is unable to process the pending message until the loop is complete. You can resolve this by adding the same DoEvents method we used to prevent multiple button clicks to the loop.
$buttonProcessLoop_Click={
    #Disable the button so we don't trigger it again
    $this.Enabled = $false
    #Reset the Progress Bar
    $progressbar1.Value = 0

    for($i = 0; $i -lt $progressbar1.Maximum; $i++)
    {
        #Do work some work here
        sleep -Milliseconds 200

        #process the pending message
        [System.Windows.Forms.Application]::DoEvents()

        #Step the progress bar
        $progressbar1.PerformStep()
    }

    #Enable the button so we can click it again
    $this.Enabled = $true
}
Now when the loop is processing you can also move the form and even click the same button so it is important to disable the loop button to prevent it from firing again. It is also important to note that since the DoEvents method allows the user to click other buttons and trigger their event blocks, this places the loop script on hold until the second event is resolved. Be aware that this interruption can potentially cause problems in situations where certain actions depend on the results of the original click event.
Here is a example process flow for how Click Events are resolved during a loop when using DoEvents method:
#User Clicks the Loop Button
-> Enter Loop_Click Event

    #User Clicks Button 2 while processing the loop

    -> Enter Button2_Click Event
        #Process the Button2_Click Event
    <- Exit Button2_Click Event

    #Continue Processing the Loop_Click Event

<- Exit Loop_Click Event
Some users may find that they don’t want to wait for the loop to finish and end up clicking on the Exit button in order to stop the process. Unfortunately, what they will find is the form will not close until the loop has completed processing. The good news is with a few slight changes you can allow the user to cancel the loop and exit the application.
First we define a variable that will tell the loop it is time to stop:
$script:CancelLoop = $false
Next we add code to the loop to evaluate the variable and see if it should stop:
$buttonProcessLoop_Click={
    #Init CancelLoop
    $script:CancelLoop = $false
    $buttonCancelLoop.Enabled = $true
    #Disable the button so we don't trigger it again
    $this.Enabled = $false
    #Reset the Progress Bar
    $progressbar1.Value = 0

    for($i = 0; $i -lt $progressbar1.Maximum; $i++)
    {
        #Do work some work here
        sleep -Milliseconds 200

        #process the pending message
        [System.Windows.Forms.Application]::DoEvents()

        if($script:CancelLoop -eq $true)
        {
            #Clear the progress bar
            $progressbar1.Value = 0
            #Exit the loop
            break;
        }
        #Step the progress bar
        $progressbar1.PerformStep()
    }

    #Enable the button so we can click it again
    $this.Enabled = $true
    $buttonCancelLoop.Enabled = $false
}
We can add a Cancel Button so the user can stop the stop the loop process. We define the Cancel button’s click event as follows:
$buttonCancel_Click={
      $script:CancelLoop = $true
}
In addition, we want to exit the loop if the user tries to close the application. We can handle this by using the forms Closing event:
$form1_FormClosing=[System.Windows.Forms.FormClosingEventHandler]{
#Event Argument: $_ = [System.Windows.Forms.FormClosingEventArgs]
    $script:CancelLoop = $true
}
Next we must handle any exit buttons. If you are using the button’s DialogResult property, you are not required to create a click event block that calls the $form1.Close() method (See: Spotlight on the Button Control). But this presents an unexpected issue because if you click the button the FormClosing event will not trigger until after the loop has completed. Therefore, you will have to define a click event for the exit button and set the $script:CancelLoop variable to false.
$buttonExit_Click={
    #The Exit Button has DialogResult = Cancel
    #So we don't have to call $form1.Close method
    #But the Closing event will not trigger until
    #the loop is finished processing
    #So we just tell the loop to stop
    $script:CancelLoop = $true
}
If you do not have the button’s DialogResult property set, you can explicitly close the form in the button’s click event and it will trigger the Form’s Closing event.
$buttonExit_Click={
    #Tell the form to close and the FormClosing event will trigger
    $form1.Close()
}
Now you have a responsive form in which you can exit the processing loop by clicking on the Cancel button or by simply exiting the application.
You can download the sample Responsive Loop Form.
For licensed customers, use the forum associated with your product in our Product Support Forums for Registered Customers.
For users of trial versions, please post in our Former and Future Customers - Questions forum.


