PowerShellGet-GUI
- Details
- Written by Ferdinand Rios
- Last Updated: 09 October 2019
- Created: 10 November 2015
- Hits: 21106
User Rating: 2 / 5


Back in mid-September, I presented a talk on “Building PowerShell GUI Tool Solutions” at the PowerShell Conference Asia in Singapore. The talk centered around GUI application design and development using PowerShell as the core language. During that talk , I developed an application that used PowerShell’s PSGet module to communicate with the PowerShell Gallery. Finishing work was done by Devin Leaman of SAPIEN Technologies. The recorded talk should be available at some point on the PowerShell Conference Asia Website.
The application creates an interface that displays gallery module information and allows the user to easily add and remove modules from their system. The complete source code can be found on the SAPIEN github repository here.
The github repository contains the complete PowerShell Studio source code as well as a packaged .EXE of the final project and an .MSI ready for deployment. For those without PowerShell Studio, we have exported the complete project into a .PS1 file that can be run from the PowerShell console. We have also taken the .PS1 file and “modularized” it and posted it to the PowerShell Gallery here.
So let’s take a look at the project…

Figure 1
Figure 1 shows the completed application interface. The top left pane displays a sorted list of the modules found on the PowerShell Gallery. The top right pane shows details for the module selected from the module list. The bottom pane is basically a dump of all the actions that are taken by the user and PowerShell cmdlet responses.
The Details
At the top of our file we start off with two calls to Import-Module: the first to import PowerShellGet and the second to import PackageManagement. (Actually, these are inserted automatically by PowerShell Studio when we include the appropriate cmdlet in our code.)
Since GUI applications are event driven, most of our operational code goes into event-handlers. These are functions that are called by the application when a specific event occurs. For instance, when a user clicks on a button, that button’s “click” event handler is called. Default event handlers are automatically generated by PowerShell Studio when you double-click on an object in the designer. Event handlers are named using the following formula:
$<objectType><objectName>_<eventName>
So for a BUTTON named MyButton, the CLICK event handler would be named:
$buttonMyButton_Click
For the purposes of this article, we are only going to examine the actual code that gets executed when an event occurs. Bear in mind that many object properties have been manipulated in the object ‘s Property list to help create a working UI. These are not being discussed here.

Figure 2
The first event handler that we are concerned with is the form_load event ($formPowerShellGet_Load), seen at the top of Figure 2. This event gets fired when the form is first loaded (as the name implies.) Our form_load event handler calls a user defined function called Check-NuGet which verifies the availability of NuGet on the system. If NuGet is not available it prompts the user to download and install it. Add-TextToOutputWindow is the helper function that writes to the output pane at the bottom of the application.
With NuGet installed, we can then implement our menu selection File->Get Modules. Besides enabling some menu options which the reader can explore on their own, this event handler calls a user defined function called Update-ListView as seen in Figure 3.

Figure 3
This is a fairly long function so let’s go through it a step at a time.
First, because we know that this function will take a bit of time (as it needs to communicate across the internet), we change the cursor to a wait cursor on line 22. We also could have put this code in a separate thread so as not to impact the UI. In lines 24-29, we store the top item’s index so that when we refresh the list we can return it to the same position. In lines 31-34, we check to see if there is an item selected, and if so, we store that item’s index.
Using the Find-Module cmdlet (line 40), we connect to the PSGallery and store the result in a local variable, $psgModules. Then in line 43 we use Get-InstalledModule to get a list of the currently installed modules and store that as well ($instModules).
In lines 46-65, we populate our list. By enclosing all the work between .BeginUpdate and .EndUpdate calls, we delay drawing the list until all the work has been done, thereby eliminating flashing of the list control. For each module in $psgModules, we get the name and the version and place those items into the list control. We also store the module itself in the listItems’s TAG property for easy access to the module later. See this article for more detailed information about the TAG property.
In lines 55-63 we check to see if the module we just added is included in our installed modules ($instModules) array and if it is, we add a checkmark image to the list control.
Remember when we stored the current selection above in line 33? Well, next we use that to check to see if an item had previously been selected and if so, we select it in the list. Then we scroll the list to the same location we stored ($topIndex) in line 26 to restore the list to the same state it was in previously (assuming that it had been scrolled and had an item selected.)
Finally, we restore the cursor to an arrow cursor.
Let us examine some of the other features of the PowerShell Get GUI application.
With our list successfully loaded with PowerShell Gallery modules, the user can take several actions:
- Select a module to inspect it’s properties
- Select a non-installed module to install it
- Select an installed module to uninstall it
Case 1
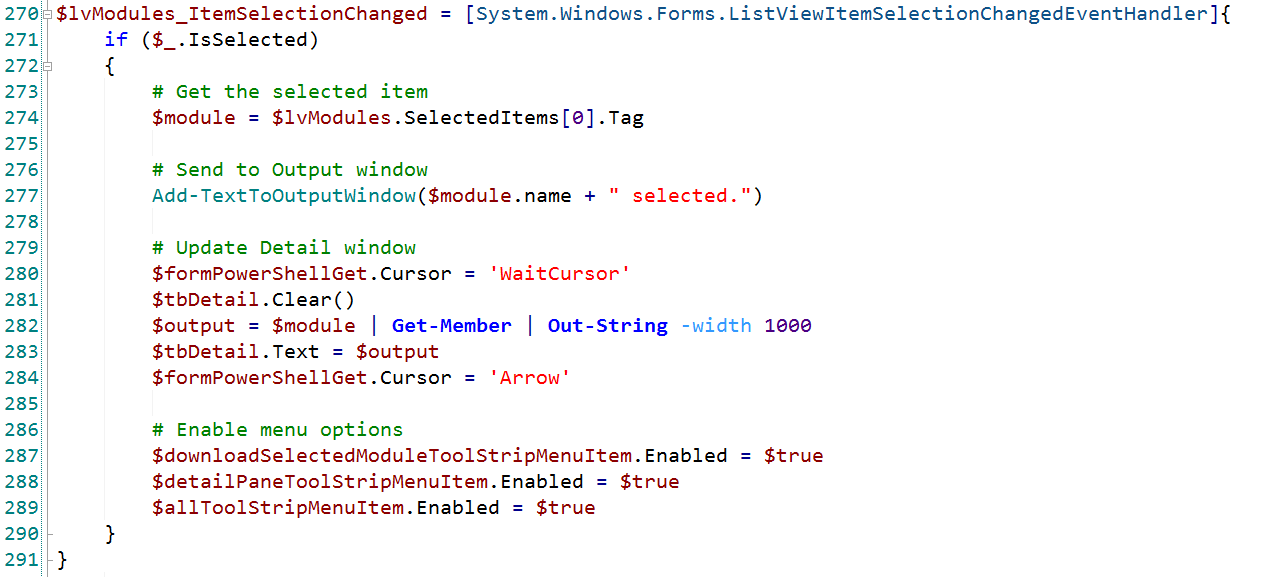
Figure 4
When the user clicks on an item in the list, the listview_ItemSelectionChanged event fires and is handled by our $lvModules_ItemSelectionChanged event handler seen in Figure 4 above. If an item has been selected, we first save the contents of the .Tag property to a local variable, $module. If you remember earlier in this article, when we filled our list we stored the actual module in the .Tag property for later access. See this article for more detailed information about the TAG property.
We then set a “wait” cursor, clear the details pane (top right of UI), then call Get-Member on the module and store the string output to $output. We assign that string output to the .text property of the details pane and return our cursor to the default arrow. We also set several menu options to enabled to create a good UI.
Case 2
A module from the list can be installed by selecting the File->Install Selected Module menu option or by right-clicking the module and selecting Install.
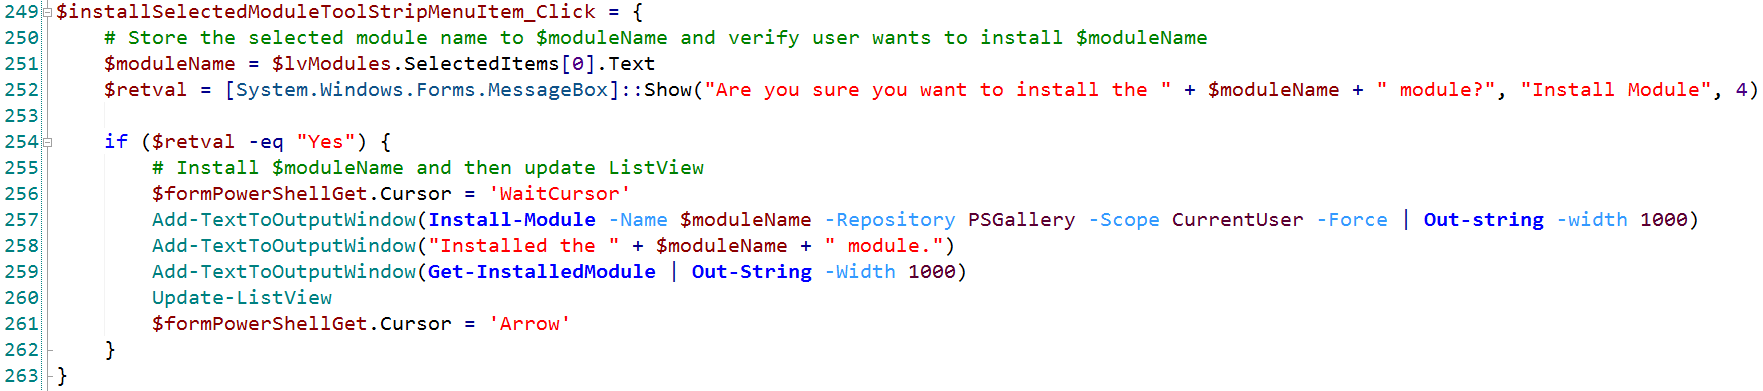
Figure 5
Figure 5 shows the code that is executed when that menu option is selected. First we get the module name and present a verification dialog to the user. If the user clicks OK in the dialog, then we set a wait cursor. Next we call Install-Module with the module name, PSGallery as the repository, and scope it to the current user. The output of these commands is converted to a string and output to the OutPut pane at the bottom of the application. We update our list view which will put a checkmark on the module. Finally, we set our cursor back to the default arrow.
Case 3
An installed module can be uninstalled by electing the File->Uninstall Selected Module menu option or right-clicking on the module and selecting Uninstall.

Figure 6
This is probably our simplest event handler. The code in figure 6 uses Try…Catch to handle any errors. In the Try section, we call Remove-Module using the text found in the first element of the list views .selectedItems array. Since there is only 1 selected item (set by an object property) we know that it will be the “0” item and the text for that selection is the module name. If this fails, then we show the error in the output pane.
Finally
There is a lot more going on in this application than what this article describes. Setting object properties, enabling and disabling menu options, etc. all work together to make a great user interface. There is plenty more that can be done with this app and we invite the community to experiment and make suggestions.
Ferdinand Rios is Chief Executive Officer at SAPIEN Technologies, Inc.
For licensed customers, use the forum associated with your product in our Product Support Forums for Registered Customers.
For users of trial versions, please post in our Former and Future Customers - Questions forum.