Manage Errors in a GUI Application
- Details
- Written by June Blender
- Last Updated: 14 April 2016
- Created: 15 January 2015
- Hits: 22757
In a previous article, I talked about displaying output in a GUI application. But I really covered only the primary output of cmdlets. In this post, we’ll discuss some very basic strategies for detecting and displaying terminating and non-terminating errors in a GUI application.
This is a critical topic. If you’re used to scripting in the console, errors are displayed automatically. But, in a GUI program, you manage the output — all of it. And nothing appears in your application window unless you place it there explicitly.
Your application’s response to an error can be as varied as your imagination — from a simple “Error” message box to changing the entire form, changing colors, and popping up help messages. But, in this post, we’ll show you the basics.
Errors Do Not Appear Automatically
In the Windows PowerShell console, both terminating and non-terminating errors appear in the all-too-familiar red text.
PS C:\ps-test> 1/0
Attempted to divide by zero.
At line:1 char:1
+ 1/0
+ ~~~
+ CategoryInfo : NotSpecified: (:) [], RuntimeException
+ FullyQualifiedErrorId : RuntimeException
In PowerShell Studio, when you run a command that generates an error …
$buttonStart_Click = { $textboxOutput.Text = 1/0 } |
… the error appears in the Output pane.

But, when you package the .psf file into an executable file (.exe) and run it, NOTHING appears in the GUI window. There is no standard output to display. And, this code doesn’t capture or redirect the error output to any control in the UI.
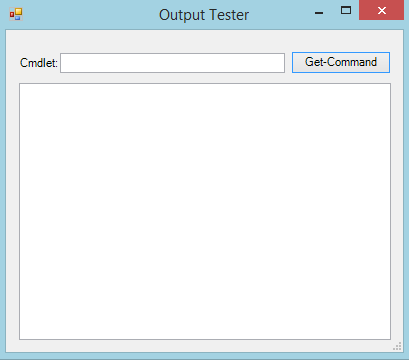
This result is confusing to users who are expecting feedback from the action of clicking the button.
Let’s fix this.
Errors do not stop a GUI application
Windows PowerShell supports two distinct types of errors. Terminating errors stop the pipeline. Non-terminating errors let the pipeline continue.
But neither terminating nor non-terminating errors stop a GUI application. The application continues to run. You can respond to any error by closing the application, but to do so, you must explicitly close the form. It doesn’t happen automatically.
Similarly, you can also respond to any error, including a terminating error, by reinitializing your input controls and letting the user try again. The choice is yours, but you need to consider the options and implement your response.
Display errors in the output window
The simplest way to notify a user of an error is to display an error in the text box that is designed for standard output.
This example uses a Try-Catch block to catch terminating errors in a Get-Command command. This sample code displays an error message when the user types an empty string.
$buttonGetCommand_Click = { try { $cmdlet = textboxInput.Text $textboxOutput.Text = Get-Command -Name $cmdlet | Format-Table -AutoSize | Out-String } catch { $textboxOutput.Text = "Enter a cmdlet name. ` The name cannot be an empty string." } } |
Here is the result.

Be sure to fix the code to avoid obvious terminating errors, like this $null value error, but include a Try-Catch block (preferred) or Trap statement (outdated, but still available) to handle the ones that you didn’t anticipate.
Display errors in red text
When you use the same output control for standard and error output, be sure to make errors immediately recognizable by displaying them in red text. Use the ForeColor property of a Textbox with a value of ‘Red’.
When the output is read-only, use a RichTextBox control, instead of a TextBox. When you set the ReadOnly property of a Textbox to $true, the ForeColor property is overridden by ReadOnly default colors. The RichTextBox control implements the ForeColor property value even when ReadOnly is $true.
This sample code displays the contents of a file. The user types the path and file name in the input text box ($textboxInput) and the script displays the file content in a rich text box ($richTextBoxOutput).
$buttonGetContent_Click = { $this.Enabled = $false try { if (!($file = $textboxInput.Text.Trim())) { Display-Error "File name cannot be blank. Enter a path and file name." } else if (!(Resolve-Path $file)) { Display-Error ` -ErrorString "Can't find $($Error[0].CategoryInfo.TargetName). ` Check the path and file name and try again." } elseif (!($richtextboxOutput.Text = ` Get-Content -Path $file -ErrorVariable fileErr | Out-String)) { Display-Error -ErrorString "Can't get content of $($file). ` `nError is: $($fileErr)." } } catch { Display-Error -ErrorString "Unforeseen error. Please try again. ` `nIf the problem recurs, contact This email address is being protected from spambots. You need JavaScript enabled to view it.." } } |
The code assigns the standard output to the Text method of the rich text box. To display each value on a separate line, use the Raw parameter of the Get-Content cmdlet, which returns a single string, instead of an array, or the Out-String cmdlet, which converts the output to a single string.
$richtextboxOutput.Text = Get-Content -Path $file -ErrorVariable fileErr -Raw |
-or-
$richtextboxOutput.Text = Get-Content -Path $file -ErrorVariable fileErr | Out-String |
Here’s the standard output:
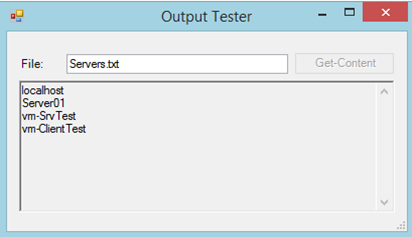
To display any error, the script calls the Display-Error function, which sets the ForeColor property of the rich text box to red, assigns the error message to the rich text box’s Text property, and places the cursor in the input text box, which signals the user to try again.
function Display-Error { param ( [parameter(Mandatory = $true)] [String] $ErrorString ) $richtextboxOutput.ForeColor = 'Red' $richtextboxOutput.Text = $ErrorString $textboxInput.Focus() } |
Here’s the result.
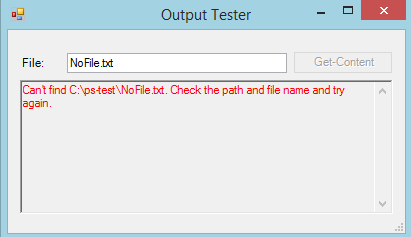
Unfortunately, if you try to restore the ForeColor in the same function, it’s restored immediately and you never see the red text. I could have used the SelectionColor property, but, instead, I restored the standard text color in the TextChanged event of the input text box.
So, when the user tries again, the output is cleared, the button is re-enabled, and the original text color is restored.
$textboxInput_TextChanged={ $richtextboxOutput.Clear() if ($textboxInput.Text.Trim() -ne "") { $buttonGetContent.Enabled = $true $richtextboxOutput.ForeColor = 'WindowText' } } |
Display raw errors
Displaying the error message that Windows PowerShell returns is considered to be bad practice. The error messages in a well-designed application should be clear, well-written, and customized for the controls in the interface.
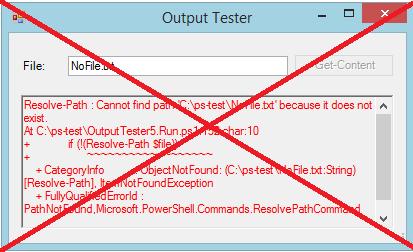
However, you might want to include some elements of the raw error message in your error message display.
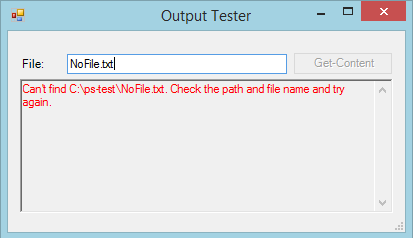
For example, the error message in this code includes the fully-qualified path that the cmdlet actually searched ($error[0].CategoryInfo.TargetName). This is really important when the user enters a file name without a path and misjudges the current directory. It’s so useful that I substitute Resolve-Path, which returns this error, for the more traditional Test-Path, which returns a Boolean value ($True/$False).
To display the error message to the user, the code assigns the error message to the value of the Text property of the RichTextBox.
if (!(Resolve-Path $file)) { $richtextbox.ForeColor = 'Red' $textboxInput.Focus() $richtextboxOutput.Text = "Can't find $($Error[0].CategoryInfo.TargetName). ` Check the path and file name and try again." } |
Here’s the result.
Display errors in an error window
You can also display errors in an error window. This occupies a lot of real estate, but might occasionally be a useful element.
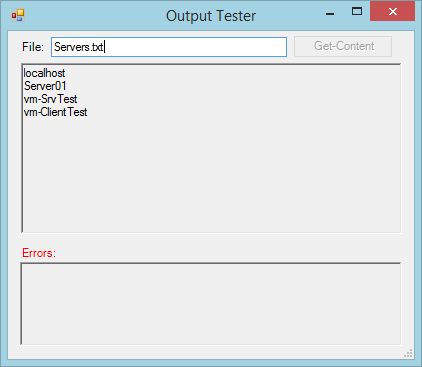
This code assigns standard output to the Text method of $richtextBoxOutput, as in the previous example.
$richtextboxOutput.Text = Get-Content -Path $file -ErrorVariable fileErr | Out-String |
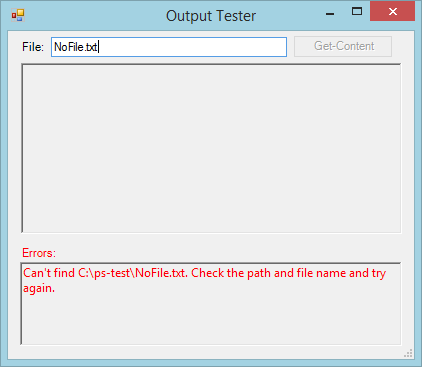
But, it assigns errors to the Text method of $richtextBoxError.
if (!($file = $textboxInput.Text.Trim()) { $richtextboxError.Text = "File name cannot be blank. Enter a path and file name." } |
Because the $richtextboxError is a dedicated error display, you can set its ForeColor property to ‘Red’ in the Properties dialog and never change it, sot here’s no need for a separate DisplayError function.
Here’s the result when the command succeeds.
And here’s the result when it fails.
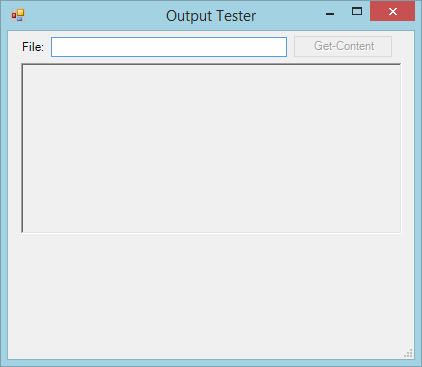
You might be tempted to make the error box invisible until you use it ($richtextboxError.Visible=$false), but invisible text boxes still occupy space. And the result is, um, disconcerting. Don’t do it.
Display errors in a message box
You can also display errors in a message box. This is quick and easier than maintaining a separate text box.
A message box isn’t a control. You create it on the fly and, by default, it includes an OK button. You don’t need to create it before you use it and it disappears automatically when the user clicks OK.
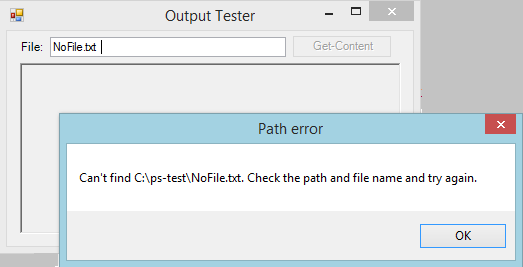
For example, if the Resolve-Path cmdlet can’t find the specified file, a message box pops up with the error message. Then, the code sets the focus back to the input text box.
To create a basic message box in PowerShell Studio, type msgbox and then press TAB. The msgbox snippet calls the static Show method with strings for the text and caption.
[void][System.Windows.Forms.MessageBox]::Show("Text","Caption") |
If you want something fancier, you can use the variety of overloads for the Show method.
Here’s the condition that creates and opens a message box when the Resolve-Path command fails. After displaying the message box, I call the Focus method of the input text box, which places the cursor in the input box, showing the user how to try again.
elseif (!(Resolve-Path $file)) { $errorMsg = "Can't find $($Error[0].CategoryInfo.TargetName). ` Check the path and file name and try again." $caption = "Path error" [System.Windows.Forms.MessageBox]::Show($errorMsg, $caption) } |
Use an Error Provider
An ErrorProvider control (see PowerShell Studio-specific info) displays a little icon beside an input field. By default, the icon blinks every 250 milliseconds and when you hover over the icon, it displays a tool tip.
You can use the error provider to indicate an error on a form.

To add an error provider control to your form, in the PowerShell Studio Toolbox, double-click ErrorProvider. You do not need to position the ErrorProvider near the input box. You use code to associate it.
To activate the error provider, use its SetError method. The first argument is the control that you want to associate with the error provider; the second argument is the text of the tool tip.
For example, in this code, errorprovider1 appears beside $textboxInput when running the Test-Path cmdlet on the value in the text box fails.
elseif (!(Test-Path $file)) { $errorprovider1.SetError($textboxInput, "File not found. Try again.") } |
Write Useful Error Messages
I’ve reviewed a few simple ways to display errors in a GUI application. These are essential, because errors don’t appear automatically.
But the best thing that you can do for users is beyond the scope of this post — and that is to write clear error messages that explain the problem, how to fix it, and how to prevent it.
June Blender is a technology evangelist at SAPIEN Technologies, Inc. You can reach her at This email address is being protected from spambots. You need JavaScript enabled to view it. or follow her on Twitter at @juneb_get_help.
For licensed customers, use the forum associated with your product in our Product Support Forums for Registered Customers.
For users of trial versions, please post in our Former and Future Customers - Questions forum.


