Working with Remote Systems
- Details
- Written by Max Trinidad
- Last Updated: 09 October 2019
- Created: 24 September 2018
- Hits: 11605
User Rating: 5 / 5

This article on working remote systems covers caching remote systems PowerShell modules and PowerShell remoting.
Caching Remote Systems PowerShell Modules
The ability to access modules residing in remote systems allows us to create PowerShell solutions that span infrastructure and DevOps environments. PowerShell Studio and PrimalScript include components, such as the "CacheExport2018.exe", to help you access modules on remote systems.
Cache Export Executable
PowerShell Studio and PrimalScript include a component that will collect the module information from the remote system—"CacheExport.exe". This program will extract module information into a file which can be accessed from the Cache Editor feature in PowerShell Studio and PrimalScript. The file "CacheExport2018.zip" contains the cache export executable.
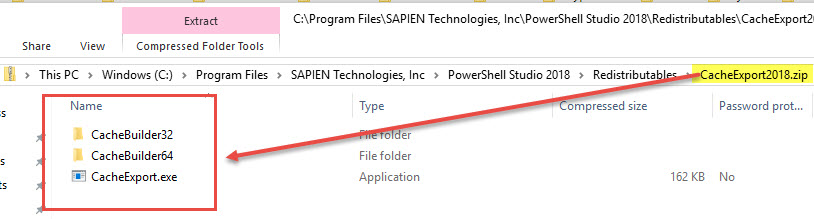
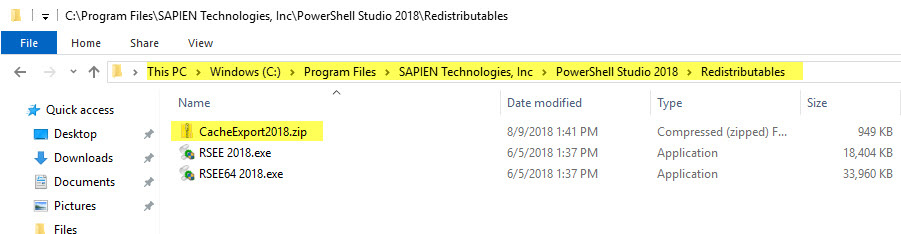
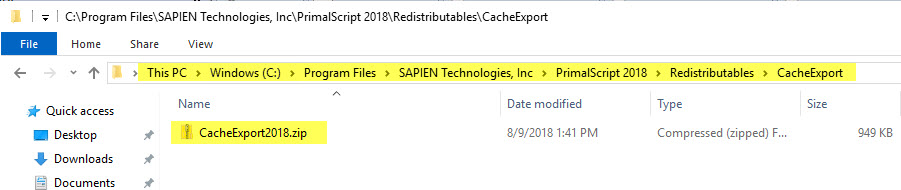
CacheExport2018.zip Location
"CacheExport2018.zip" is located in the SAPIEN Technologies products installation folder under "Redistributables":
PowerShell Studio file location:
"C:\Program Files\SAPIEN Technologies, Inc\PowerShell Studio 2018\Redistributables"
PrimalScript file location:
"C:\Program Files\SAPIEN Technologies, Inc\PrimalScript 2018\Redistributables"
Building the Cache Export File from a Remote System
The files in "CacheExport2018.zip" need to be extracted on the server where you are going to create the Export Cache file. The steps outlined below are my preferred method because I don't have to copy over the executable or leave it on the server.
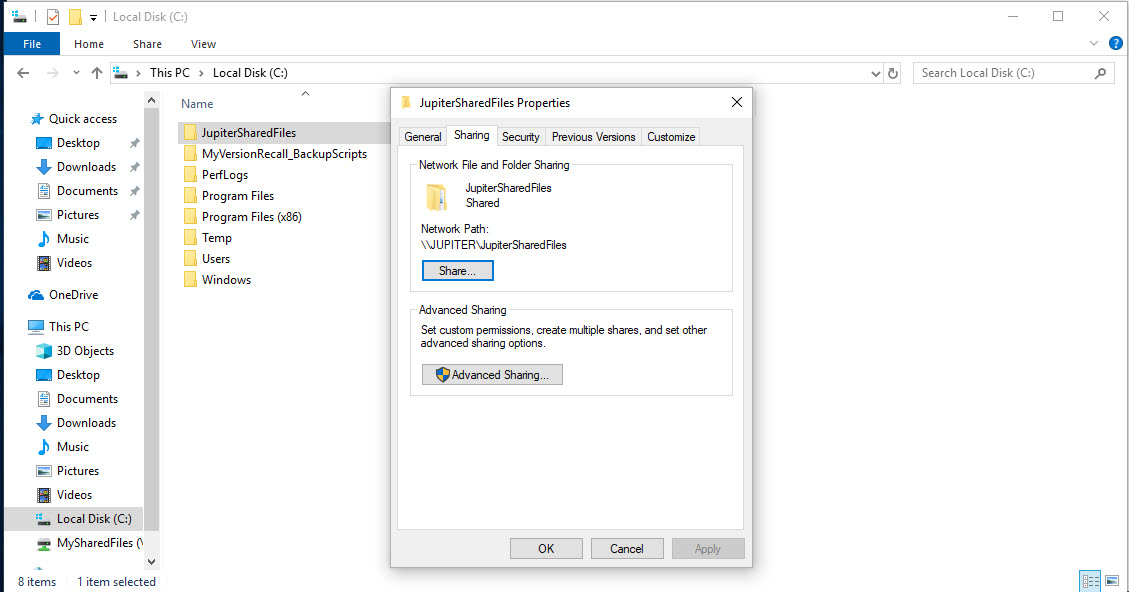
Use Shared Folder
- Create a shared folder locally.
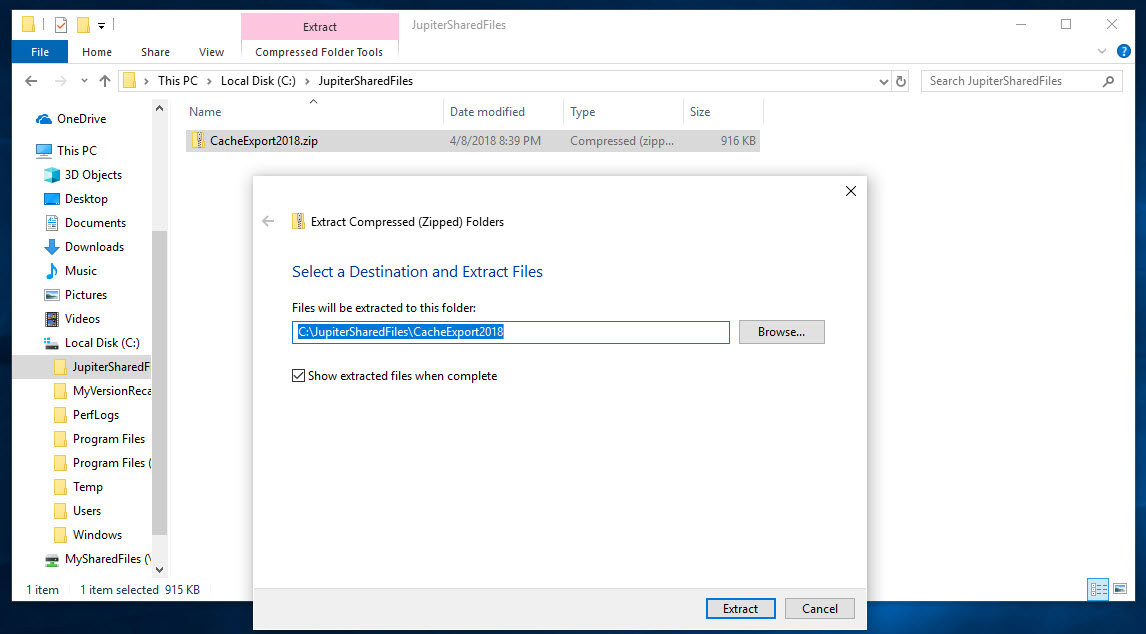
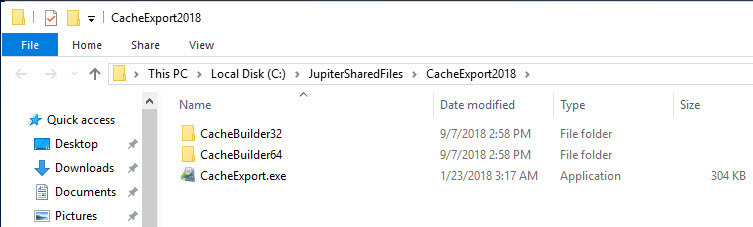
- Copy "CacheExport2018.zip" to the shared folder and extract the files, which will create the "CacheExport2018" folder containing the executable "CacheExport.exe".
Now we can proceed to connect to this shared folder from the remote system.
Connect to the Shared Folder from the Remote System
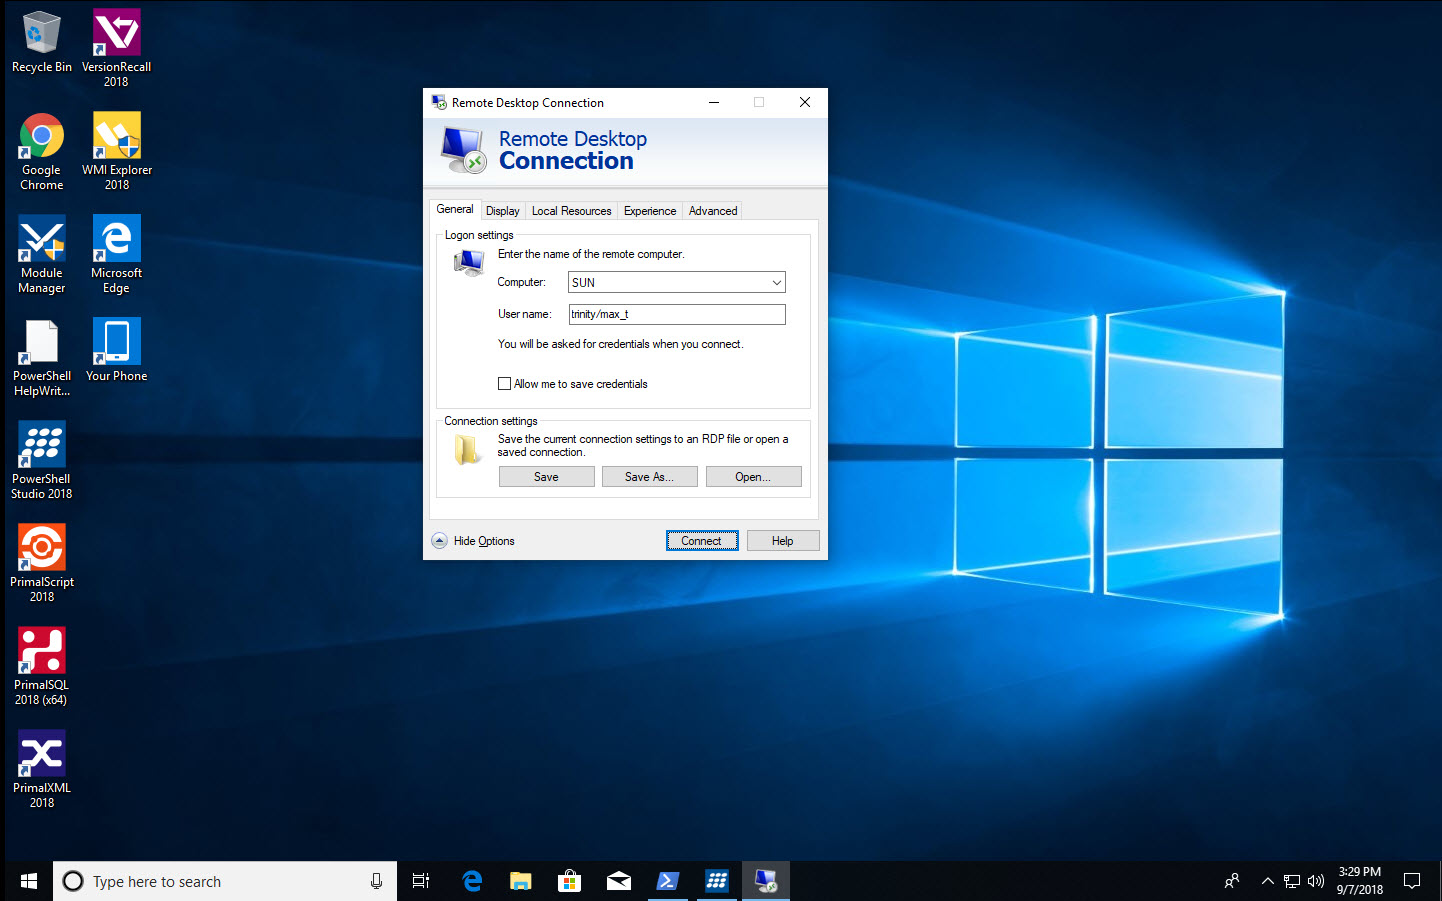
- Open a Remote Desktop session to the remote system.
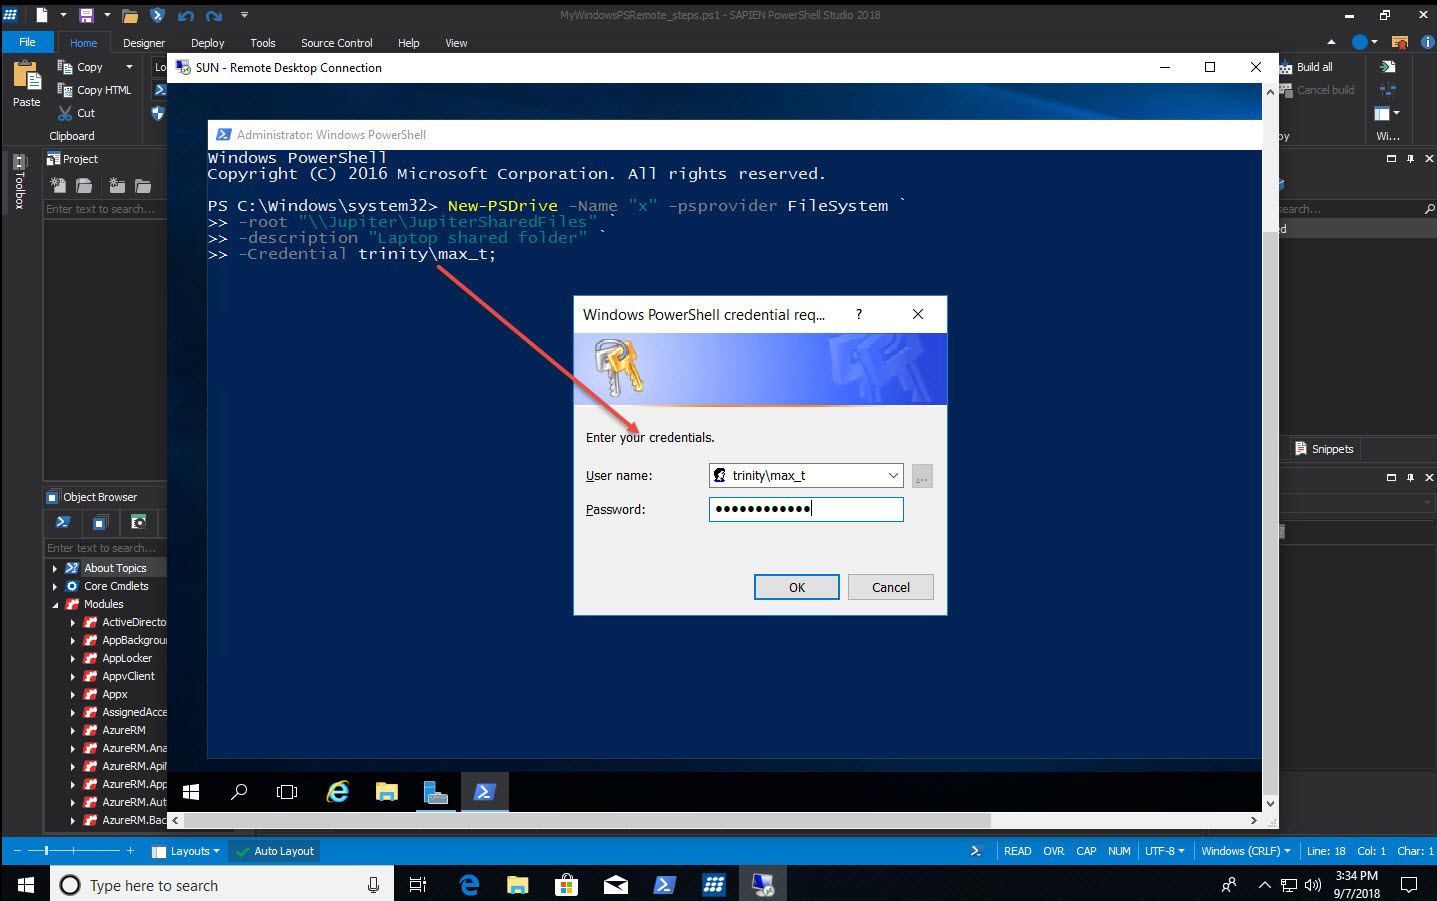
- Use PowerShell or File Explorer to map a drive (x:) to the shared folder that contains the Cache Export executable.
- Navigate to the attached shared folder (e.g., x:\CacheExport2018).
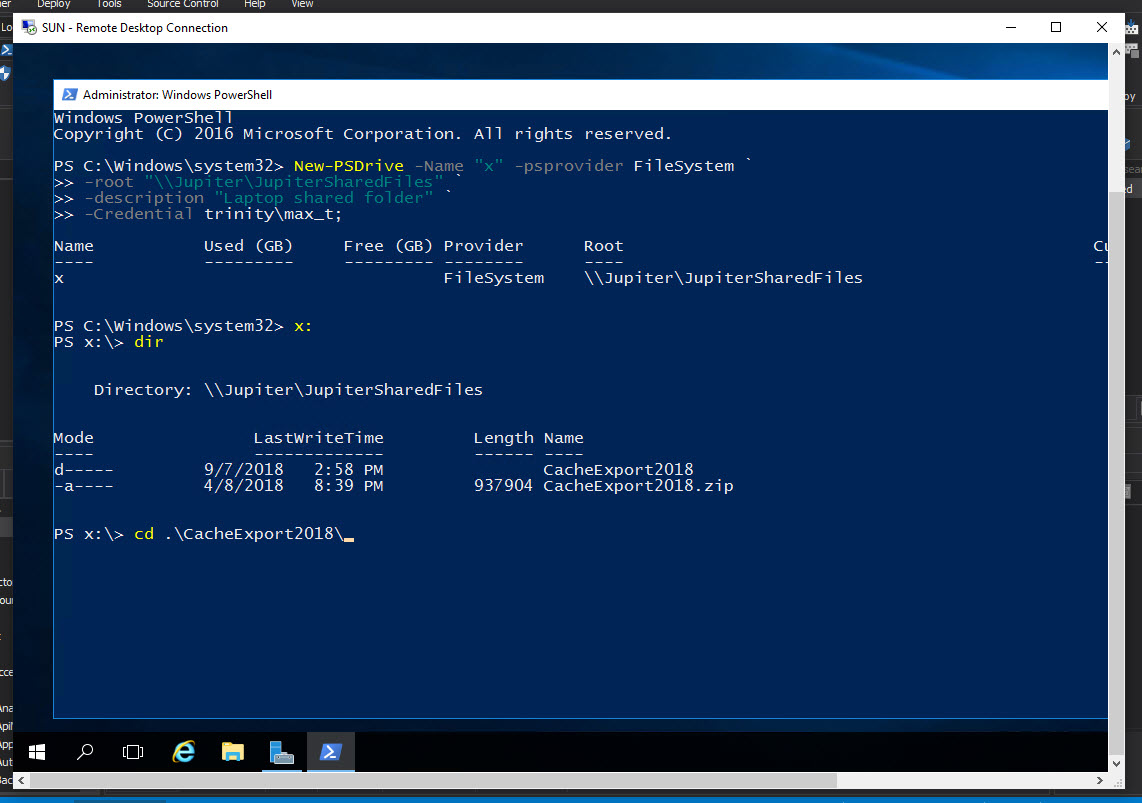
Build the Cache File
- Run "CacheExport.exe" to build the cache file:
- If using PowerShell Console, type the program name CacheExport <Tab>, then press <Enter> to execute.
- If using File Explorer, just double-click on the file name "CacheExport.exe".
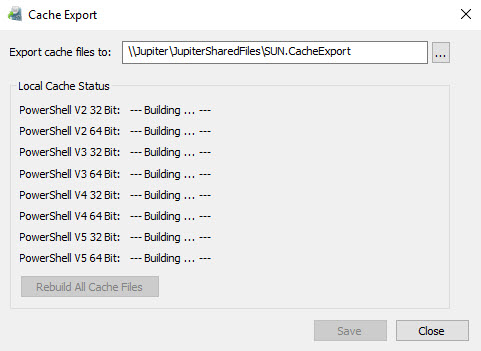
- In the Cache Export pop-up window, change the Export cache files to: filepath to the shared folder.
- Select Rebuild All Cache Files to build the export file.
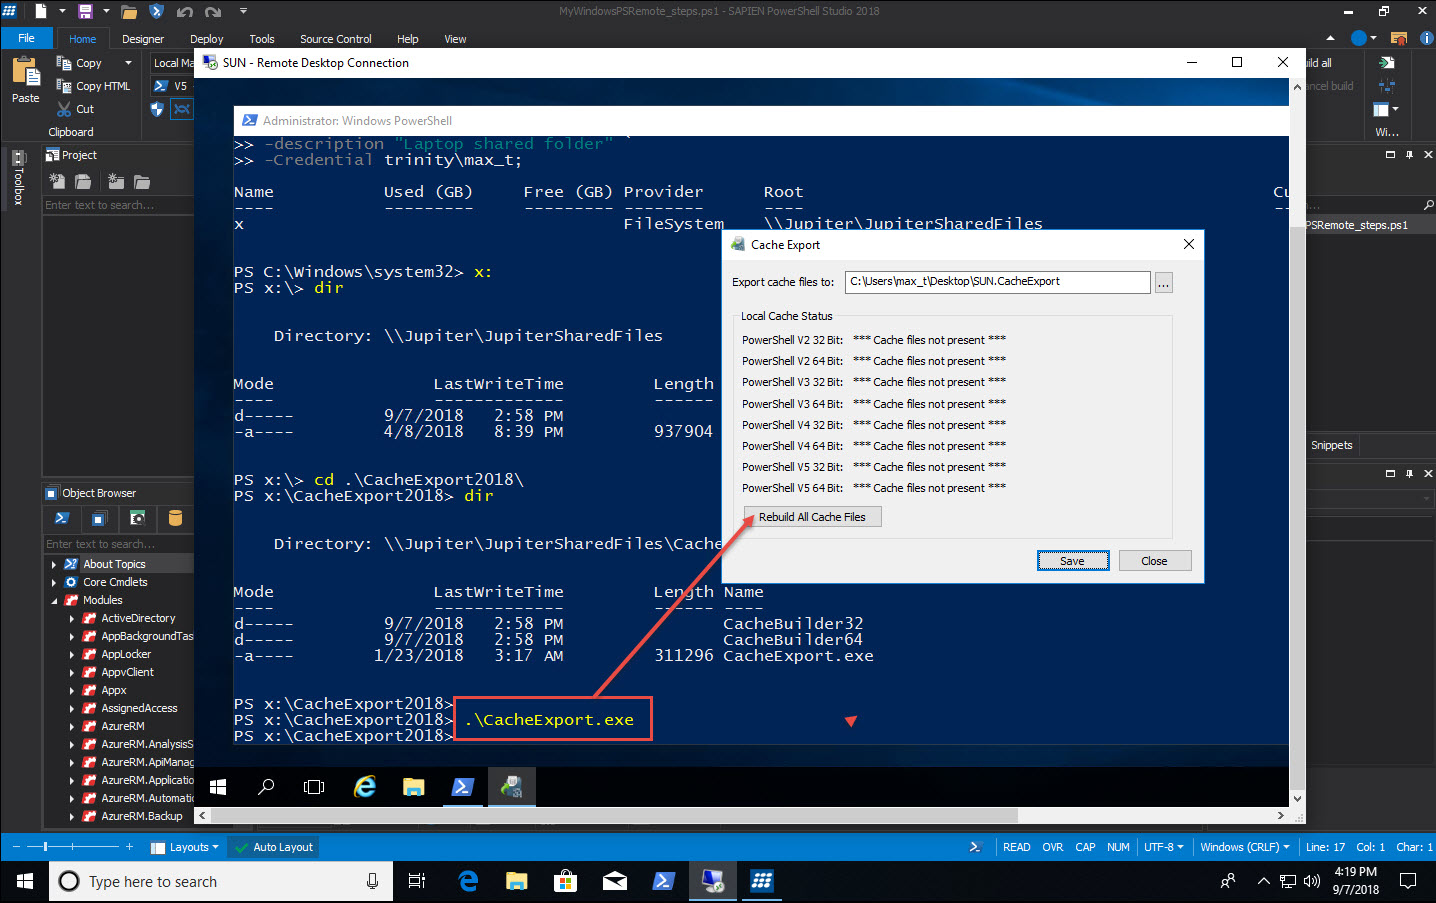

At the end of this process, select Save to store the cache file in the shared folder.
Reminder: This folder resides where you will use PowerShell Studio (or PrimalScript) to access the exported cache modules.

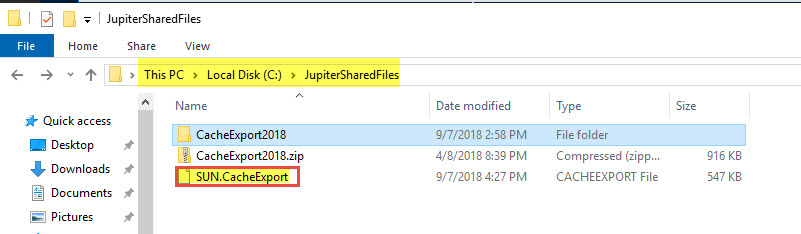
IMPORTANT: The Cache Export file naming format is "<servername>.CacheExport". Please do not rename this file.
Load the Exported Cached Modules
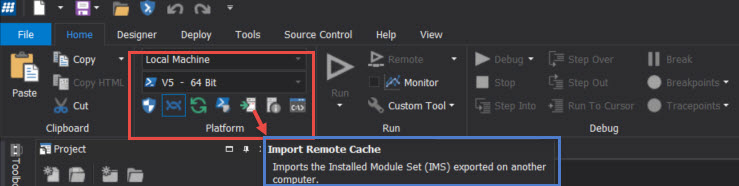
The "<servername>.CacheExport" file has been created from the remote system. Now we can access the file from PowerShell Studio. On the Home ribbon > in the Platform section > select Import Remote Cache:
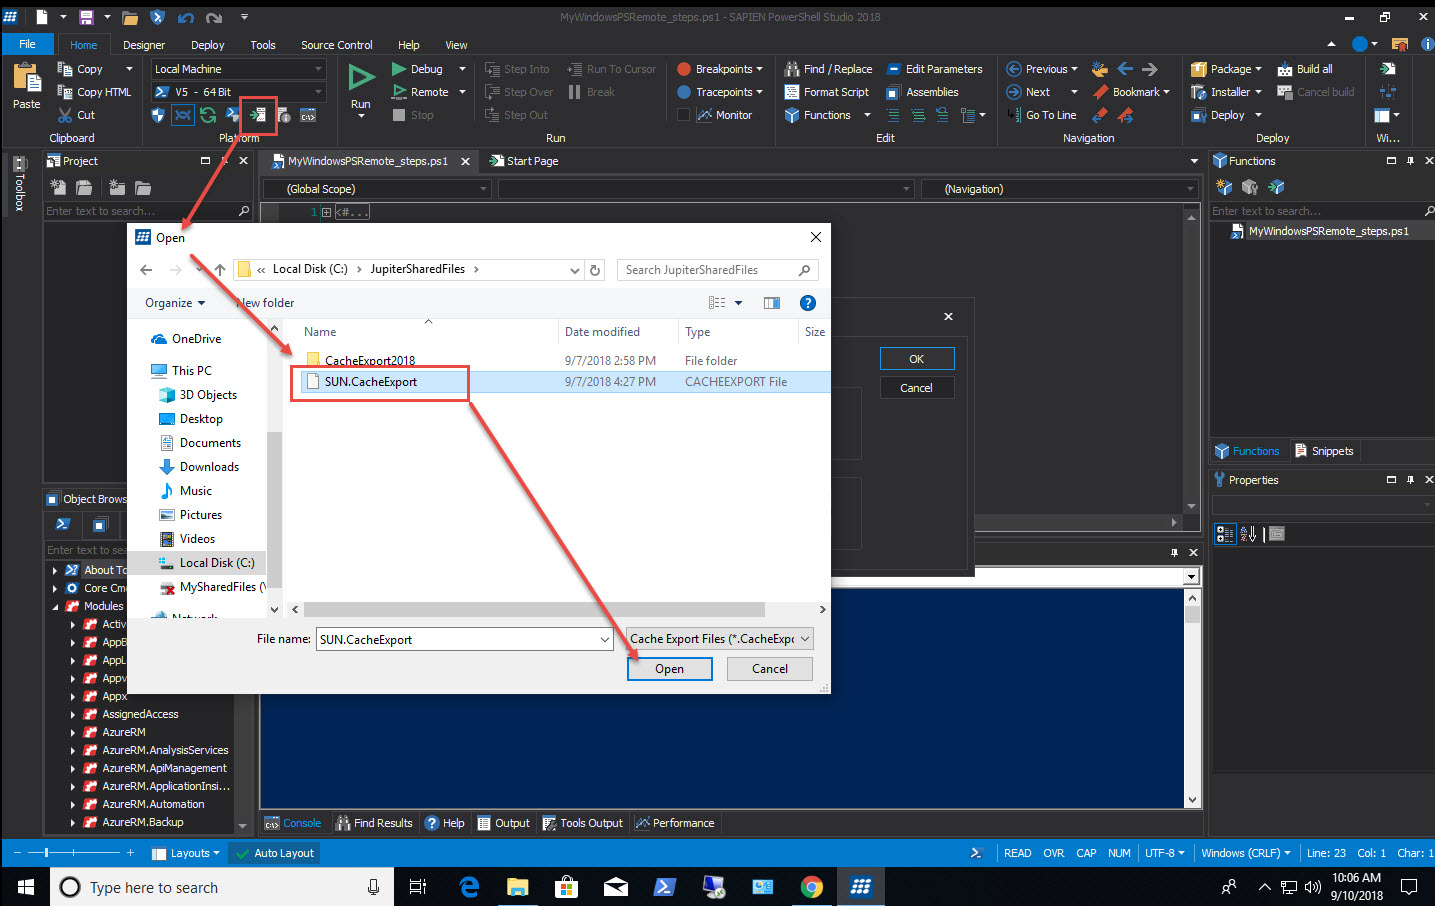
Navigate to the "<servername>.CacheExport" file and click Open:
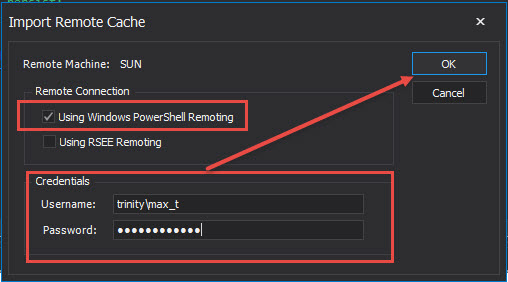
In the Import Remote Cache dialog, select the Using Windows PowerShell Remoting checkbox > enter the user credentials > then click OK:
Access the Exported Cached Modules
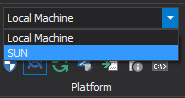
In the Platform section, change the selection from "Local Machine" to the remote system name (e.g., "SUN"):
After selecting the remote system name, the Object Browser panel will refresh and display the Remote System modules as well as any installed snap-ins*:

*Note: PowerShell snap-ins will not be supported in the newer version of PowerShell (> v5).
Now all of the the remote system modules are accessible from the PowerShell Studio Editor.
You can also use the PowerShell Cache Editor to select/deselect modules from the remote system (in the Platform section > select the desired machine > then click the Edit Cache button):
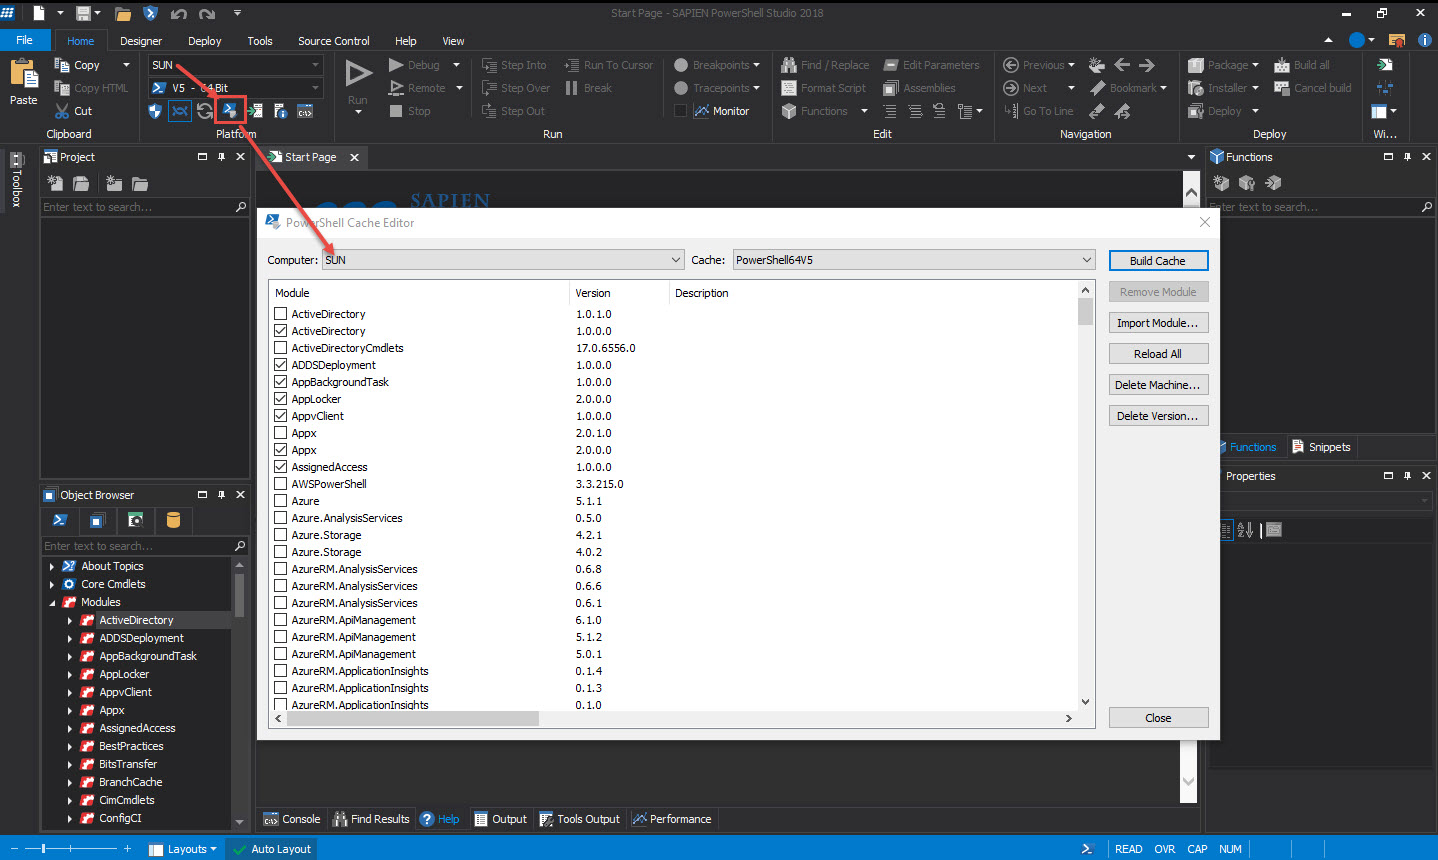
*Note: When selecting a "Computer" from the list in the PowerShell Cache Editor, all checked modules belong to the selected computer.
Related Articles
- Developing PowerShell scripts for other machines
- PowerShell Studio: Cache Editor
- Refreshing Local Cache PowerShell Cmdlets and Modules
PowerShell remoting
This section will show you how to use Windows PowerShell Remoting for remote scripting using PowerShell Studio.
The following topics will be covered:
- Prerequisite for PowerShell Remoting
- Adding Functionality using PowerShell Profile
- PSSession Configuration setup
- PSSession Configuration name
- PowerShell Studio "Remote Console"
- Creating a PSSession Console Host
Prerequisite for PowerShell Remoting
Before we start we need to configure our system to support Windows PowerShell Remote with PowerShell Studio.
First, verify that PowerShell is enabled for Remoting by executing the following one-liner:
Enable-PSRemoting -Force
Note: This command enables the computer to receive remote commands via the WS-Management service.
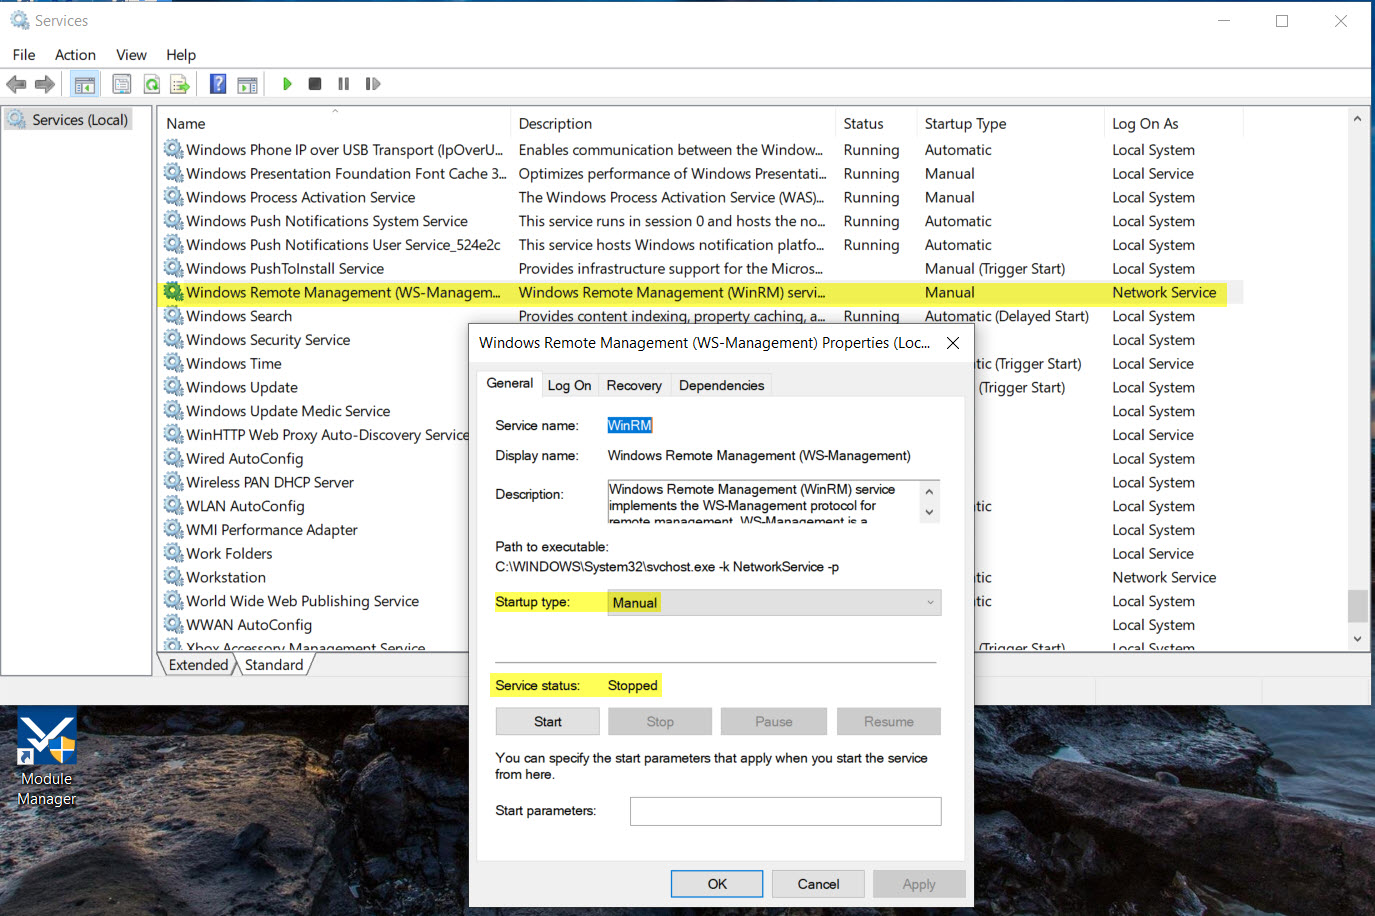
Next, verify that the WS_Management service is running (see image below). By default, this service will remain in Stopped status with the Startup Type set to Manual.
For more information on how to setup PowerShell Remoting, see these PowerShell Help topics:
- about_Remote
- about_Remote_Troubleshooting
## - Display PowerShell Help Topics:
Get-Help about_Remote -Detailed
Get-Help about_Remote_Troubleshooting
Note: Remember that PowerShell help information is available in your system. Execute the "Update-Help -force" command to download PowerShell help topics and cmdlets documentation.
Adding Functionality using PowerShell Profile
Although it is not mandatory to create a PowerShell Profile, it is beneficial when adding your own set of custom functions and also when adding PSSnapin's because they are made available when the PowerShell console is active.
Keep in mind, PowerShell Snap-ins are not modules and are not loaded automatically. If you are considering using a PowerShell Profile, it will be useful to add PowerShell Snap-ins during the PowerShell Remoting sessions in either Windows PowerShell and PowerShell Studio console.
For more information about how to create a Windows PowerShell Profile and .NET Snap-ins, see these PowerShell Help topics:
- about_Profiles
- about_PsSnapins
## - Display PowerShell Help Topics:
Get-Help about_Profiles -Detailed
Get-Help about_PsSnapins
PSSession Configuration setup
These steps will need to take place on the remote system that will be accessed from Windows PowerShell, or from PowerShell Studio Consoles.
- Create a simple PowerShell Profile
- PSSession Startup Script
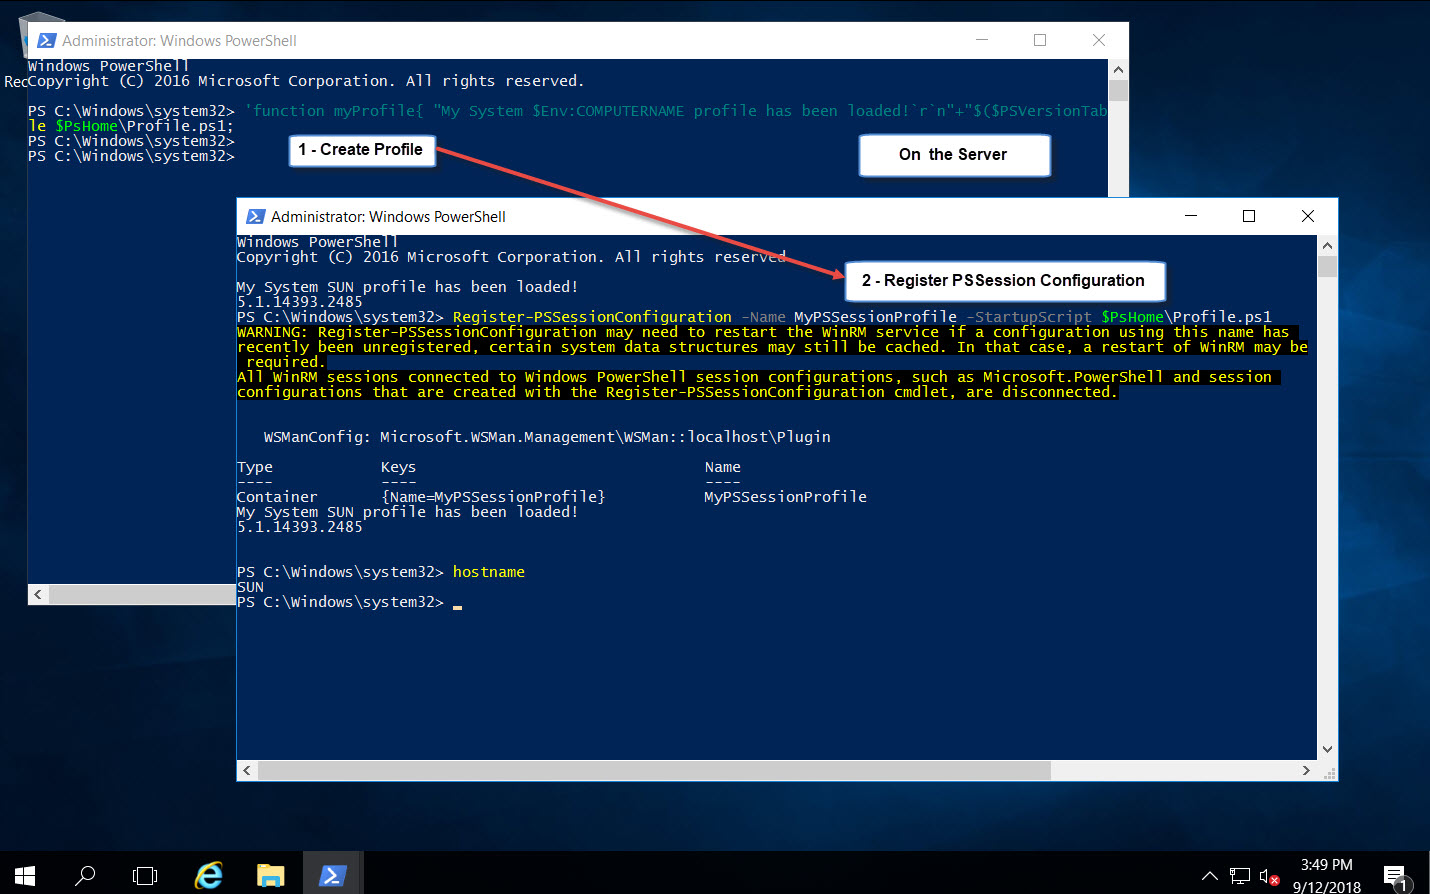
Create a simple PowerShell Profile
The following steps will create a new Windows PowerShell Profile used for All Users and All Hosts. Just make sure to open the Windows PowerShell Console using Run as Administrator:
'function myProfile{ "My System $Env:COMPUTERNAME profile has been loaded!`r`n"+"$($PSVersionTable.PSVersion)"}; MyProfile;' | Out-File $PsHome\Profile.ps1;
PSSession Startup Script
Now, in order for the Windows PowerShell Remote session to automatically load the profile, we need to use the Register-PSSessionConfiguration cmdlet with the ‘-StartupScript‘ parameter to include the location of the profile that we just created:
Register-PSSessionConfiguration -Name MyPSSessionProfile -StartupScript $PsHome\Profile.ps1
For more information about how to create a PSSession configuration, see these PowerShell Help topics:
- Register-PSSessionConfiguration
## - Display PowerShell Help Topics:
Get-Help Register-PSSessionConfiguration
PSSession Configuration name
Finally, using either the Windows PowerShell Console or the PowerShell Studio PowerShell Console, we proceed to create a PowerShell Remote session from our local machine to the remote system. Using the Enter-PSSession cmdlet with the parameter ‘-ConfigurationName' followed by the name we registered in the PSSession configuraiton command. This will load the PowerShell Profile during the remote session.
Use the the following one-liner with the correct system name and credentials in either of the Windows PowerShell or the PowerShell Studio console:
Enter-PSSession -ComputerName W2k16SHP01 -Credential trinity\maxt -ConfigurationName MyPSSessionProfile
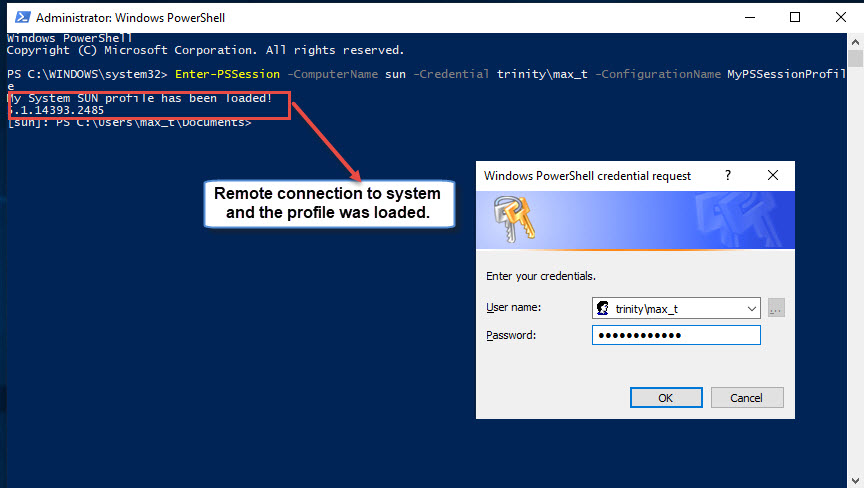
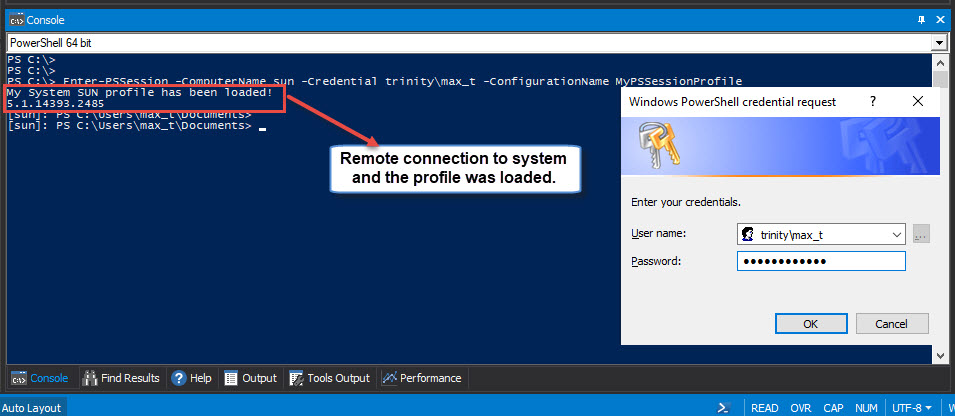
This will verify that we have a successful remote connection to another system via PowerShell Remoting.
PowerShell Studio "Remote Console"
If you don't need to use the PowerShell Profile, PowerShell Studio gives you the ability to do remote scripting thru the Remote Console button found under the Platform ribbon menu.
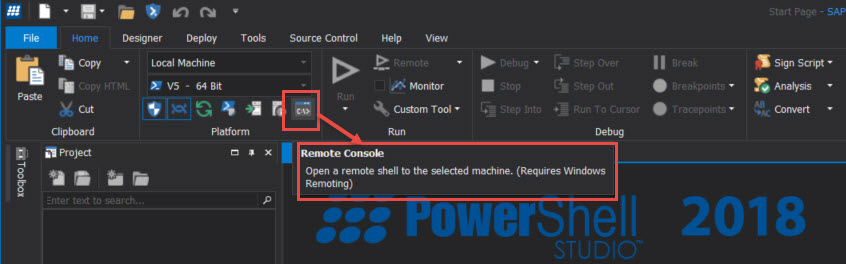
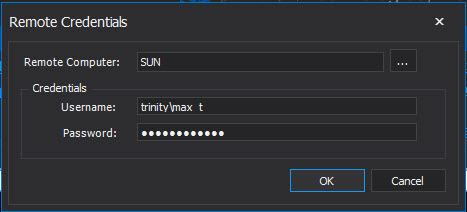
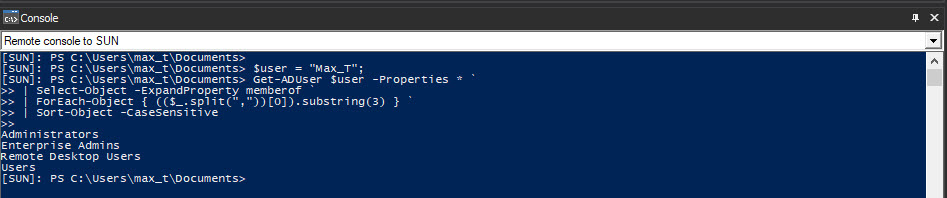
The Remote Console is good for basic system-to-system remoting without the need to create a PSSession configuration name.
Creating a PSSession Console Host
If you're constantly managing multiple systems, it would tedious to perform these steps every time:
- Open a script.
- Type, or highlight the Enter-PSSession one-liner.
- Then, run in console to connect to the remote system.
- Repeat the steps for another system.
PowerShell Studio allows for creating additional Console hosts, and we can create remote connections to individual systems. This can be done using the Options button in the Windows ribbon menu. You can add custom consoles in the Console section.
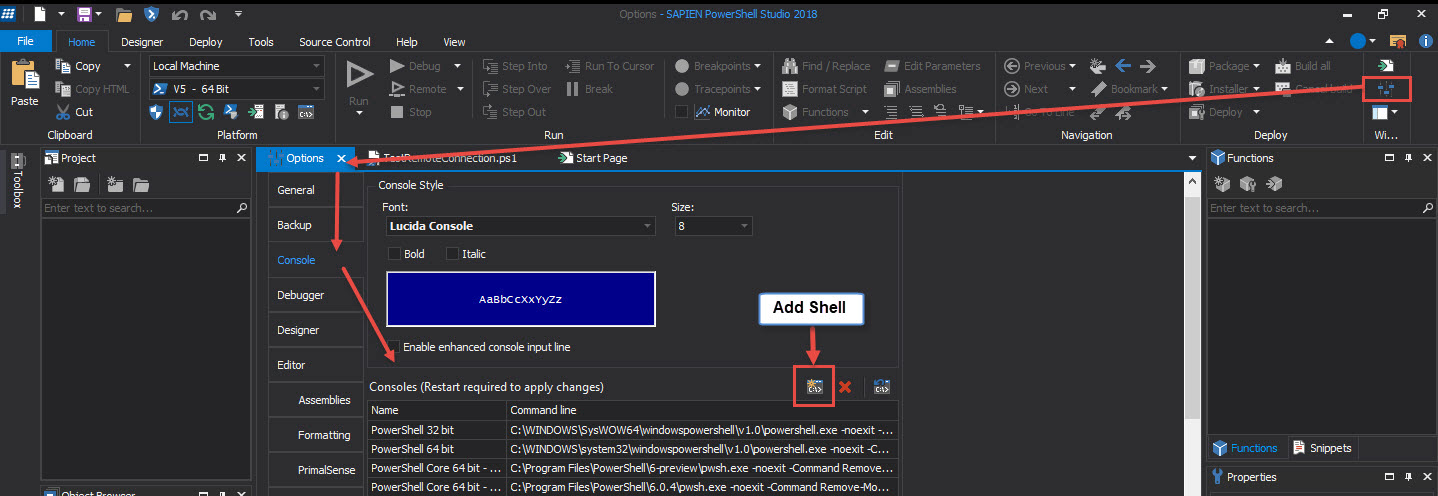
The following sample will be used to create a new console host to remote connect to another system. This will require the name for the Console host, and the command line to execute:
Name: PSSessionToRemoteSystem1
Command line: C:\WINDOWS\system32\windowspowershell\v1.0\powershell.exe -noexit -Command "Enter-PSSession -ComputerName SystemName -Credential Domain\UserName -ConfigurationName MyPSSessionName";
Note: Please notice that the one-liner has the system name and credentials hard coded. Also, the parameter ‘-ConfigurationName' is optional.
When you have added the new console host command line, exit the Option panel and restart PowerShell Studio.
The next time you click on the Console panel, the newly added PSSession Console is available in the console drop-down list:


Select the newly added console "MyPSSessionXXX", and this will remote connect to the other system.

Conclusion
You need to properly configure and test your Windows PowerShell environment to support PSRemoting before you start working with PowerShell Studio against remote systems. Taking advantage of the PowerShell Help documentation and PowerShell Studio features will assist in extending both your local and remote scripting to work interactively with PowerShell on any system.
Note: The overall concept explained in this article can be applied to our PrimalScript editor.
Related Articles
For licensed customers, use the forum associated with your product in our Product Support Forums for Registered Customers.
For users of trial versions, please post in our Former and Future Customers - Questions forum.