The Progress Bar
- Details
- Written by Max Trinidad
- Last Updated: 09 October 2019
- Created: 27 March 2019
- Hits: 25450
User Rating: 4 / 5


Displaying Script Progress in GUI Applications
Sometimes a script can take time to complete a task and we need a way to display this in our GUI application. We can add a visual aid to help us see the progress of our script.
There are a number of ways to accomplish this:
- Write the results to a text file.
- Write the results to a database table.
- Display the results in a text or label box in our GUI form.
You can also use the available progress control objects and script commands in your solution:
- Progress Bar Control
- Progress Bar Overlay Control
- ToolStrip Control
- StatusStrip Control
- Write-Progress (non-graphical progress bar for console scripting)
All of these controls enable the GUI application to display the progress of the script during execution.
Once you learn to use one, it is easy to use the others since they have most of the same .NET properties and methods for handling the progress bar animation.
To learn more about these properties and methods, check out the following article on the ProgressBar Control.
Progress Bar Display Options
The following images show some options for using the progress bar controls. These can be the starting point for building either simple or complex forms. The complexity is up to you—be creative!
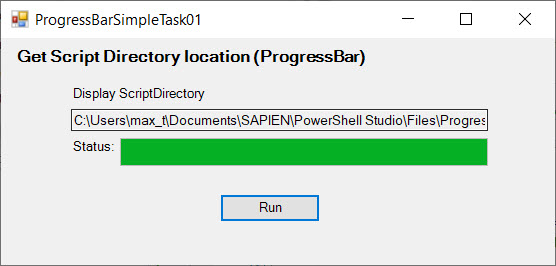
Using the "Progress Bar" control in it's simplest form, and in a multi-task progress:
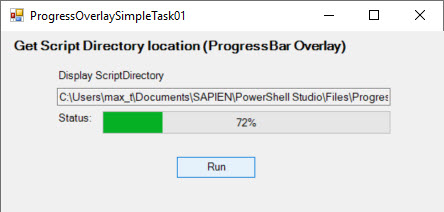
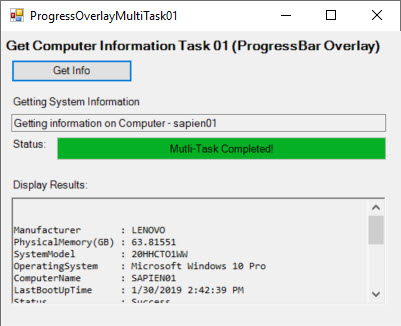
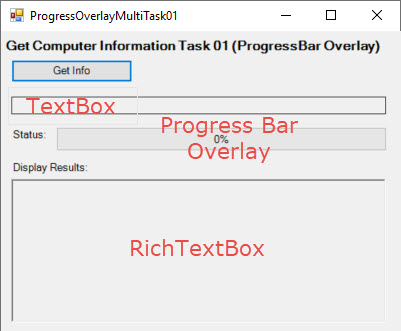
Using the "Progress Bar Overlay" control gives a better notion of completion by adding text to the progress bar:
All of the above GUI forms were created manually. The GUI templates provided with PowerShell Studio can save development time and can also provide ready-to-use code that can be easily modified.
The images below provide examples of the progress bar control added to a pre-existing template.
When you use either the "StatusStrip" or "ToolStrip" control, the progress bar will be added to a specific location on the form. When the "StatusStrip" control is used, the Progress Bar is placed at the bottom of the form:
![]()
When the "ToolStrip" control is used, the Progress Bar is placed at the top of the form:
![]()
Using either the "Progress Bar" or "Progress bar Overlay" control gives you the ability to add the control anywhere on the form:
![]()
If you want to provide a non-graphical progress bar for a console script solution, use the "Write-Progress" cmdlet. For more information and an example, run the following command:
Get-Help Write-Progress -detailed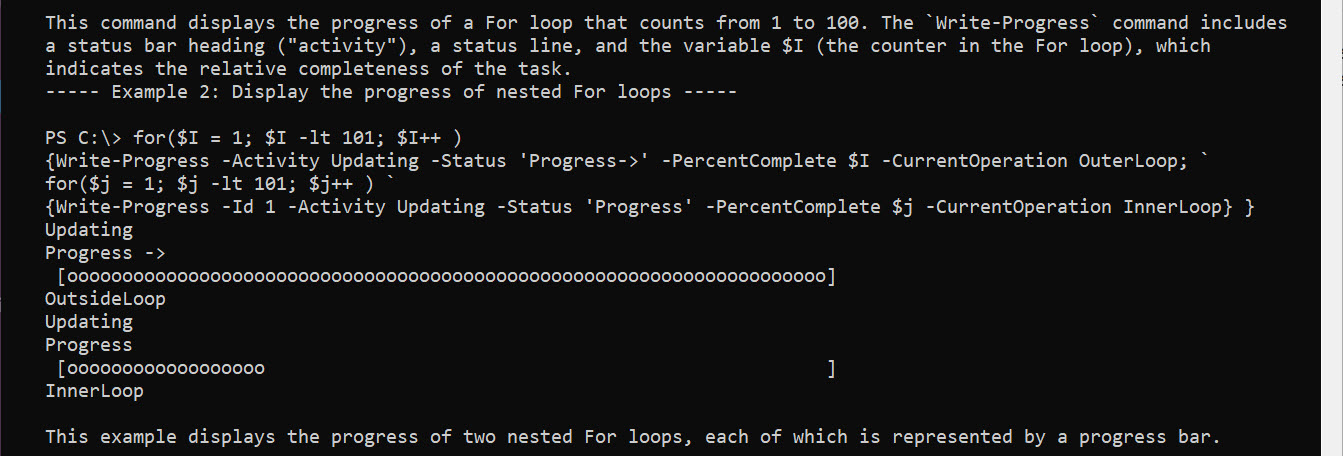
Keep in mind that using the "Write-Progress" cmdlet is host dependent—when packaging the application, it won't work when using either "Silent Engine" or "Windows Form" in a GUI application.
By using any of these controls (or cmdlet) and a few lines of code, we can add the visual aid to help us see what's going on with our script progress.
Notice that when executing the progress bar in a GUI application, it will become unresponsive until it completes processing the code behind the control. If there is a requirement to give a user the ability to interrupt or cancel the progress operation, you need to build a responsive form.
Check out these articles for information on making a responsive GUI:
For an example of a "Responsive Form", see "Handling Steps Progress with a Background Job in a GUI Application".
Handling Progress with Notion of Completion in a GUI Application
Here we cover handling a script's task progress with the notion of completion by using a "Progress Bar" control in a GUI application to provide a visual presentation of what is processing.
Backup Files GUI Scenario
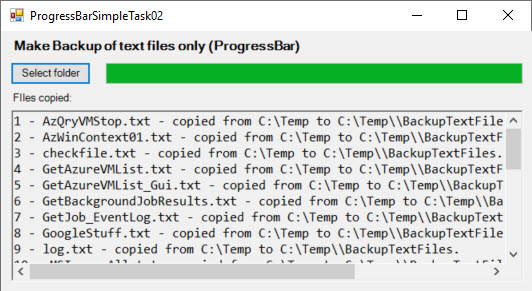
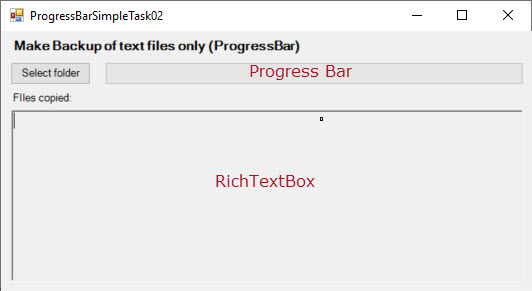
In this scenario, we will develop a GUI application that creates a backup folder that will copy a series of files from a selected folder. This application will include a progress bar to visually show the progress while copying the files.
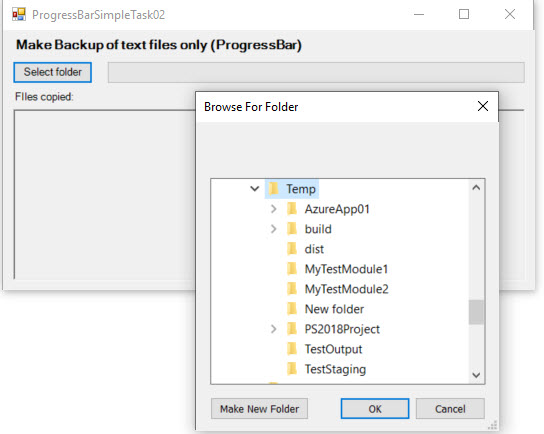
This application will prompt the user to select the location of the folder containing all text files to be backed up, and it will automatically create the backup folder in the selected folder. "Progress Bar" and "RichTextBox" controls have been added to the form to show what is going on during the process.
The combination of using both controls gives us the notion of completion in our GUI application.
"Select Folder" Button Control
To make the progress bar work, we added the necessary code behind the "Select folder" button control event. The GUI application will prompt to select the folder containing the files to backup before starting the backup step. These files will be copied to a predefined backup folder-name in the chosen folder location.
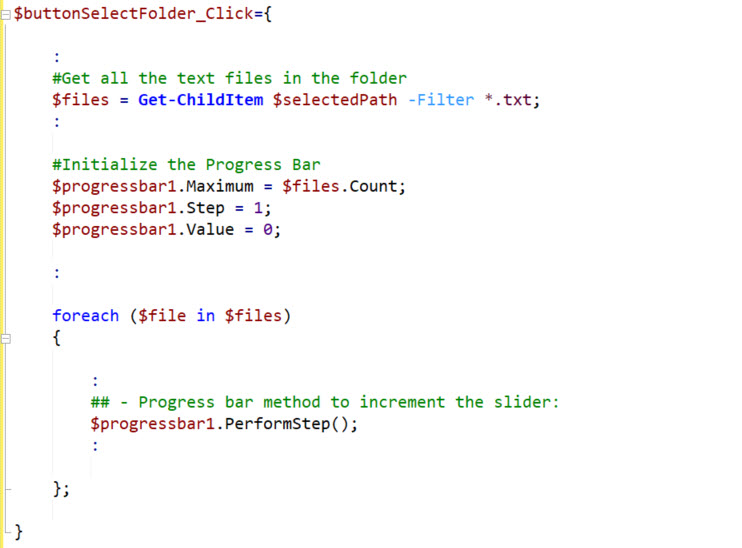
After selecting the folder, we save the total number of files.
:
#Get all the text files in the folder
$files = Get-ChildItem $selectedPath -Filter *.txt;
:
Next, we use the saved total files to initialize the progress bar Maximum property. Then we initialize all other properties before starting to display the progress activity.
#Initialize the Progress Bar
$progressbar1.Maximum = $files.Count;
$progressbar1.Step = 1;
$progressbar1.Value = 0;
The progress bar will start with Value property = 0, and use the Step property to increment that Value by 1 when executing the for-each loop. The progress bar will start to increment.
#Copy the files and update the progress bar
$cnt = 1;
foreach ($file in $files)
{
Copy-Item ('{0}\\{1}' -f $selectedPath, $file) -Destination $destination;
$copiedfiles = "$cnt - $($file.name) - copied from $($selectedPath) to $($destination).";
$richtextbox1.AppendText(($copiedfiles | Out-String -Width 1000));
$cnt++;

## - Progress bar method to increment the slider:
$progressbar1.PerformStep();

};
Inside the foreach(..) loop logic, every time the PerformStep() method executes after the copy step the progress bar will increment by 1, as defined in the Step property.
While the GUI application is executing, we can see the progress bar increment as the files are copied to the selected backup folder. At the same time, we can see the information being updated in the RichTextBox area:
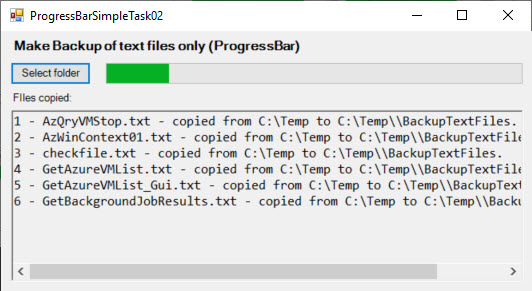
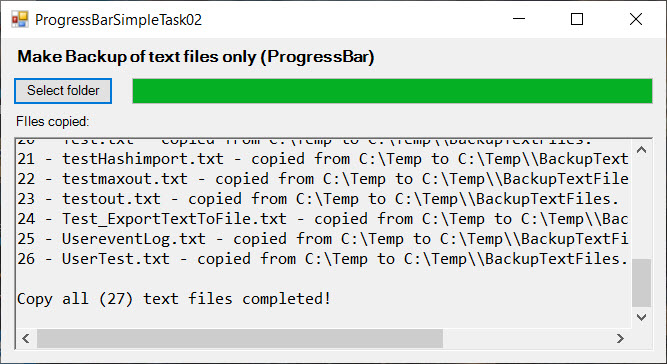
All of this done is done with just a few lines of code.
Summary
To make the progress bar work, we need to initialize the Maximum value to the total amount of the files being copied. Then we use the PerformStep() method to increment the progress bar.
Below is a general view of the logic used in the progress bar sample:
Download Progress Bar sample form: ProgressBarSimpleTask02.zip
Handling Progress Status Information in a GUI Application
Now we are going to take a more in-depth look at the "Progress Bar Overlay" control. This control allows us to display text in the progress bar while processing the script in the application.
Getting Computer Information Scenario
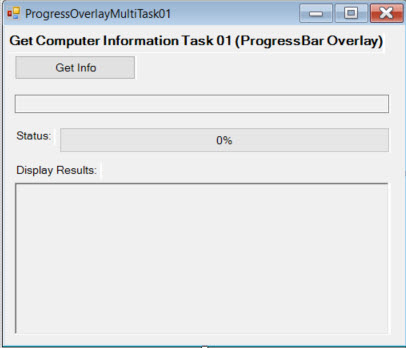
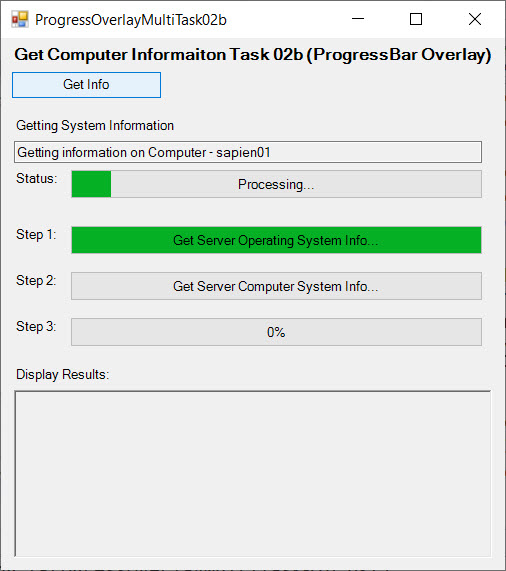
In this GUI application, we will retrieve some system information and at the same time display each data collection step of the process by using the "Progress Bar Overlay" control.
As the script steps execute, the TextBox control will show the computer name for the data that is being collected. Next, the progress bar will increment as the different script steps complete, and then the RichTextBox control will display the results.
"Get Info" Button Control
The "Progress Bar Overlay" control contains the TextOverlay property, where you can add a text string that will display as the progress bar increments during script execution.
The script's processing takes place in the code behind the "Get Info" button control. The text box will display the system from which the data is being collected. The computer names are stored in a string array, and then the for-each loop will pick one computer name at a time.
In this scenario, to get the progress bar Maximum property value, we get the total count of items in the array and then multiply by the number of steps. The Step property is set to 1 which will allow the Perform() method to increment the bar by 1. Using the Start-Sleep cmdlet helps to provide a delay of 1 second to display the "Processing…" text in the progress TextOverlay property, which allows us to see the progress bar increment while executing the script steps in the for-each loop logic.
:
## - Set list of systems:
$svrList = @("$($env:COMPUTERNAME)", "$($env:COMPUTERNAME)");

## - TextOverlay before executing function:(Array count * number of steps)
$progressbaroverlay1.Maximum = $svrList.Count * 3;
$progressbaroverlay1.Step = 1;
$progressbaroverlay1.Value = 0;
$progressbaroverlay1.TextOverlay = "Processing...";
Start-Sleep -Seconds 1;
:
Then, inside the for-each loop in each of the script step's sections, the following progress bar actions are performed:
- The progress bar TextOverlay property displays the step text.
- The script step executes.
- The progress bar PerformStep() method visually increments the bar.
- The Start-Sleep cmdlet at the end of each step gives a slight delay allowing the progress bar to display the script step text.
:
## - Foreach to get system information:
$global:SvrObj += foreach ($name in $svrList)
{
## - Get Computername:
$textbox1.Text = "Collecting information from Computer - $name";

## - Script Step 1:
$progressbaroverlay1.TextOverlay = "Step 1: Get Server Operating System Info...";
$x = get-wmiObject -Class Win32_OperatingSystem -Computername $name `
-ErrorAction 'SilentlyContinue' -ErrorVariable MyError;

$progressbaroverlay1.PerformStep();
Start-Sleep -Seconds 1;

## - Script Step 2:
$progressbaroverlay1.TextOverlay = "Step 2: Get Server Computer System Info...";

$x1 = get-wmiObject -Class Win32_ComputerSystem -Computername $name `
-ErrorAction 'SilentlyContinue' -ErrorVariable MyError;

$progressbaroverlay1.PerformStep();
Start-Sleep -Seconds 1;
## - Script Step 3:
$progressbaroverlay1.TextOverlay = "Step 3: Create $name PSObject ...";

## - Build PSCustomObject:
[PSCustomObject]$SystemInfo = New-Object PSObject -Property @{
ComputerName = $x.csname;
OperatingSystem = $x.Name.Split('|')[0];
LastBootUpTime = $x.ConvertToDateTime($x.LastBootUpTime);
Status = "Success";
Manufacturer = $x1.manufacturer;
SystemModel = $x1.model;
'PhysicalMemory(GB)' = [float]($x1.TotalPhysicalMemory/1gb);
} -ErrorVariable MyError; $SystemInfo

$progressbaroverlay1.PerformStep();
Start-Sleep -Seconds 1;
};
: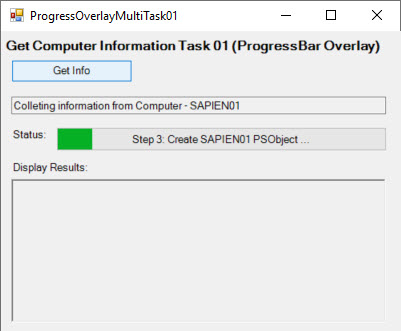
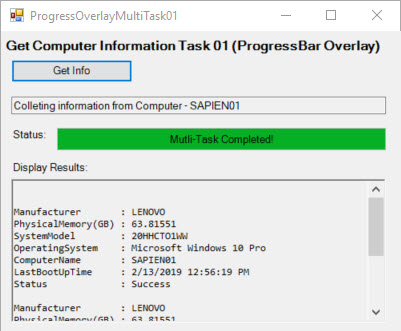
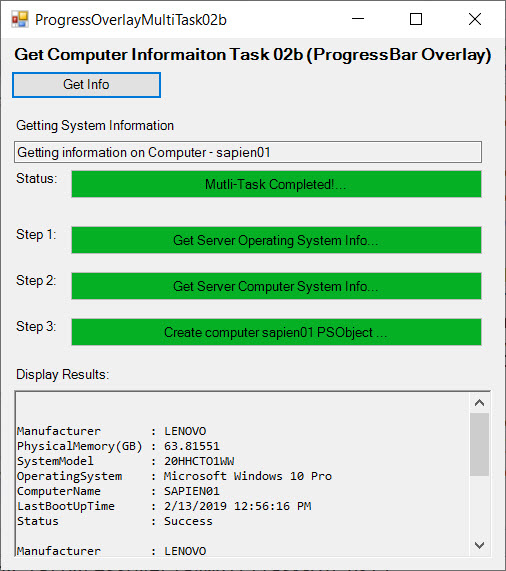
Now we can see the progress bar increment and display the text for the script step that has executed.
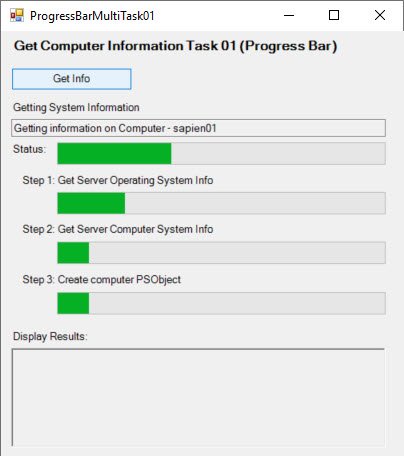
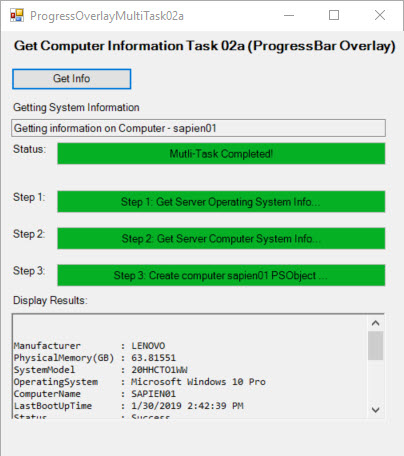
Another variation for this scenario is to use multiple progress bars while executing a series of script steps. This involves modifying the form to display overall progress and also individual step progress while collecting information from each system.
As you can see, there are different ways that your application can display progress.
Summary
The scenario outlined above follows the same coding approach as the previous post in the series, except here we are executing a series of script steps. Additionally, using the progress bar overlay allows us to provides details about what is happening by displaying text as the progress bar increments.
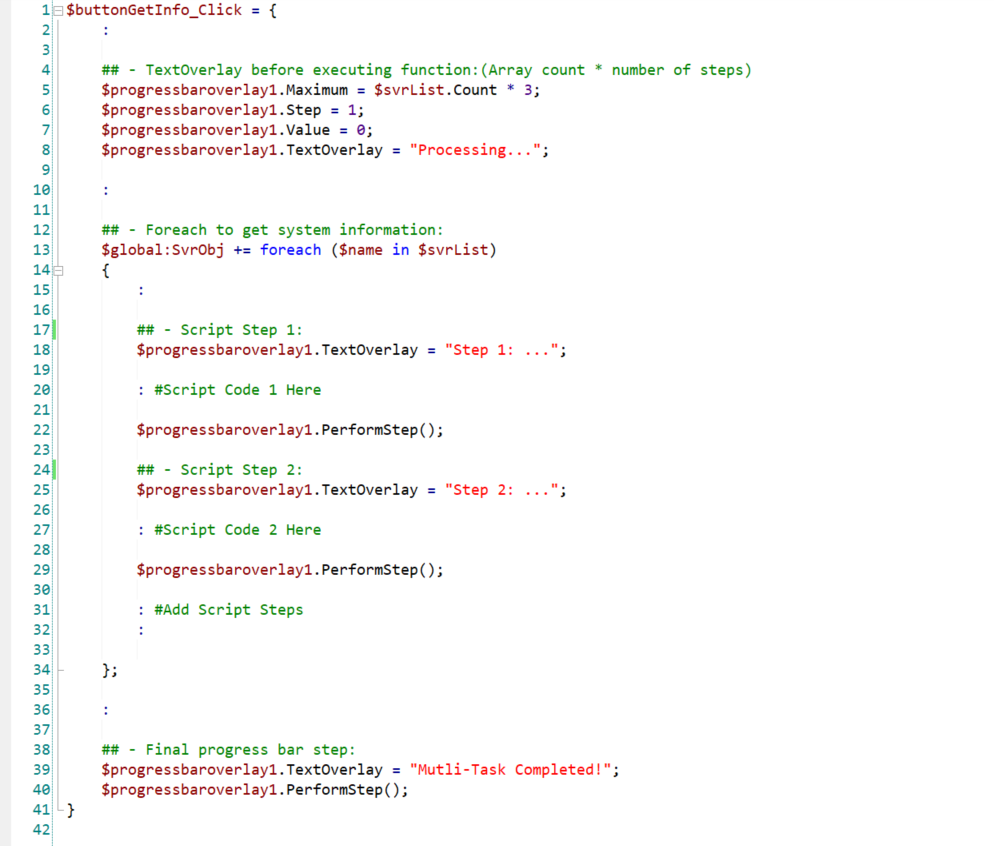
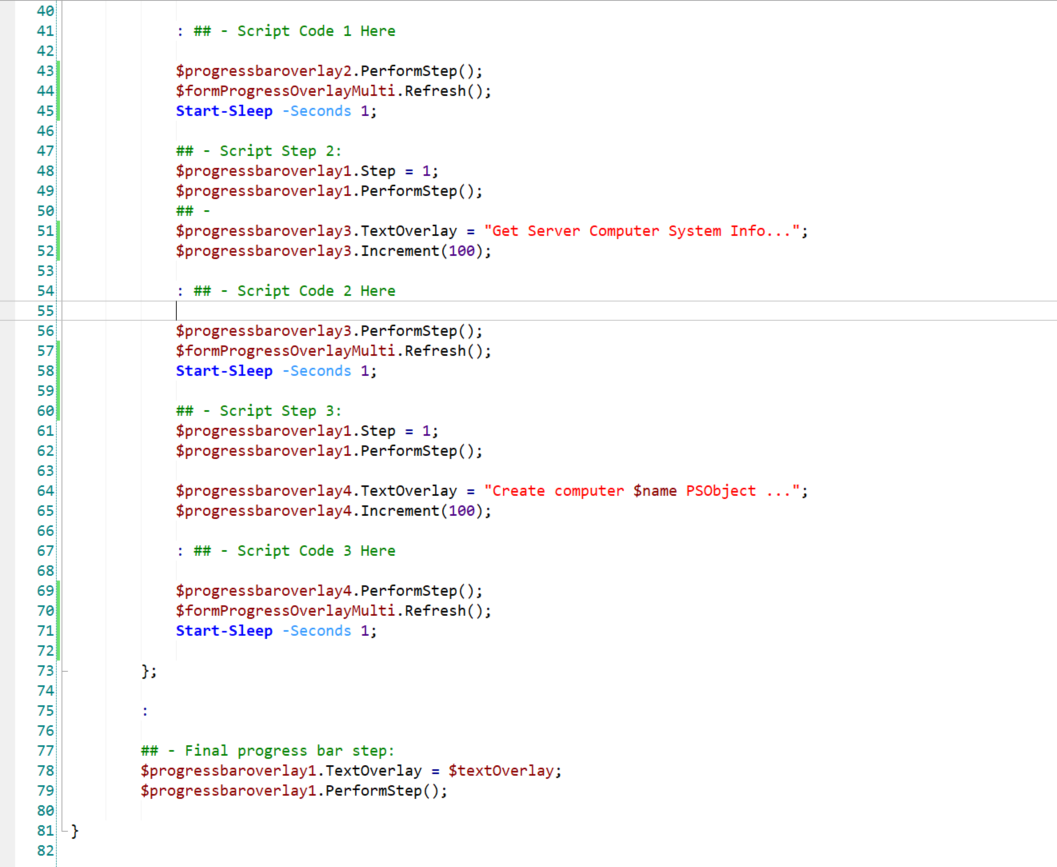
Here is a general view of the logic used in the progress bar overlay sample:
Download Progress Bar Overlay sample form: ProgressOverlayMultiTask01.zip
Here is the multi-steps progress bar code overview:
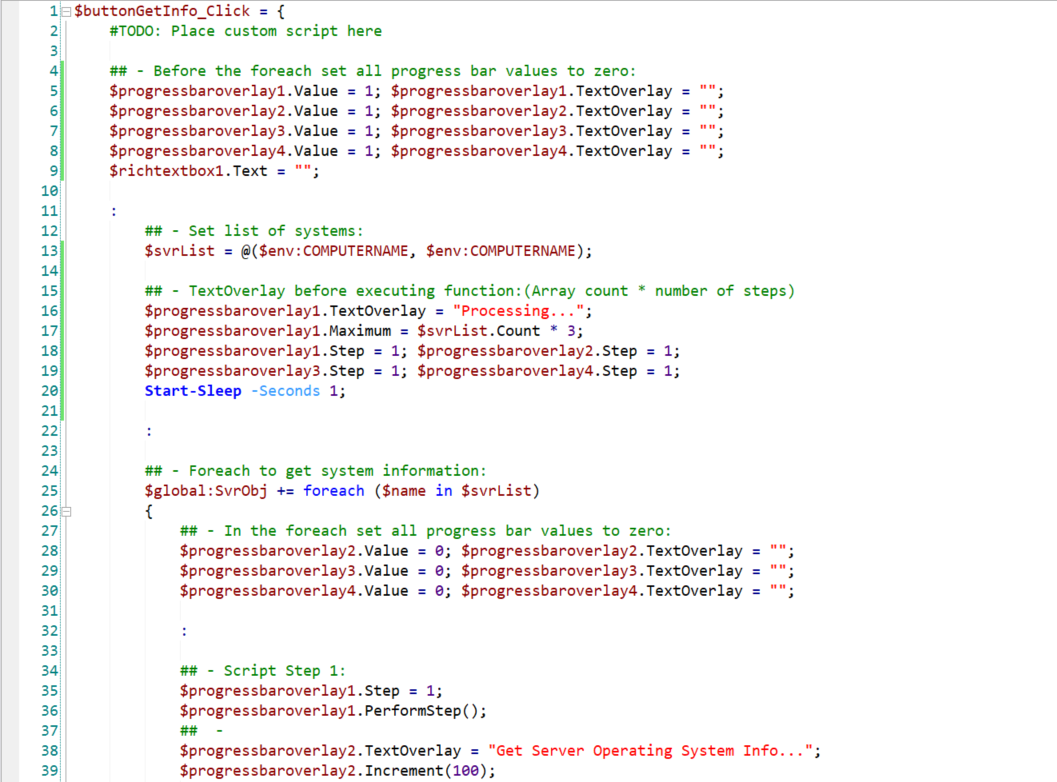
Download the multi-steps progress bar sample form: ProgressOverlayMultiTask02.zip
Handling Steps Progress with a Background Job in a GUI Application
In this section, we integrate a progress bar control in a GUI application that submits a job for background processing. We also demonstrate how to interrupt the running job.
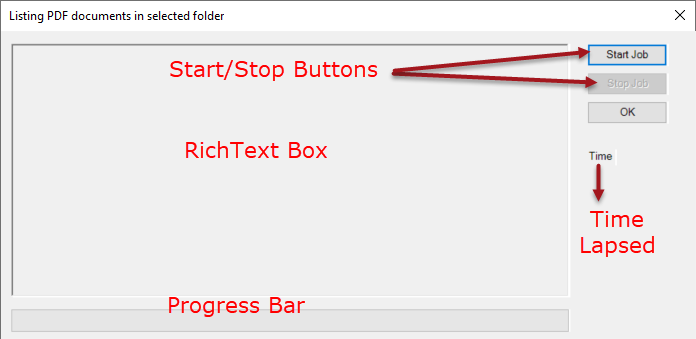
GUI Application for Listing PDF Documents
In this scenario, we show the use of the progress bar while processing a background job. This application is an example of a "responsive" form which prevents the form from freezing during job execution. The form also provides an option to interrupt the job at any time and includes a time-lapse display.
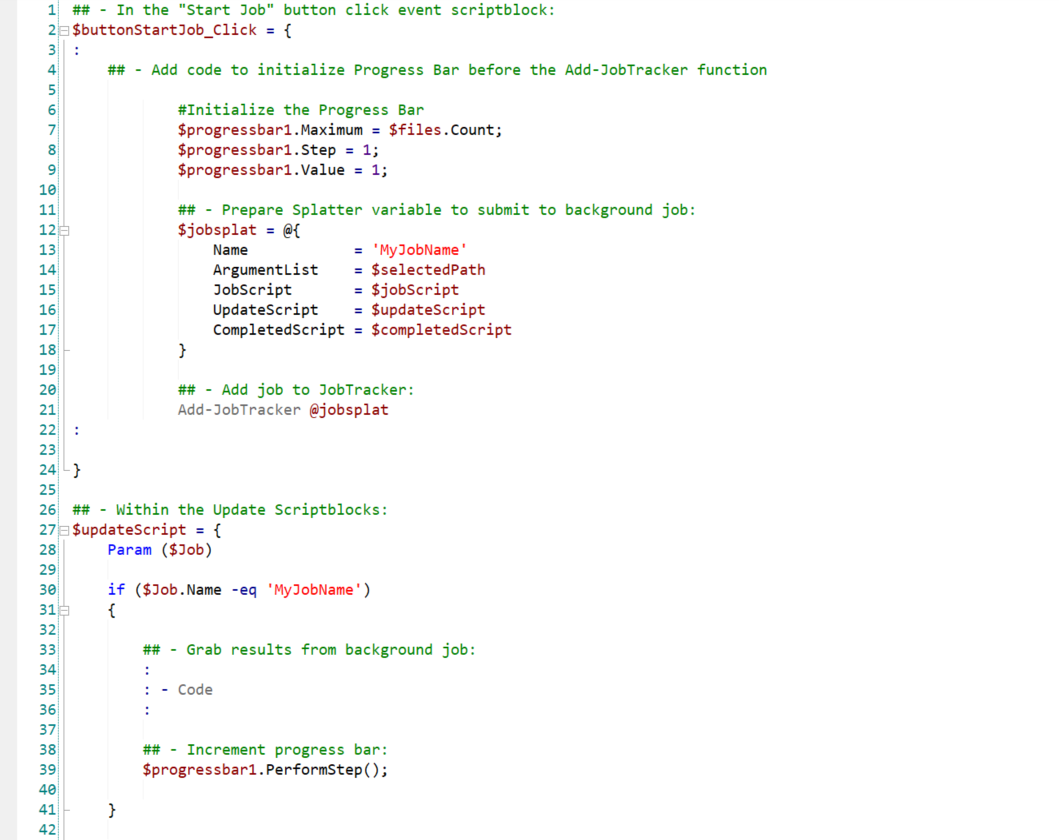
"Start Job" Button Control
In the "Start Job" button control script block, we add the code to initialize the progress bar properties after a folder is selected.
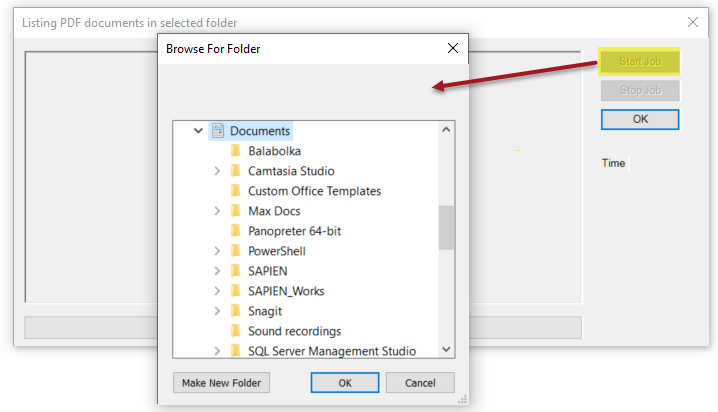
After selecting a folder containing PDF files, we get the total number of files and use that in the Progress Bar Maximum property. Then we initialized both Step and Value properties to 1.
#Initialize the Progress Bar
$progressbar1.Maximum = $files.Count;
$progressbar1.Step = 1;
$progressbar1.Value = 1;
In the "Start Job" button script block, we use our Add-JobTracker Helper function. The following parameters are defined in this function to handle the background job process:
- Name – The Job-Name for the running job.
- ArgumentList – (Optional) A single value or an array of values to pass as an Argument to the job.
- JobScript – The script code that will be sent to run the background job.
- UpdateScript – The script code used to update what is going on with the background job.
- CompletedScript – The script code that will execute when the background job completes processing.
A splatting variable is created holding the parameter's value to be passed to the Add-JobTracker function:
#Initialize the Progress Bar
$progressbar1.Maximum = $files.Count;
$progressbar1.Step = 1;
$progressbar1.Value = 1;

## - Prepare Splatter variable to submit to background job:
$jobsplat = @{
	Name		    = 'MyJobName'
	ArgumentList    = $selectedPath
	JobScript	    = $jobScript
	UpdateScript    = $updateScript
	CompletedScript = $completedScript
}
At this point, the function will submit the job for processing in the background.
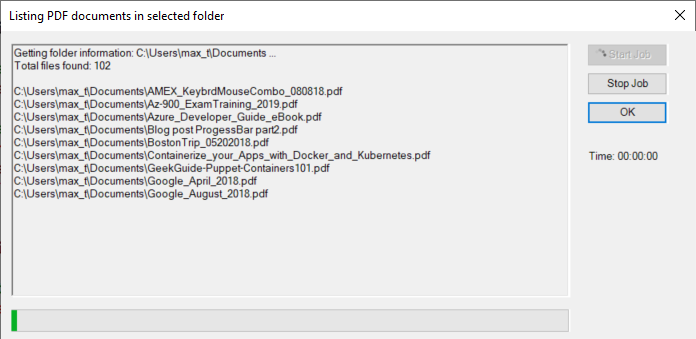
During Job Processing
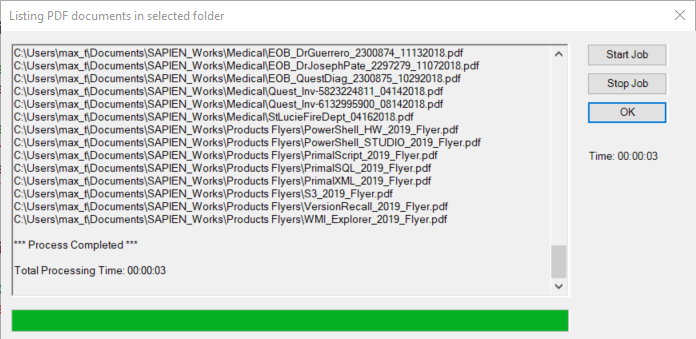
While the job is processing in the background, the PDF files in the selected folder are being displayed in the output "RichTextBox" control, the timer is counting, and the progress bar increments while processing.
All of this action is being handled by the "UpdateScript" script block section in the Add-JobTracker function:
$updateScript = {
Param ($Job)
if ($Job.Name -eq 'GetFiles')
{
## - Grab results from background job:
$results = Receive-Job -Job $Job
$richtextbox1.Lines += $results | select -ExpandProperty Fullname
## - Make the text scroll-up while processing:
$richtextbox1.SelectionStart = $richtextbox1.Text.Length
$richtextbox1.ScrollToCaret()
## - Increment progress bar:
$progressbar1.PerformStep();
}
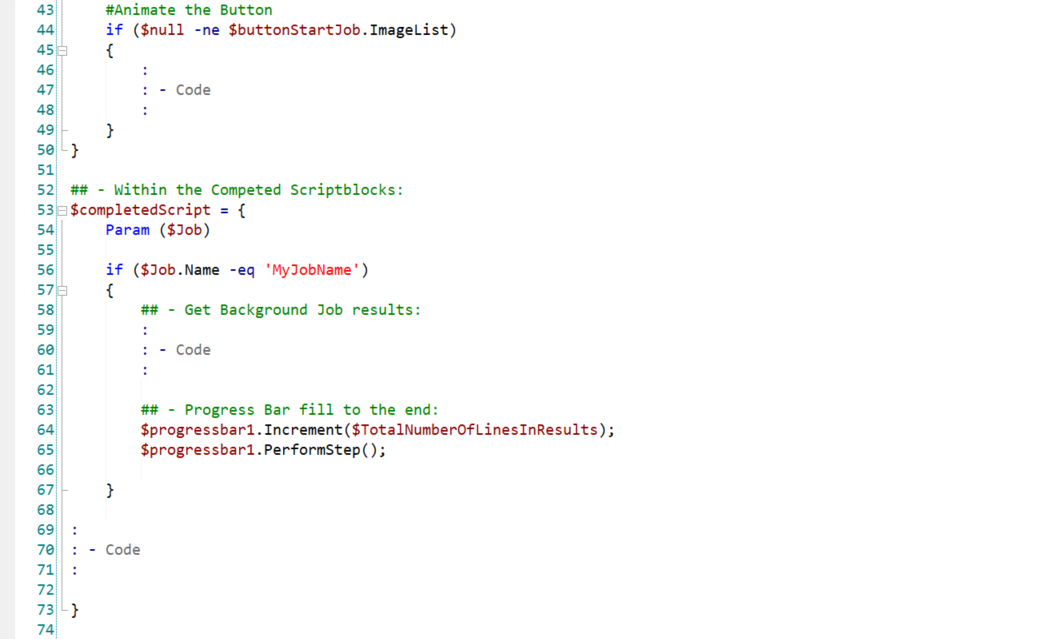
#Animate the Button
if ($null -ne $buttonStartJob.ImageList)
{
if ($buttonStartJob.ImageIndex -lt $buttonStartJob.ImageList.Images.Count - 1)
{
$buttonStartJob.ImageIndex += 1
## - Code to Display Time Elapsed:
$CurrentTime = $Script:Time.Elapsed;
$DisplayTime = $([string]::Format("Time: {0:d2}:{1:d2}:{2:d2}",
$CurrentTime.hours,
$CurrentTime.minutes,
$CurrentTime.seconds));
$labelTime.Text = $DisplayTime;
}
else
{
$buttonStartJob.ImageIndex = 0
}
}
}In this section, the progress bar method PerformStep() will trigger the bar to increment.
When the background job ends, the "CompletedScript" script block section executes. At this point, the total number of PDF files found will display in the "RichTextBox" output area, the total duration of the process will be displayed, and the progress bar will increment to completion.
$completedScript = {
	Param($Job)

	if ($Job.Name -eq 'GetPDFFiles')
	{
		## - Get Background Job results:
		$results = Receive-Job -Job $Job;
		$richtextbox1.Lines += $results | select -ExpandProperty Fullname;

		## - Display Process Stopped text:
		$richtextbox1.AppendText(("`r`n`r`n*** Process Completed ***`r`n"));

		## - Display processing time:
		$richtextbox1.AppendText("`r`n" + "Total Processing $($labelTime.Text)" + "`r`n");

		## - Scroll top end of lines:
		$richtextbox1.SelectionStart = $richtextbox1.Text.Length + 4;
		$richtextbox1.ScrollToCaret();

		## - Progress Bar fill to end:
		$progressbar1.Increment($richtextbox1.Text.Length);
		$progressbar1.PerformStep();

   }

	#Enable the Button
	$buttonStartJob.ImageIndex = -1
	$buttonStartJob.Enabled = $true

}
In this section, we use the progress bar method PerformStep() to help complete the bar.
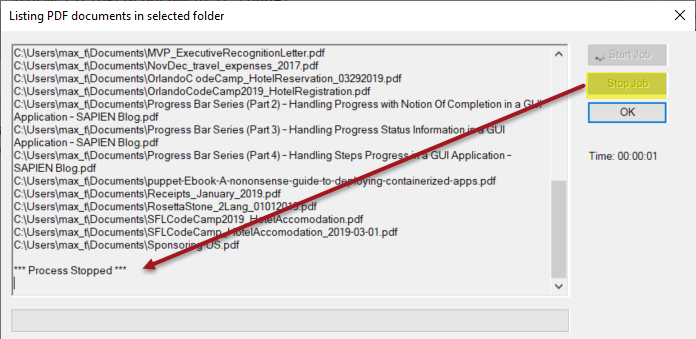
Interrupt the Job
This application includes the ability to stop the job with the "Stop Job" button control. When the job is stopped, the progress bar will stay idle without any increments.
In the "Stop Job" control, both progress bar Value and Step properties are set to 0:
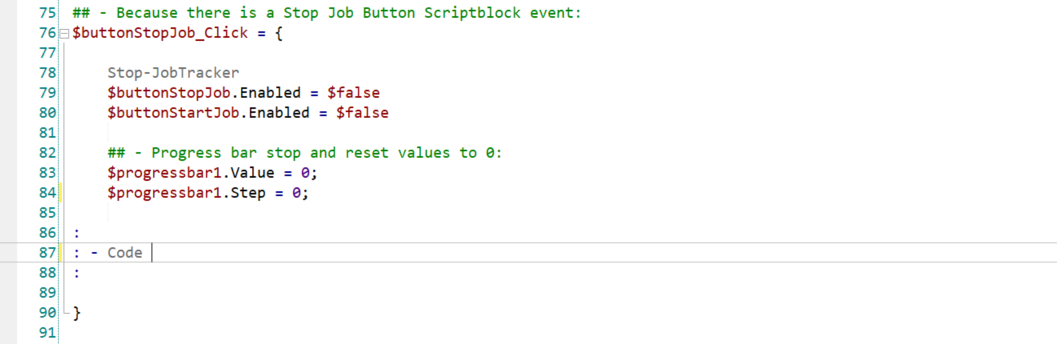
$buttonStopJob_Click = {

	Stop-JobTracker
        $this.Enabled = $false
	$buttonStartJob.Enabled = $false

	## - Progress bar stop and reset values to 0:
	$progressbar1.Value = 0;
	$progressbar1.Step = 0;

	## - Process Abort text:
	$richtextbox1.AppendText(("`r`n`r`n*** Process Stopped ***`r`n"));
}
As you can see, it was simple to integrate the progress bar properties in the Add-Tracker function script block with the button controls.
Summary
We have shown how to integrate the progress bar in a "responsive" application that is handling a background job, with the ability to interrupt the job.
Below is a general view of the logic used in this GUI application sample:
Download Progress Bar sample form: ProgressBarJobTracker_wStopOption1.zip
Display Progress in a non-GUI Script
Last, but not least we take a look at the Write-Progress cmdlet, which can be used to display task progress in a non-GUI script. This cmdlet is available in Windows PowerShell and PowerShell Core (cross-platform).
Windows PowerShell
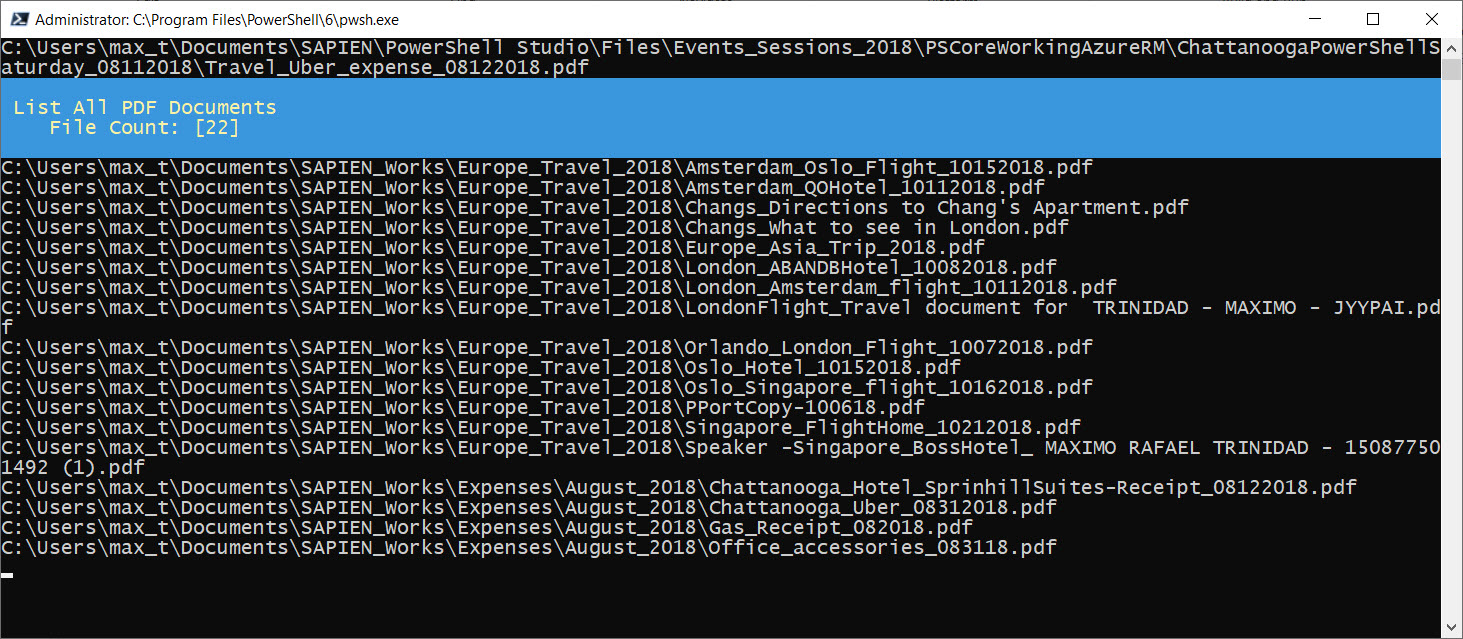
PowerShell (Core) – Windows OS
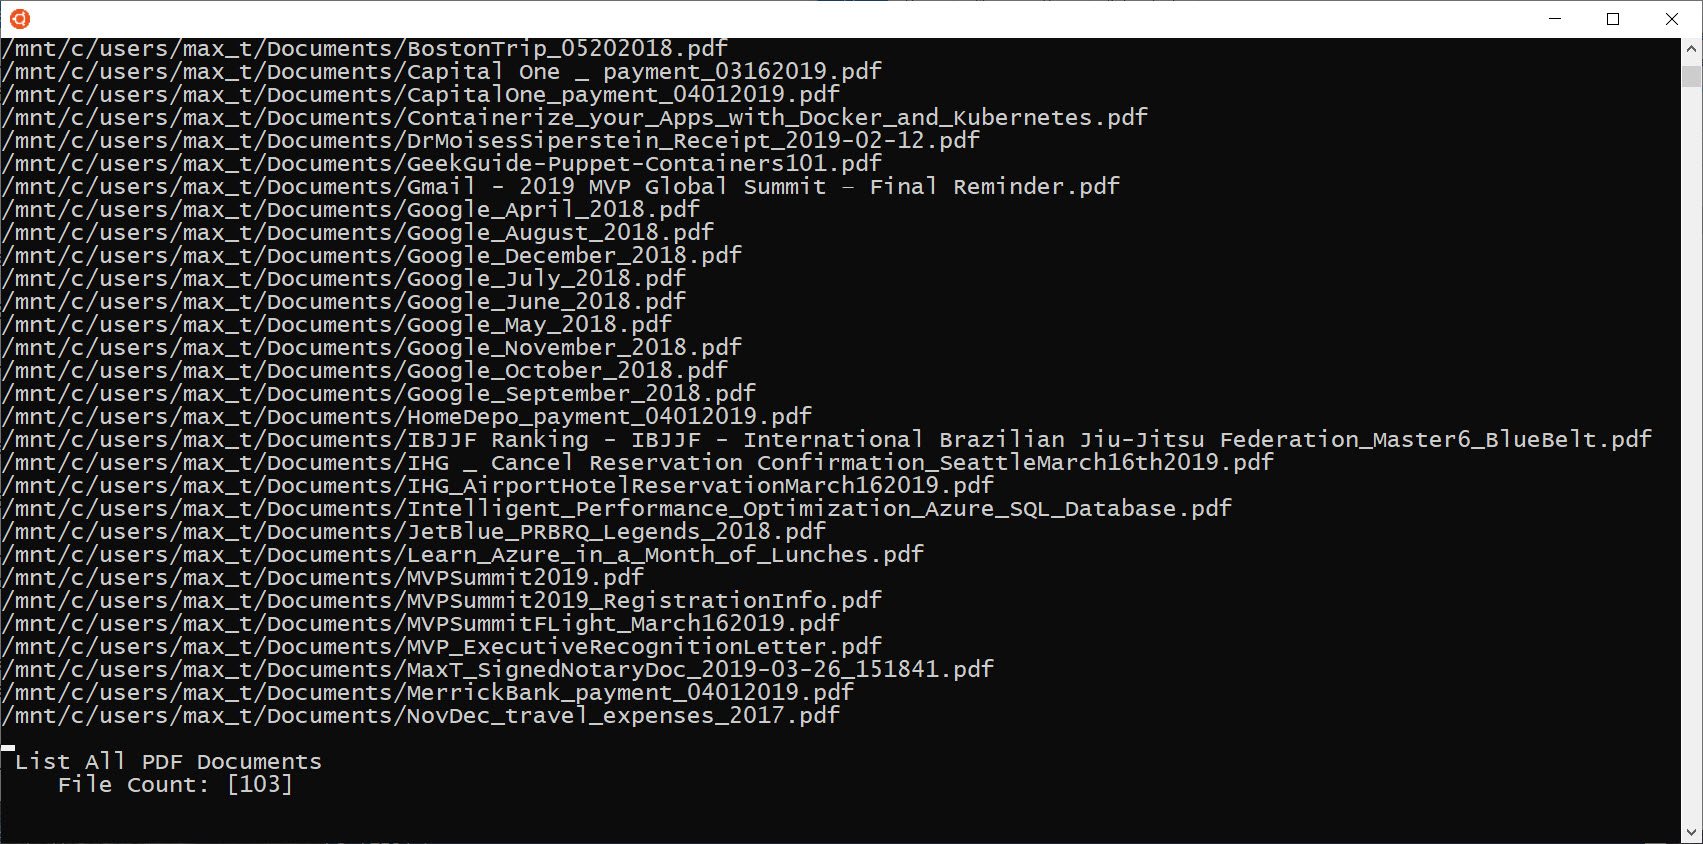
PowerShell (Core) – Linux
There are two essential ways to use this use this cmdlet:
- Display the progress with text only.
## - Sample where item counts exceeds 100:
:
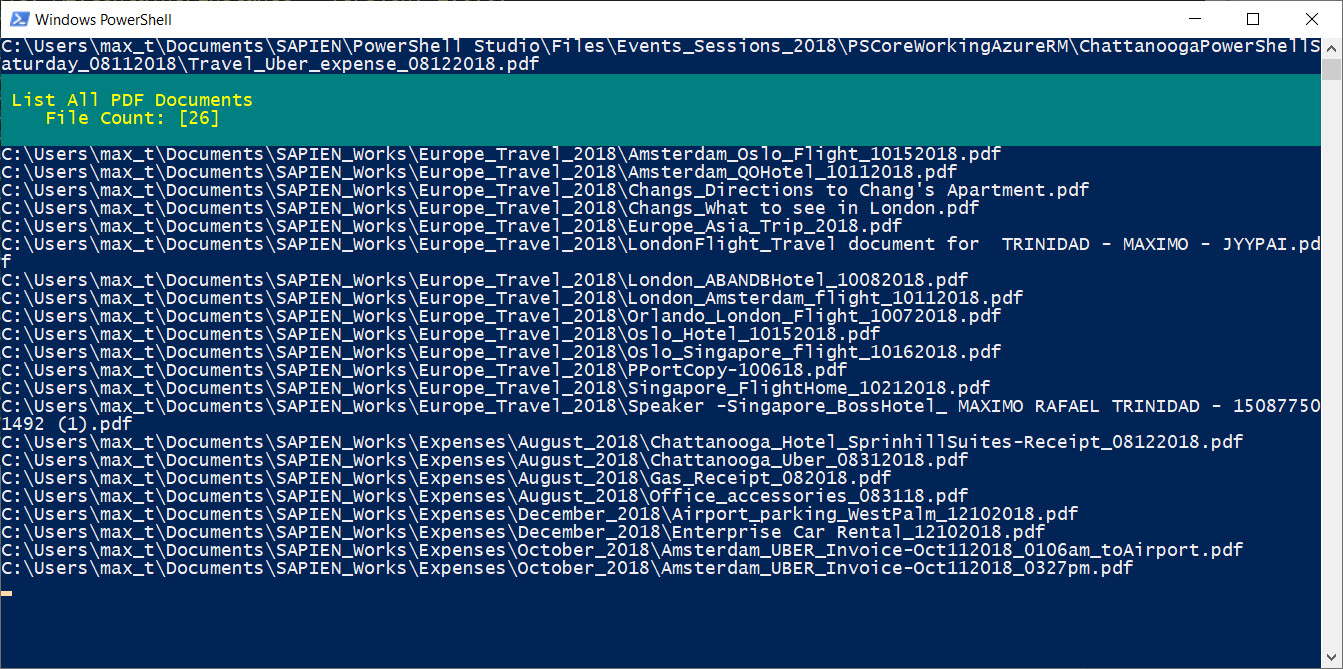
Write-Progress -Activity 'List All PDF Documents' -Status "File Count: [$i]";
:- Display the progress bar in increment.
## - Sample where item counts is less than or equal 100:
:
Write-Progress -Id 2 -Activity "Total Entries Found: $($EventLog.Count)" -PercentComplete (($EventCount/$TotalEventLog.Count)*100) -Status 'Build PSObject Results';
:
The item count range is a limiting factor, whether there are 10 items or 1000. You will need to calculate the percentage before calling the cmdlet. Or we could use the "-Status" parameter with a text string to display the count of the items in the task.
Calculating Percent
When calculating the percent use the "-PercentCompletion" parameter to display the progress bar. Also, make sure the percent expression is enclosed in parentheses or save the variable.
... -PercentComplete (($index/$totalcount)*100)Warning: Be careful of reaching $totalcount = 0 in the percent calculation as this will result in a "divided by zero" exception.
Practical Scenarios
Here are three non-GUI sample script scenarios for using Write-Progress:
- Simple Script: List PDF Documents—to display activity with text.
- Task Function: Getting Application Newest Log Entries—to display activity with the use of percent.
- Multi-Task Write-Progress sample—to display progress activity on multiple task script.
These sample scenarios are just a starting point for using the Write-Progress cmdlet in a non-GUI script solution.
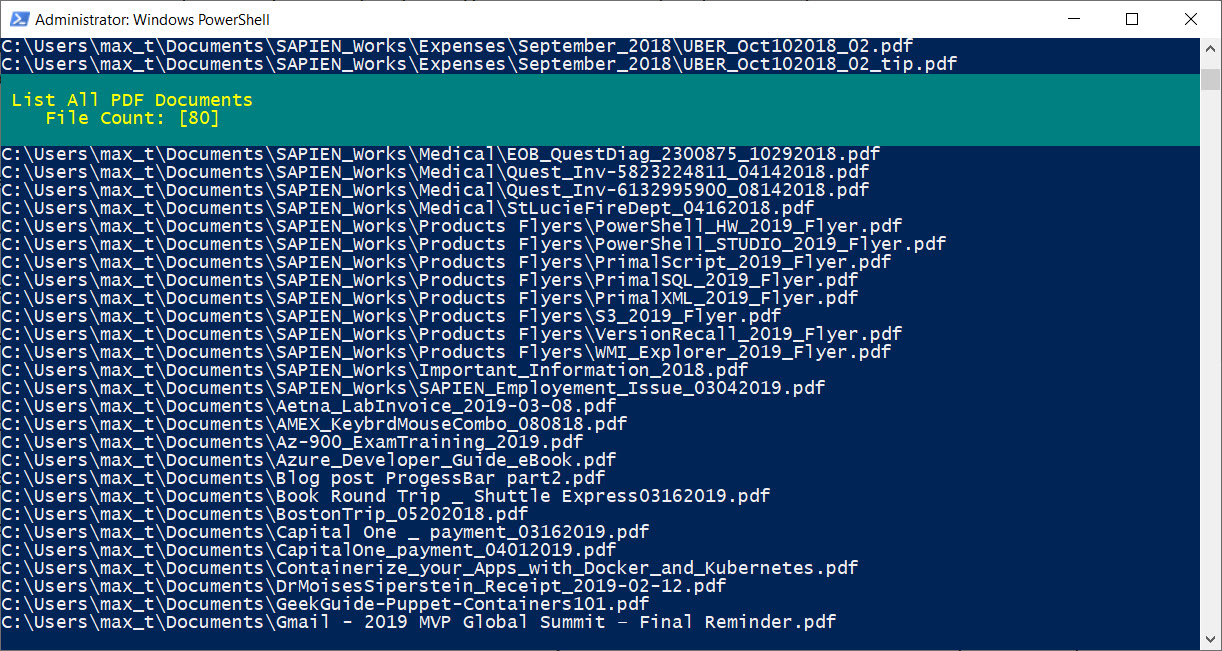
Simple Script: List PDF Documents
In this scenario the script will search for PDF documents. While listing the documents it will display the task progress with text.
Because the count of documents could exceed 100, it is not suitable to use the progress bar. This is why using the "-Status" with a text string can visually display the progress of the task by adding the incremental value from the for-loop $i variable.
Sample Code:
Clear-Host;

## - Get all PDF's found in Documents user folder:
$MyPDFList = Get-ChildItem -Path $env:USERPROFILE\Documents\*.pdf -File -Recurse;

## - For each to go thru each of the files found:
for ($i = 0; $i -le $MyPDFList.Count; $i++)
{

## - List all PDF fullName:
$MyPDFList[$i].FullName;
Write-Progress -Activity 'List All PDF Documents' -Status "File Count: [$i]";

## - Slowing down process:
Start-Sleep -Milliseconds 120;
};
The code uses the $MyPDFList.Count PSObject to get the total PDF documents found. In the For-loop it will increment the $i counter until it reaches the total count of documents.
This incremental value is updated in the status text string while the filename is been listed on screen.
Download Write Progress sample script: WriteProgressSample01.zip
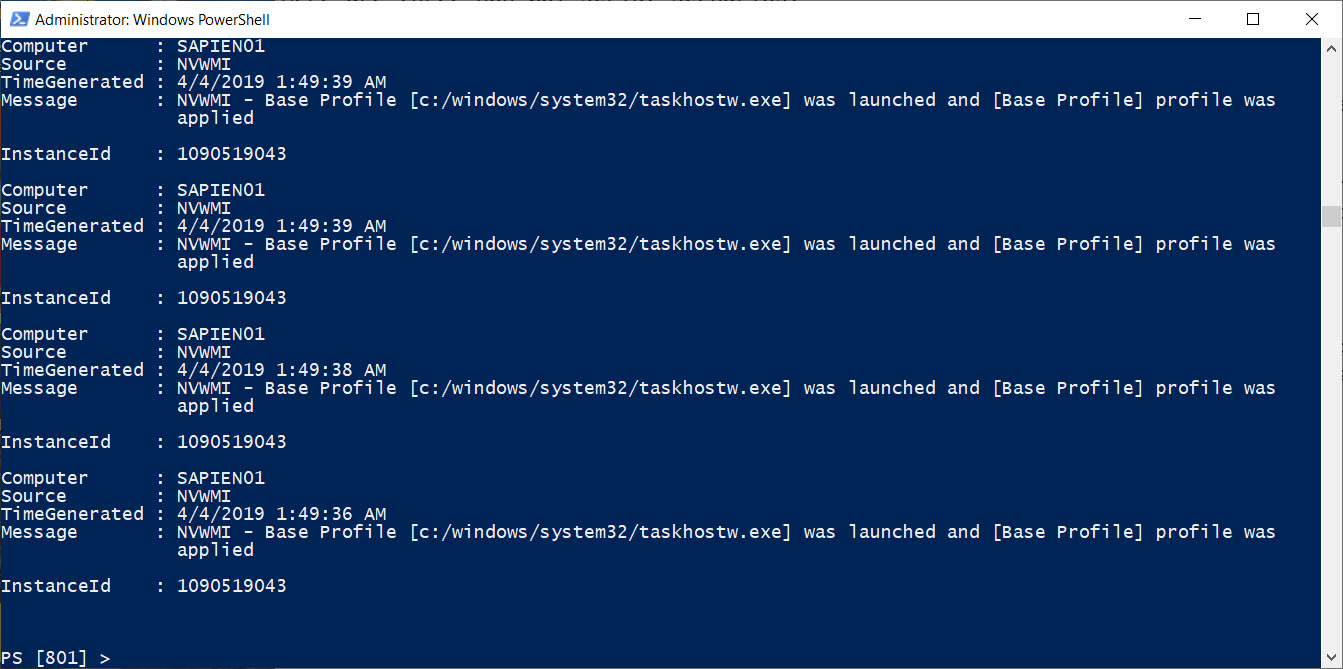
Task Function: Getting Application Newest Log Entries
In this scenario, a script function is used to query information from the Application Event Log for the purpose of limiting the number of log entries been extracted for review.
Again, we calculate the percent in the "-PercentComplete" parameter.
... -PercentComplete (($EntryCount/$TotalEventLog.Count)*100)The script will display the progress activity after extracting the information from the Application log. Then it will build the PowerShell PSObject variable result that will be displayed in the console.
- Write-Progress Identifier: $Id – Unique Id for each individual progress bar.
- Total number of event entries: $EventLog.Count – Use in the "-PercentCompleted" parameter calculation.
- Use individual Entry count: $EntryCount – Use in the "-PercentCompleted" parameter calculation.
- Display Total of Entries found : $EventLog.Count – Use in the "-Activity" parameter.
- Display increment count of Entries: $EntryCount – Use in the "-Status" parameter.
- Percent Complete calculation: (($EntryCount/$EventLog.Count)*100)
Sample Code:
function Get-MyApplicationEvent
{[CmdletBinding()]
Param (
[string]$COMPUTERNAME = "$env:COMPUTERNAME",
[ValidateRange(1,100)]
[int]$NumEntries = '100'
)

Write-Host "Getting Application Events in Progress";
Start-Sleep -Seconds 2;

## - Get Envent log entries with the assigned number of entries less than 101:
$EventLog = Get-EventLog -LogName Application -Newest $NumEntries -ComputerName $ComputerName;

## - Write-Progress distiguished ID:
$Id = 1;

## - Initialize variables:
$EntryCount = 0; $AppLogEntries = $null;

## - Foreach-loop to collect EventLog entries and build the PSObject variable:
$EventLog | foreach {
[System.Array]$AppLogEntries += $_ | `
Select-Object @{ label = 'Computer'; Expression = { $ComputerName } }, `
Source, `
TimeGenerated, `
Message, `
InstanceId;

## - Display Progress Bar:
Write-Progress -Id $Id `
-Activity "Total Entries Found: $($EventLog.Count)" `
-PercentComplete (($EntryCount/$EventLog.Count)*100)`
-Status "Build PSObject Results - [$($EntryCount)]";

## - Add delay to show progress bar:
Start-Sleep -Milliseconds 100;

## - Increment entry counter variable:
$EntryCount++
};

## - Display Eventlog collected entries stored in the PSObject variable:
$AppLogEntries;
}; Get-MyApplicationEvent
In either the for-loop or foreach-loop, the count increments until it reached the 100 limit.

Download Write Progress sample script: WriteProgressSample02.zip
Multi-Task Write-Progress sample
This scenario shows a series of tasks to be performed on a number of computers. It queries multiple WMI sources and builds a custom PowerShell PSObject variable.
In order to display the task activity for each of the areas collecting the information, the following needs to be determined:
- Write-Progress Identifier: $Id – Unique Id for each individual progress bar.
- Total number of steps: $TotalSteps – Use in the "-PercentCompleted" parameter calculation.
- Use individual Step Number identifier: $Step – Use in the "-PercentCompleted" parameter calculation.
- Step text description: $StepText – Use in the "-Activity" parameter.
- Task text description: $Task – Use in the "-CurrentOperation" parameter.
- Status text description: $StatusText – Use in the "-Status" parameter.
- Percent Complete calculation: (($Step / $TotalSteps) * 100)
Sample Code:
Clear-Host;
## - Initializing variables:
$Svrlist = @($env:COMPUTERNAME, $env:COMPUTERNAME);
$TotalSteps = 4;
$Id = 1;
$loopCnt = 1;
## - Foreach to process all tasks:
$SysInfoResults = foreach ($name in $SvrList)
{
## ------------- Step 1 Settings -------------------------
$Step = 1;
$Task = "Begin Collecting Information";
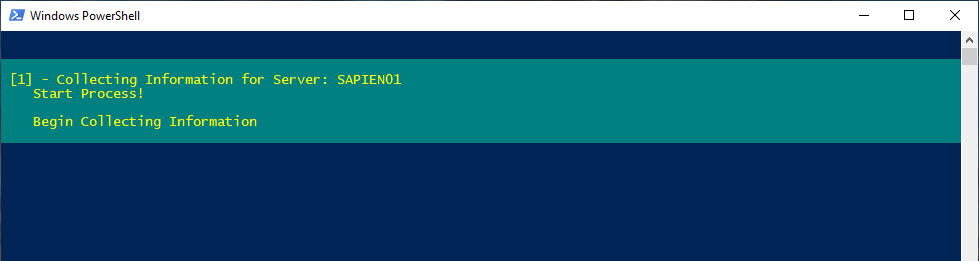
$StepText = "[$($loopCnt)] - Collecting Information for Server: $($name)";
$StatusText = "Start Process!";
## - Display Text only progress:
Write-Progress -Id $Id -Activity $StepText -CurrentOperation $Task -Status $StatusText;
## - Slight delay:
Start-Sleep -Seconds 10;
## ------------- Step 2 Settings -------------------------
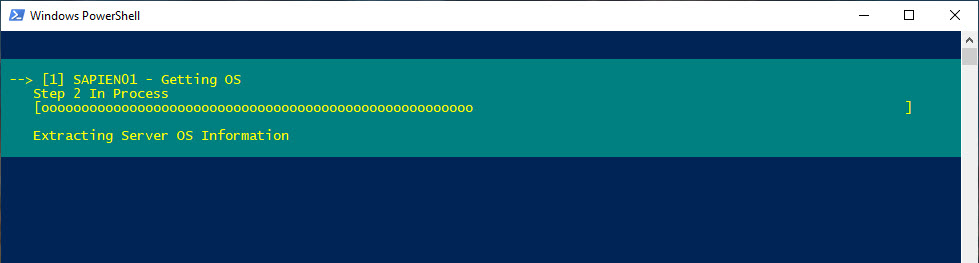
$Step = 2;
$StepText = "--> [$($loopCnt)] $($name) - Getting OS";
$Task = "Extracting Server OS Information";
$StatusText = "Step $($Step) In Process";
## - Run WMI Win32_OperatingSystem command:
$x = get-wmiObject -Class Win32_OperatingSystem -Computername $name `
-ErrorAction 'SilentlyContinue' -ErrorVariable MyError;
## - Display Progress Bar:
Write-Progress -Id $Id `
-Activity $StepText `
-Status $StatusText `
-CurrentOperation $Task `
-PercentComplete (($Step / $TotalSteps) * 100);
## - Slight delay:
Start-Sleep -Seconds 10;
## ------------- Step 3 Settings -------------------------
$Step = 3;
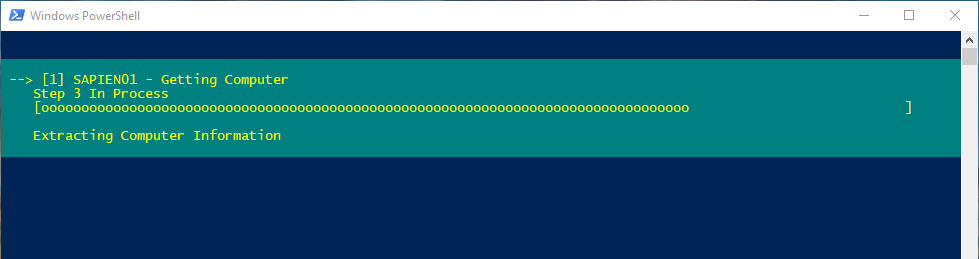
$StepText = "--> [$($loopCnt)] $($name) - Getting Computer";
$Task = "Extracting Computer Information";
$StatusText = "Step $($Step) In Process";
## - Run WMI Win32_ComputerSystem command:
$x1 = Get-WmiObject -Class Win32_ComputerSystem -Computername $name `
-ErrorAction 'SilentlyContinue' -ErrorVariable MyError;
## - Display Progress Bar:
Write-Progress -Id $Id `
-Activity $StepText `
-Status $StatusText `
-CurrentOperation $Task `
-PercentComplete (($Step / $TotalSteps)*100);
## - Slight delay:
Start-Sleep -Seconds 10;
## ------------- Step 4 Settings -------------------------
$Step = 4;
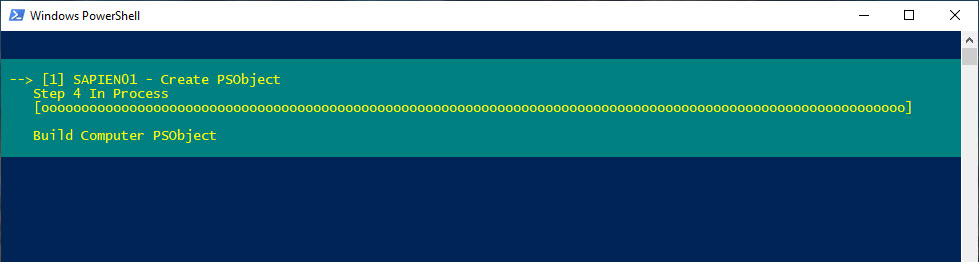
$StepText = "--> [$($loopCnt)] $($name) - Create PSObject";
$Task = "Build Computer PSObject";
$StatusText = "Step $($Step) In Process";
## - Build Computer system info PSObject:
[PSCustomObject]$SystemInfo = New-Object PSObject -Property @{
CntID = $Id;
ComputerName = $x.csname;
OS = $x.Name.Split('|')[0];
LastBootUpTime = $x.ConvertToDateTime($x.LastBootUpTime);
Status = "Success";
Manufacturer = $x1.manufacturer;
SystemModel = $x1.model;
'PhysicalMemory(GB)' = [float]($x1.TotalPhysicalMemory/1gb);
}; $SystemInfo
## - Display Progress Bar:
Write-Progress -Id $Id `
-Activity $StepText `
-Status $StatusText `
-CurrentOperation $Task `
-PercentComplete (($Step / $TotalSteps) * 100);
## - Slight delay:
Start-Sleep -Seconds 10;
## - Increment loop counter variable:
$loopCnt++
};
## - Display results in Console:
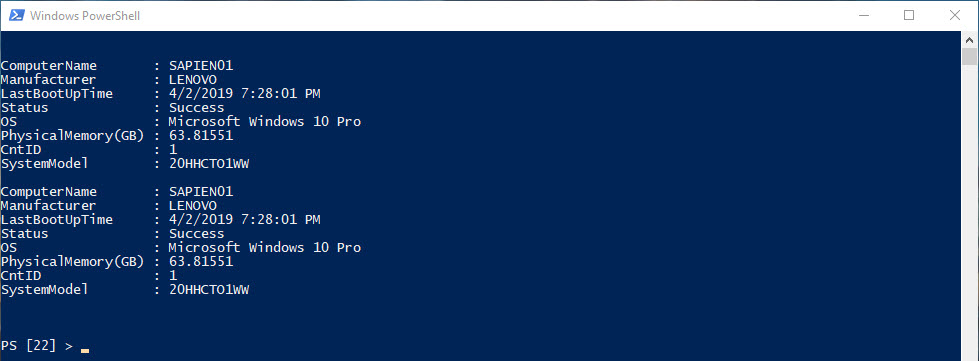
$SysInfoResultsThis is a simple top-down programming approach where a series of tasks are executed inside the foreach-loop, one task at the time for each computer in the $Svrlist array variable.
At the end of the process, the results are stored in the $SysInfoResults PSObject variable and will be displayed in the console.
Download Write Progress sample script: WriteProgressSample03.zip
Summary
The ability to determine the best use of the Write-Progress cmdlet depends on whether you are going to display the progress using percent completion, or using text.
Be creative using both the "-Activity" and "-Status" parameters for displaying progress information. Try to keep it simple!
Related Articles
- ProgressBar Control
- ProgressBarOverlay Control
- StatusBar Control
- StatusStrip Control
- Creating Responsive Loops
- Creating Responsive Forms
- About Splatting
- Handling Progress with a Background Job in a GUI Application
For licensed customers, use the forum associated with your product in our Product Support Forums for Registered Customers.
For users of trial versions, please post in our Former and Future Customers - Questions forum.