Designing GUIs for High DPI Displays
- Details
- Written by David Corrales
- Last Updated: 09 August 2022
- Created: 29 March 2017
- Hits: 62778
User Rating: 4 / 5


In this article we cover techniques on how to make your PowerShell GUI compatible with high DPI (Dots per inch) displays. The article will also cover a few caveats to be aware of.
To get a better understanding of what different DPI settings mean, let's look at standard screen resolutions. A typical 1080p screen will a have 96 DPI (Font scale: 100%). Higher resolution monitors, such as 4K monitors can have a DPI of 192 or higher (Font scale: >=200%).
DPI is determined by the font scale of the OS. If you would try to maintain a DPI of 96 on a 4K monitor, everything will appear to be tiny. Increasing the font scale, will decrease the DPI, which in turn will make icons and text appear larger and easier to see.
You must have PowerShell Studio v4.2.124 or greater installed in order to support GUI scaling within the designer and when executing.
The snippets referenced in this article are included in PowerShell Studio 2017 v5.4.139 or above.
Requirements for GUI scripts to display in high DPI:
The host running the GUI script must be DPI aware. If the host is not DPI aware, the GUI will be scaled by the OS, often resulting in a fuzzy presentation.
The following table lists common hosts and specifies if they are DPI aware.
| Host | DPI Aware |
| PowerShell Studio | Yes |
| PrimalScript | Yes |
| Packager Engines | Yes |
| PowerShell Console | No |
| PowerShell ISE | No |
Enabling DPI Awareness
Microsoft’s recommended method of setting a host / application’s DPI awareness is by enabling it the application’s manifest. This might be a problem for those of you who are not creating their own PowerShell hosts and require a high DPI GUI.
There are two ways around this:
1. Use an alternative high DPI host such as a packaged executable.
2. Enable DPI awareness using a Windows API call. This method has some caveats that you should be aware of:
- Changing the awareness of a graphical application that isn’t designed for it can result in rendering and layout issues.
- You must change the DPI awareness of a host before displaying a GUI to prevent scaling issues.
- You have to call a Windows API, which can be difficult to do in PowerShell.
Set DPI Aware Snippet
Luckily, we created a snippet named SetDPIAwareness that will handle the Windows API call for you.
How WinForms Handles DPI Scaling
Container controls such as the Form control, have dedicated properties that govern how the control and its children scale in different DPI environments. These properties allow the Form to calculate and scale its child controls depending on the system that designed the GUI and the system that runs the GUI.
AutoSaleMode
This property determines how the controls scale. The scaling is determined by the system font size or the current DPI.
| Value | Description |
| Dpi | Controls scale relative to the display resolution. Common resolutions are 96 and 120 DPI. |
| Font | Controls scale relative to the dimensions of the font the controls are using, which is typically the system font. This is the default value. |
| Inherit | Controls scale according to the classes' parent's scaling mode. If there is no parent, automatic scaling is disabled. |
| None | Automatic scaling is disabled. |
It is recommended to use the default Font setting because it will handle both DPI and system font changes.
AutoScaleDimensions
This property represents the DPI or font setting of the screen that the control was scaled to in the designer.
Note: You don’t have to set this property. The value is determined by the AutoScaleMode and is set by the designer. If AutoScaleMode is set to Font, it will store the average character size of a font.
CurrentAutoScaleDimensions
This property contains the current run-time dimensions of the screen. WinForms compares the design time AutoScaleDimensions property with the runtime CurrentAutoScaleDimensions and scales the controls accordingly.
Even with these properties, WinForms can still have scaling issues, because the controls use pixels as a form of measurement instead of a device independent unit. As a result, you might notice images and the spacing of the controls are very small in high DPI environments when compared to a 96 DPI environment. Later versions of .NET such as 4.5.2 and 4.6 have improved their DPI support for WinForms controls.
Design Considerations
Now that the environment is configured, we will cover some design considerations that you should keep in mind when you create a GUI that supports higher DPI environments.
General Considerations
Anchoring and Docking
Whenever possible Anchor or Dock your controls (See: Common Properties and Methods). Anchoring or docking your controls will ensure that they maintain their relative size and location to the Form.
Spacing Out Controls
Leave extra spacing between your controls in the designer in order to prevent any potential overlapping after scaling.
Explicitly Set Fonts
Some controls (i.e. Labels, ListBox) inherit their font settings from their parent container or form (See: Ambient Properties). When the controls inherit the font, they may encounter sizing issues and incorrectly render the control. You can circumvent this issue by explicitly setting the control’s Font property.
Explicitly set the font for the following controls:
- ListBox
- TextBox
- RichTextBox
- Label
- CheckedListBox
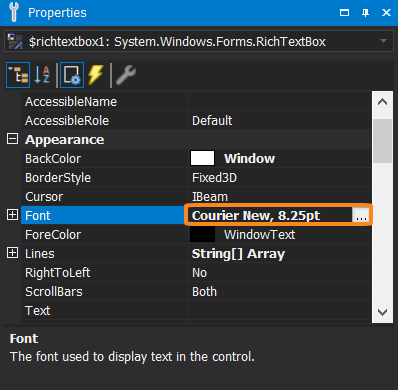
- CheckBox
![]() When you set the font in the designer, the value should be displayed in bold text:
When you set the font in the designer, the value should be displayed in bold text:
Use Layout Panels
Use layout panels to organize your controls within the Form. A layout panel will help ensure your controls scale correctly when docked or anchored and will prevent overlapping issues.
- TableLayoutPanel – Organizes your controls in a column / row fashion. This control allows you to auto size the column and rows to fix the scaled content.
- FlowLayoutPanel – This panel lays out your controls in a set order and dynamically moves them when the panel changes size.
Controls with Scaling Issues
WinForm controls don’t always scale correctly and this is mainly due to the fact that everything is measured in pixels instead of a scalable unit. We will cover controls and properties that do not scale correctly.
Scaling Pixels
We included a ConvertTo-ScaledPixel funciton snippet that will convert 96 DPI pixel scale to the current display scale. You will need to use this function to upscale sizes as denoted below.
$scaledHeight = ConvertTo-ScaledPixel –Form $form1 –Height 90
$scaledWidth = ConvertTo-ScaledPixel –Form $form1 –Width 90
All Controls
The following properties are all based on pixels and will not translate in a high DPI environment (if designed in a low DPI and visa-versa). It is recommended to scale these values at runtime and assign them in the Form’s Load event.
- MinimumSize
- MaximumSize
Groupbox
We discovered an issue with groupboxes that contain checkboxes. In this instance, the checkboxes may not size correctly, but setting the Groupbox’s AutoSize property to True seemed to resolve this scaling issue.
Label
If you have a label with AutoSize set to False, be sure to explicitly set the font of the control and anchor when possible.
ListBox
Explicitly set the font of the ListBox, otherwise the scaling of the control can result in layout issues with in the parent control (form or panel).
ListView
The ListView’s columns will not scale; therefore, you will need to scale the width dynamically in your script. It is recommended, to handle this in the Form's Load event.
$form1_Load={
	foreach ($column in $listview1.Columns)
	{
		$column.Width = ConvertTo-ScaledPixel -Form $form1 -Width $column.Width
	}
}
SplitContainer
The following SplitContainer properties use pixel measurements and should be scaled and assigned dynamically.
- Panel1MinSize
- Panel2MinSize
- SplitterDistance
TextBox
Explicitly set theTextBox's Font property if the Multiline property is set to True.
TreeView
The images in the TreeView will not scale, so you will have to set the appropriate sized image depending on the DPI setting. See below for recommended image / icon sizes.
Recommended Icon / Image Sizes
The following table contains Microsoft’s recommended icon sizes for different DPI settings:
|
DPI |
Recommended Icon Size (16x16) |
| 96 | 16x16 |
| 120 | 20x20 |
| 144 | 24x24 |
| 192 | 32x32 |
|
DPI |
Recommended Icon Size (32x32) |
| 96 | 32x32 |
| 120 | 40x40 |
| 144 | 48x48 |
| 192 | 64x64 |
It is not necessary to use larger icons, but it is recommended for a better user experience.
Use the Get-DPI function snippet to determine the current DPI:
if ((Get-DPI $form1.Handle) -gt 96)
{
    $treeview1.ImageList = $imagelistHighDPI
}
else
{
    $treeview1.ImageList = $imagelistRegular
}
Adding Controls Dynamically
If you are adding controls dynamically in your script, use the following code to add the controls to the form in order to ensure that the control is automatically scaled (size and location) when added to the form:
$form1.SuspendLayout()
$form1.AutoScaleDimensions = '6, 13'
$form1.AutoScaleMode = 'Font'
$form1.Controls.Add($control)
$form1.ResumeLayout()
The script above suspends the layout logic of the form and sets the AutoScaleDimensions property to mimic a 96 DPI environment. After the control is added to the form, it is automatically scaled when the code resumes the form’s layout logic.
If you do not suspend the form’s layout and set the AutoScaleDimensions property before adding a control, you will have to:
- Scale the control manually using the control’s Scale method.
- Take into consideration the current DPI when setting a control’s location because it is measured in pixels. A location of 10 is very different in 96 DPI environments vs. 192 DPI environments. If you use the Add-Control snippet function, you do not have to worry about these considerations.
PowerShell Studio includes the Add-Control snippet function that will handle adding controls to a form or panel for you.
Add-Control –Parent $form1 –Control $control
Scaling Snippets
To reiterate, we added new snippets that will assist you in creating a high DPI compliant GUI.
| Snippet Name | Description |
| SetDPIAwareness | Allows the PowerShell host to display high DPI GUIs. You must call this before displaying the form. |
| Add-Control | Used to dynamically add controls in a high DPI environment. |
| ConvertTo-ScaledPixel | Used to scale pixels in a high DPI environment. |
| Get-DPI | Returns the current DPI. |
These snippets are available in PowerShell Studio 2017 v5.4.139 or above.
DPI compliance requires a few extra considerations on the designer’s part, but if you follow the suggestions above, your GUI scripts should scale and display correctly in high DPI displays.
For licensed customers, use the forum associated with your product in our Product Support Forums for Registered Customers.
For users of trial versions, please post in our Former and Future Customers - Questions forum.